The Service Agreement Module for Smart Service is an add-on to the program. This module is designed to help you manage your customer’s residential and commercial contracts, what items and services are covered by these contracts when these contracts will expire, and who to call to renew the contracts. Purchasing this module also brings the added benefit of specialized reporting on your service agreements and their status, as well as equipment attached to the agreement.
The above video is a brief overview of the Service Agreement Module’s process. For a comprehensive view of the module and why service agreements help you, check out our service agreement webinar here.
Getting Started
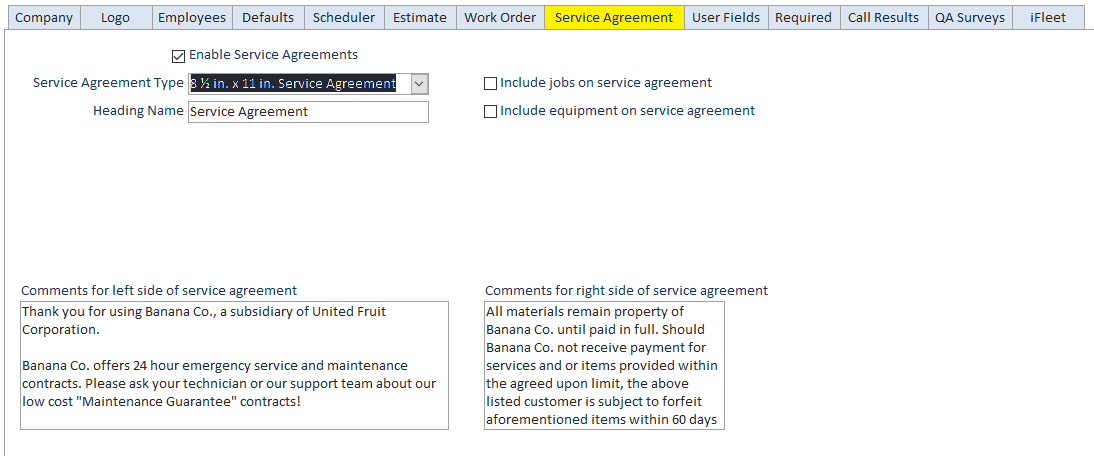
The first thing to do is enter Smart Service Settings and enable this module. Using the picture below, you can identify each of the available settings. Make sure you check the “Enable Service Agreements” box at the top of the screen before continuing.
By default, this option will be set to the standard 8.5 in. by 11 in. Service Agreement printout. If you have a custom service agreement created by Smart Service, you can replace this with the “Custom Service Agreement” option here.
The “Mail Merge” option will open a merge document in Microsoft Word where you can create your own customized template to email your customers for a paperless process.
Use the “Heading Name” option to give your service agreement a custom name. This could be called a “contract”, “maintenance agreement” or something similar.
If you’re using the paper version of the service agreement provided by Smart Service, this option will display the names of any jobs attached to the agreement on the printout.
If you’re using the paper version of the service agreement provided by Smart Service, this option will display the names of any equipment attached to the agreement on the printout.
Any terms and conditions you’d like your customers to see on Smart Service’s paper version of your service agreement should be written in these two boxes. In the image above are some examples of the material you might consider displaying to the customer.
Creating Service Agreements
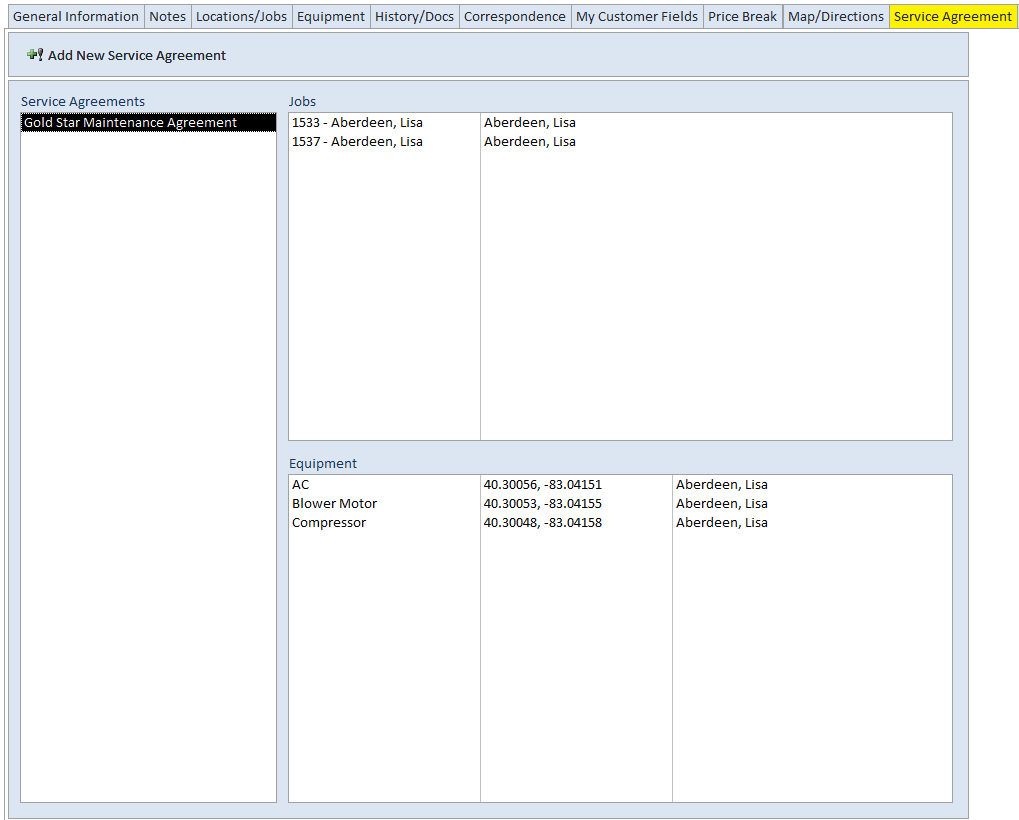
Once your settings are in place, open any customer or location and you will have the “Service Agreement” tab available. If you chose a custom heading name in your settings, the custom heading name will be displayed for this tab instead. Inside this tab, either click on an existing service agreement or click on “Add New Service Agreement” at the top of the tab.
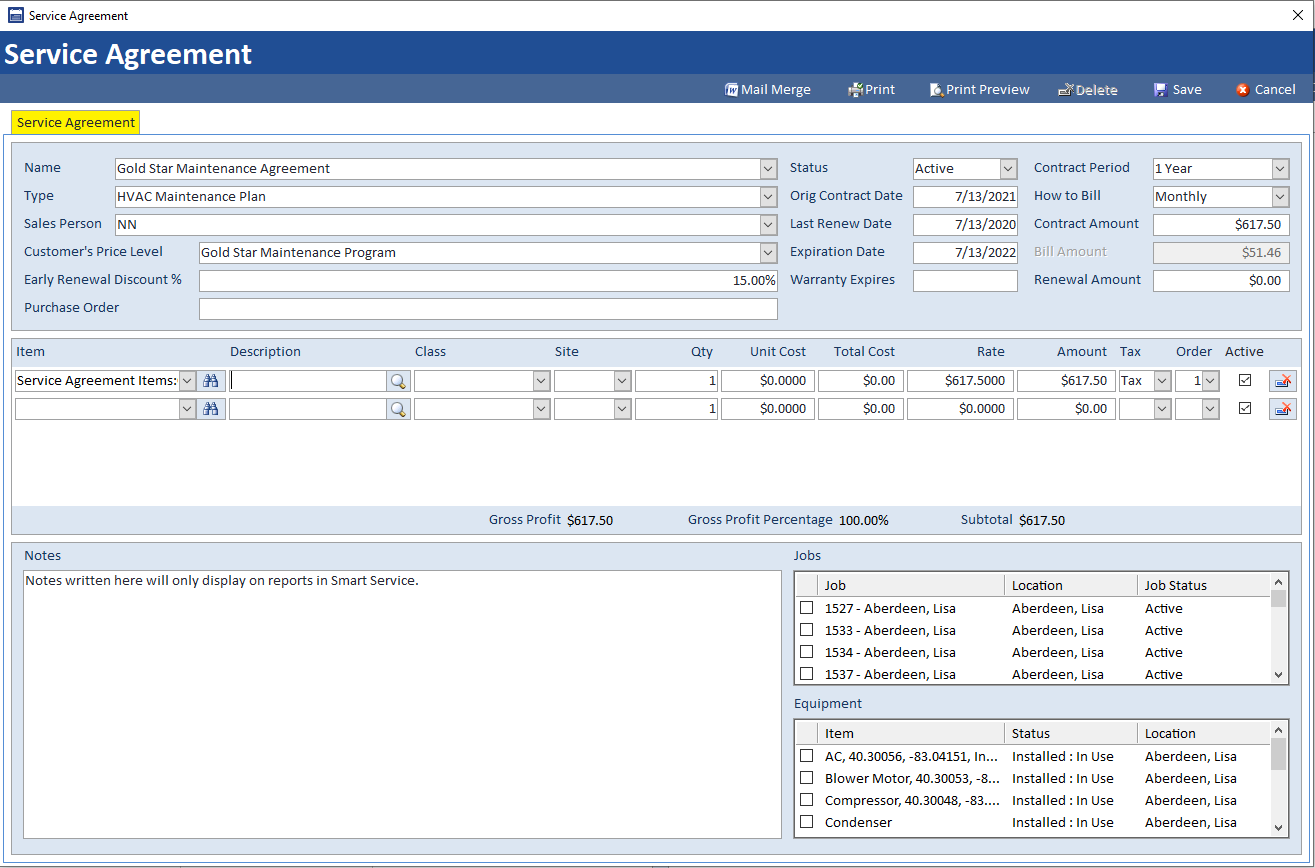
Each service agreement can have a custom name if you’d like, but we recommend entering names in one of the following fashions:
- Contract Types: If you offer different packages (like a silver or gold star) you could name your agreements after the package.
- If you offer different types of agreements on a per equipment basis, name the agreement after the equipment type.
The options you choose here are interchangeable with the service agreement “type” field listed below. An important note to make, when attaching a job to an agreement later, these two fields will be the only ones displayed to identify the customers different agreements.
Each service agreement can have a custom type if you’d like, but we recommend entering types in one of the following fashions:
- Contract Types: If you offer different packages (like a silver or gold star) you could create types named after the package.
- If you offer different types of agreements on a per equipment basis, add the type of equipment serviced here.
The options you choose here are interchangeable with the service agreement “Name” field listed above. An important note to make, when attaching a job to an agreement later, these two fields will be the only ones displayed to identify the customers different agreements.
If one of your sales reps is responsible for the sale or maintenance of this contract you can select their name and initials here. Only those listed as a “Sales Rep” in QuickBooks will be displayed as an option here.
A price level is a percentage increase or decrease for either all items or a particular set of items, depending on what version of QuickBooks Desktop you have. You can add a price level to the agreement, which will modify the pricing on any job attached to this agreement. Price levels are not available for QuickBooks Online users at the time of this publishing.
You can write in a percentage that will be discounted if your custom renews their agreement before its expiration date. If you do not offer a discount, leave the percentage at 0.
If there are purchase orders in QuickBooks you’d like to reference when viewing this agreement you can write the PO number(s) in this field.
The status of this agreement can be active, canceled, or expired. By default, the status will be active. If you’d like to enter in previous contracts the customer might renew later, make sure to switch this status to canceled or expired.
If there are jobs attached to this service agreement when it is marked as canceled or expired, those jobs will automatically change to a “pending” status, which prevents them from being sent to iFleet.
This option will default to today’s date, but you can click inside the field to enter the date the customer originally entered this contract.
If the customer has had this agreement with you for more than one contract period, you can add the last date they renewed their contract with you here.
Adding an expiration date will cause the contract to expire if it is not renewed. If your contracts remain perpetually active and do not expire, you do not have to enter an expiration date here.
If there are jobs attached to this service agreement when it is marked as canceled or expired, those jobs will automatically change to a “pending” status, which prevents them from being sent to iFleet.
If your agreement covers a specific piece of equipment which is covered by a warranty, you can enter the warranty expiration date here.
The contract period defines the length of time between when the contract is created/renewed and when it will need to be renewed again. If your contracts do not expire, this field will work together with the “How to Bill” field below to determine the bill amount.
“How to Bill” determines the frequency invoices should be generated in QuickBooks for this customer’s agreement.
The contract amount is determined by the sum of all line items added in the section below. Please review the next section for best practices on getting this amount to be the number you wish to see.
Based on the contract period, how to bill, and the sum of your line items, a bill amount will be generated.
If there is a fee associated with renewing the customer’s agreement aside from the billing amount sent on your billing frequency, enter that amount here.
Adding Line Items
Although there are several options for managing the financial side of the service agreements here are a few to get you started. The deciding factor for this is how your agreements work in relation to inventory tracking
Create one item to represent the total due for the agreement
The first option is to create a line item in QuickBooks which represents the total amount the customer must pay for the service agreement this contract period. For this method, you will need to remember that any job items covered by the service agreement need to be marked as $0.00 items on the job if you plan on posting that job to QuickBooks. This will happen if you would like a paid invoice in QuickBooks, or for the items to subtract from your inventory count, or would like to bill for any services that were not part of the agreement.
The advantages of this method:
- Easiest to use, requires minimal setup.
- Does not force you to add items used for the agreement now, you’ll add them to the job later.
- Lets you accurately track inventory, since the parts will be added to the jobs and not subtracted again when posting the agreement.
The disadvantages of this method:
- Does not allow you to reference specific items to the agreement, rather a lump sum.
Add specific items to the service agreement
The second option is to record the individual line items that the customer is offered and the quantities of these items to your service agreement.
The advantages of this method:
- Gives you the exact amount based off of the items used, giving each customer a personalized agreement.
- Allows you to use a Service Agreement report to see what items were covered by the agreement.
The disadvantages of this method:
- If you are tracking inventory, you cannot add items to the jobs if you wish post them to QuickBooks, otherwise your items will be subtracted twice. Items not covered by the agreement can still be added if they were used.
Linking Jobs to Agreements
The next step in the process is to create a job to track times and items used as part of this customer’s agreement. When creating this job, you need to select which contract the service is covered by on the job’s “general information” tab. Alternatively, any jobs existing already can be attached to the agreement inside the agreement itself.
Make sure that any items covered by the customer’s service agreement are marked as $0, this will cause QuickBooks to generate a “paid” invoice which will just be filed away. If there are items not covered by the customer’s agreement, leave their prices on to ensure that the proper invoice is generated in QuickBooks. We also recommend that you add a special job type and description to the service (as shown above) to help with tracking service agreement jobs.
From this point onward, you can add items, recurrence patterns, and the rest of the job’s information. Continue to use the job as if it were a regular service for the customer. The only difference you will encounter will be what happens when you post the job. Since the total is likely to be 0 you will receive a paid invoice in QuickBooks.
Service Agreement Billing
Depending on the billing frequencies offered by your company, an office user will want to visit the “Office” section of Smart Service to post over the agreements in the form of QuickBooks invoices. Follow the steps below to manage and bill for your agreements.
All service agreements managed by your company will be displayed here. You can use the filters at the top to filter down to the agreements you wish to review or bill.
Select the contract type you wish to see. The entries in this field are dependant on what types of contracts have been created.
Select which contract period you wish to see. The entries in this field will be dependant on what periods your company offers.
You can choose to view contracts that are currently active, expired, or have been canceled here.
Choose whether you’d like to view your monthly, quarterly, semi-annual, or annual contracts.
When it comes to dates, you can choose to view contacts within a specific date range. You can view this by original contract date, last renew date, expiration date, the last time it was invoiced, or the next time the contract needs to be invoiced. Choose the date range in the fields below this option.
If you like to email your invoices from QuickBooks to your customers this option will add the posted invoices to the “Print Later” queue in QuickBooks. This will allow you to open any invoice later on and click “Batch Print” to send out any invoices marked as to be printed at once.
If you like to email your invoices from QuickBooks to your customers this option will add the posted invoices to the “Email Later” queue in QuickBooks. This will allow you to open any invoice later on and click “Batch Email” to send out any invoices marked as to be emailed at once.
Use this option to set a custom invoice date of your choosing. Without this option, Smart Service will use the billing date.
Checking this option will include the customer’s billing cycle as part of the invoice description.
Selecting this option will add the attached job names to your QuickBooks invoice. In order for the job name to be on the invoice, you must first have a history record for the job associated with the agreement.
If there are no job history records for the jobs associated, they will not be present on the QuickBooks Invoice.
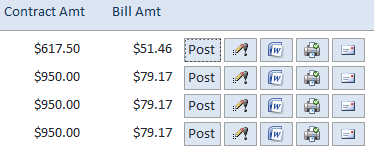
To generate your QuickBooks invoice, click the “post” button. The edit tool to the right will open up the contract and allow any revisions to be made. The Microsoft Word icon will send this one contract to a mail merge. This is followed by the print and email icons.
At the bottom of your screen you have the option to post all invoices in view at once, send the contracts to a mail merge, batch print or email them. To use the posting option, check the button once to enable the feature then again to post the contracts.
Service Agreement Invoicing
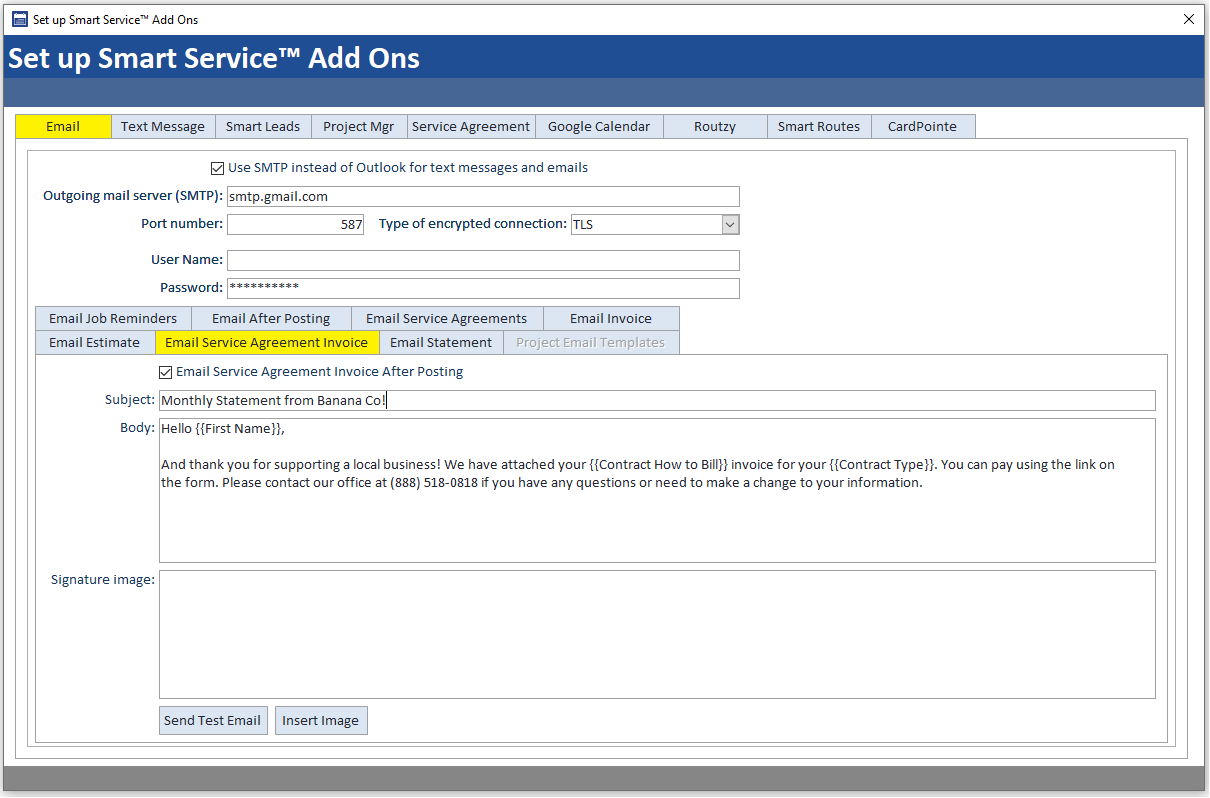
If you plan on invoicing service agreements from Smart Service, you should consider setting up your email template. This template can be set up under the “Set up Smart Service Add-ons” option in Settings.
Within this menu, you can see the “Email Service Agreement Invoice” template as shown below. If you would like to use merge fields for your template, right-click in the subject or body to add them as needed.
Post the service agreements as mentioned above in the ‘Service Agreement Billing’ section. Notice on the image above that the system will automatically email a copy of the service agreement invoice to the customer. If you have our Merchant Service, CardPointe, and have set up a Hosted Payment Page (HPP), a link for the customer to pay online will be included in the invoice email.
Service Agreement Reporting
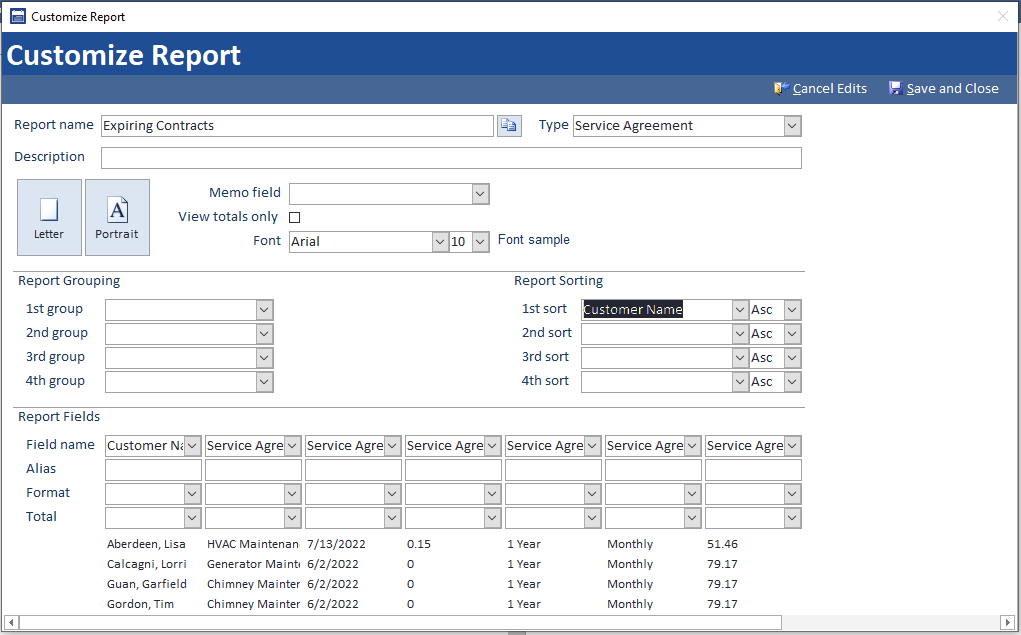
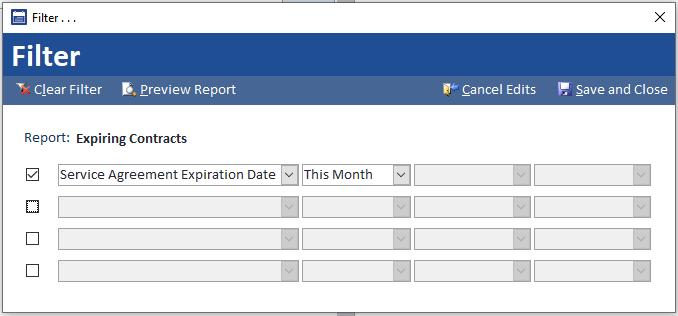
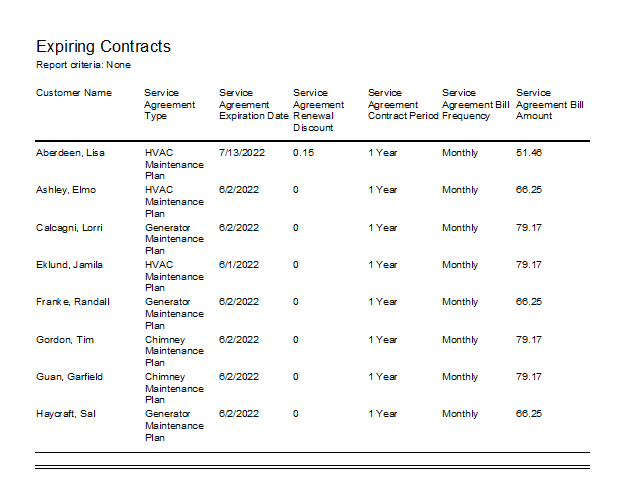
The Service Agreement Module also enables a specialized “Service Agreement” type report which contains all of the fields available on the service agreement screen. If you’re new to reporting, check out our reporting section here. Otherwise, here’s a suggested report that displays contract expirations, amounts, and contact information.

