Time Tracking with Smart Service
Smart Service and iFleet have time tracking and management capabilities built in for your field users. These times are stored automatically and can be used for billing, costing, payroll, reporting (and exporting), and general review. In addition to these features, times entered have the capability of being exported to QuickBooks Desktop for billing, costing, and/or payroll, and QuickBooks online for billing.
If you’re new to time tracking, we recommend you check out the webinar video above to get a complete grasp of the processes in place to record and manage your employee timesheets. The remainder of this article will assume that you have knowledge of the content demonstrated in this video.
Prerequisites for Sending Times to QuickBooks Desktop
- To track payroll time, you must set up payroll items for the employees in QuickBooks
- You must also have the setting “Use time sheets to create paychecks” toggled on
- To bill your customer for time on site, you must have service items, such as trip charge and labor
- Your Smart Service user profile must have a QB employee or vendor name listed in the “QB Employee” field.
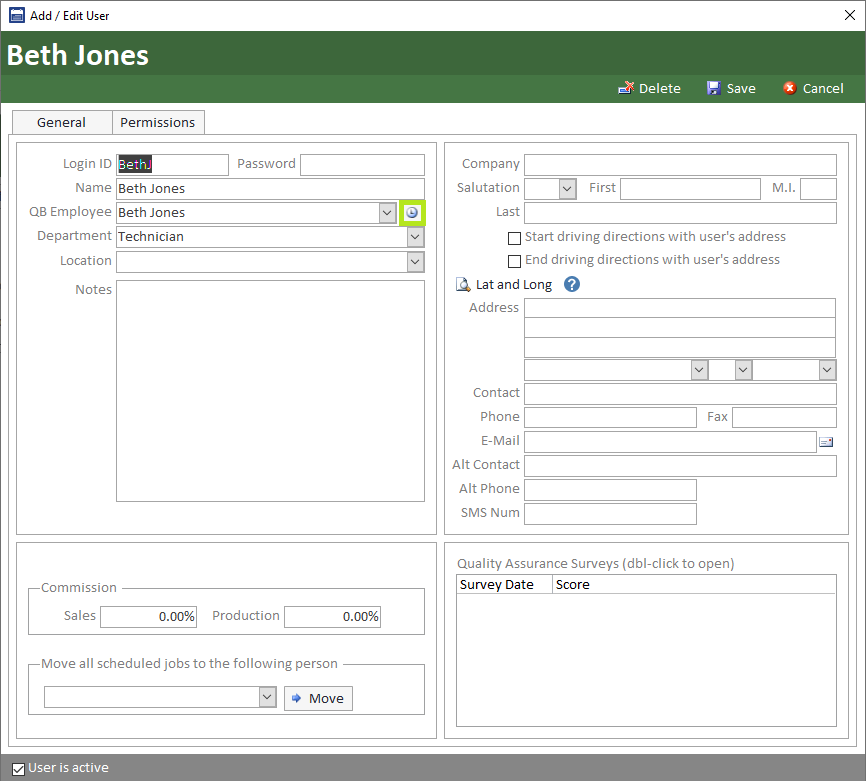
- We recommend that you click the clock to the right of the box mentioned above and add some default payroll and/or service items. These can always be adjusted on a per job basis later.
How iFleet Tracks Time
Below you will find links to both Android and iOS versions of iFleet. Please review the process guide for your appropriate version, which includes using our timestamp features on a daily basis.
Daily Management
The following areas of Smart Service are vital to maintaining time tracking records. Depending on what you are attempting to do, there may be additional set up required. Please see the section above for details.
Where do I see time entries?
You have the option to right-click any job on the scheduling board and use the “View Time Details” option. This will display all timestamps currently entered against this job and allow you to create new stamps or edit the existing ones.
Please do not alter the timestamps while your iFleet user is working on the job, this will potentially cause data loss or a resend back to the device.
The “Production Time” Column will also allow viewing, adding, and editing of timestamps on the job. The amount displayed in Post Work Orders is the total production time from all involved on this date of service.
You can click on the production time to see all the timestamps associated with the job. These will also appear in the Post Timesheets screen.
The Post Timesheets screen is available in the office under the “Time Management” header. This is your main time management console where you can view not only job times, but the clock in/outs, lunches, breaks, and see a calculation for the amount of downtime on a given day.
You can also post times to the QuickBooks employee timesheet from this screen, more on that in the following sections.
You can report on time entries at any time via the Smart Service reporting section. Make sure to use the “Timesheet” type reports to get the most information. Reports can also be exported to Excel and handed over to a third party payroll service.
Make sure to watch the webinar above to see how to build time reports and export them to Excel.
Setting Up Billable Time
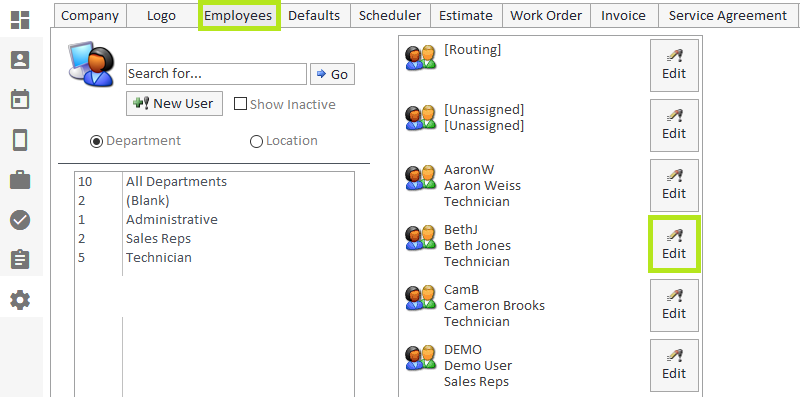
Just like QuickBooks, both Smart Service and iFleet have the ability to make billable times from your timestamps. In order to use this feature, you will first need to make sure the employee has a service item assigned to them. To do so, start by going into Settings in Smart Service, then select the Employees tab, find the employee you want to set up, and click Edit next to their name.
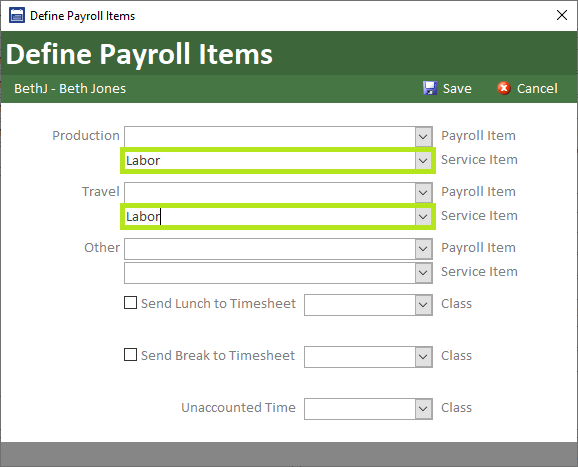
On that screen, look for the dropdown box labeled QB Employee, and click the clock icon to the right of the dropdown. This will open a popup window where you can select a Service Item that Smart Service should use for Production, Travel, and Other timestamps for that technician. Using these dropdowns, you can select any item from your QuickBooks item list which is marked as a Service item (an item where the Type is Service).
If you don’t see an item that corresponds to what you use for labor charges for that employee, you may need to add a new item to your QuickBooks item list, or edit an existing item to make sure its Type is marked as Service. If you make any changes to your QuickBooks item list, remember to run Get Lists from the Settings tab in the Smart Service ribbon to sync your changes over.
The item you choose on this screen will be the item which is used by default for billable time for this employee. Keep in mind that you will be able to switch the item to a different service item on a per-service basis, if your service item changes based on what service is being performed or depends on prevailing wage.
In this window, you can also set up Payroll items, which will be important if you want to post time to QuickBooks for payroll purposes.
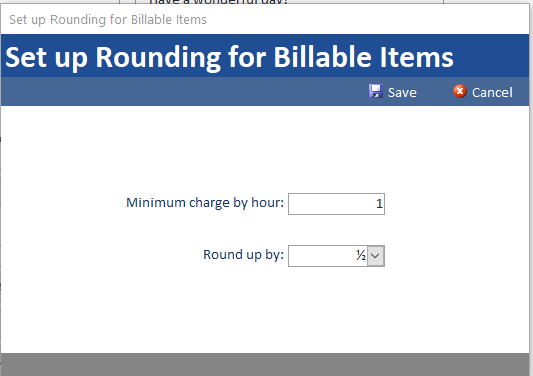
You have the ability to set up rounding on these billable items as well. You can set up the Minimum Charge by hour, and how much you round up from. You can find these options in Smart Service by going to Settings, selecting the Company tab, and clicking “Set up Rounding for billable items”.
Using Billable Time
Once you’ve set up service items for your employees (or manually set a service item for the timestamps in question), you can create billable times from your timestamps.
Please note that in the example below, once the times are made billable to the customer, the quantity and/or item used for the billable time can be edited directly on the work order. This is especially useful if you have the wrong service item, would like to round the quantity up or down, or are charging a different rate for this customer or service.
To get started, open any active job record within Smart Service and head over to the job items tab. Once there, click the “+!” button at the top, left-hand corner of the screen. Here you will see multiple options, one of which being the “Add Time Charges” option.
Any time entries missing a service item will be displayed in red, meaning they cannot be charged for. You can remedy this by adding a service item for that time entry from one of the various other screens.
To bill for the desired times, check the checkbox to the left of each time entry. By default, the “Combine by Service Item” option is checked. This option will take all time entries for this job with the same service item and combine them into one line item. Without this box, the work order will display a new line item for each time entry.
The “Billed” checkbox on the right will be checked if the times have been added to the work order using this feature already. This is to prevent you from charging for the same labor twice. You can manually uncheck the box and bill for the labor a second time if needed.
Once the time has been added to the job as a line item, you can adjust the line item used, the quantity, rate, or amount. You may want to use this option to round the quantity up or make the quantity meet the minimum labor time charged if you haven’t set up Rounding for Billable Items.
Posting Time to Quickbooks
To send time to the QuickBooks timesheet, we recommend you visit the “Post Timesheets” option from the office screen. Once here, you have filters at the top to narrow your results to the desired date range and employee(s). Click on the picture below to expand to full screen and observe the time entries from Nuwriy and Jess.
This is the day of the week when the timestamps were entered.
These two timestamps show the date and time for the timestamp entry. There are a few situations that will cause one or both of these timestamps to be displayed in red:
Please note that QuickBooks (and therefore Smart Service) will not allow timestamps to span midnight. This is because time is kept on a daily basis. We cannot track time for payroll efficiently if timestamps cover multiple days or payroll periods.
Another common situation is when a user forgets to finish a timestamp. If either the start or end time are missing, the entry will be displayed in red until you correct it.
This is the employee who entered this timestamp.
This field displays the customer and job that the timestamps were entered against. This sections will be blank for lunch and break times, as those are not associated with a customer or job.
This field displays the amount of time represented on the timestamp in HH:MM format.
Type displays the kind of time entry created by the technician. This could be travel or productions times, which are associated with jobs, but also lunch or break times which are not associated with jobs.
This field displays the amount of time the job was scheduled for. This figure has no effect on what the technician is compensated for or what the customer is charged for. Use this value to compare your “quoted” time and see which technician is efficient. Of course, if you schedule in time windows or similar, ignore this section entirely.
This is the payroll item assigned for this timestamp entry. You may adjust this item by clicking the edit tool to the right of this timestamp. Remember, payroll items can only be created in QuickBooks and do not come from your list of products/services.
This is the service item assigned for this timestamp entry. You may adjust this item by clicking the edit tool to the right of this timestamp. Remember, service items can only be created in QuickBooks from your list of products/services.
If these times have been converted into line items for billable time already, this box will be checked. The purpose of this feature is to let you know if iFleet or another user charged the customer for the time on-site already.
If these times have already been posted to QuickBooks, this box will be checked. Back in the Post Work Orders screen, you have an option to post job times when the invoice is posted. If that setting was used, or if you’ve already partially posted times for the date in question, posted times may display in this section.
Although times are always accessible from reporting, once the entire day has been posted, these posted times will be removed from this screen. Posted times can always be edited on the QuickBooks side of things.
This value represents the total clock in/out time minus any lunches that were taken. This value does include the “unaccounted time” value to the right, as the unaccounted time value represents how much of that paid time wasn’t associated with working on work orders or estimates.
Unaccounted time is a representation of the total amount of time the user was clocked in, but not working towards any particular job or estimate. This generally includes breaks and downtime. For an efficient user entering timestamps correctly, there should be little unaccounted time.
If you do not see a value for unaccounted time, it is likely that the user in question did not clock in or out for the day. Unaccounted time cannot be calculated if there is no clock in/out times for the day. Once you post times to QuickBooks, unaccounted time will still be paid, but represented as “Other” time on the QuickBooks timesheet.
The simplified answer to posting times over to QuickBooks is to review the data on this screen, use the information below to edit and incorrect timestamps, and click the “Post All” button at the bottom, right-hand corner of the screen. Doing so will post all time entries in the current screen. Keep this in mind when selecting what times to post. The filters at the top of the screen not only control what you see but also what is sent to QuickBooks.
How Smart Service Interprets Timestamps
Time Tracking is a big topic with several options and multiple uses. When using the time tracking features within Smart Service, there are a few rules to keep in mind:
- Times do NOT need to be posted to QuickBooks unless you want them to be.
- Technicians are paid based on their clock in/out time, minus their lunch.
- If there is no clock in/out, technicians are paid based on travel, production, and breaks.
- “Unaccounted Time” is the time the user was clocked in, but not working on a specific job.
- “Unaccounted Time” will be converted into “Other Time” when posted to QuickBooks.
- Timestamps CANNOT span midnight since QuickBooks timesheets cannot span midnight.
- Additional employees will automatically receive the main employee’s job times.
Post Timesheets displays a lot of information to provide an accurate breakdown of the user’s day. Provided that the technician has been diligent and entered the appropriate timestamps, you should have several entries and minimal unaccounted time.
Editing or Creating Timestamps
You can click the edit tool to the right of any time entry to modify the existing stamps or create new entries. The editing tool looks like a pencil next to an exclamation point which is located to the right of the “posted” column. Doing so will open the following window where you can edit the existing stamps or add new ones via the “Add” option at the top.
When entering times, you must use the date/time format listed in the above picture. Smart Service will not allow you to save times in another format. Under “Type” you have the option to enter lunches, breaks, clock ins, and outs; you do not need to enter a “job” name for timestamps other than “travel” and “production” types. A description is also not necessary to save times but might be used by the field if more timestamps than usual were recorded.
Frequently Asked Questions Regarding Time Management
Below are answers to common questions usually asked by users who have just started using our time tracking features. Each of these questions has also been explained and demonstrated in depth in the webinar video at the top of the page.
While we do have several companies who work overnight or remain on call, Smart Service requires a single date to be assigned to each timestamp entry. Smart Service handles this by automatically breaking up timestamps that cross midnight into two timestamp entries, one ending just before midnight and another starting at midnight.
While Smart Service will automatically break up times entered normally through iFleet, it will not automatically do the same for timestamps entered manually. If you are manually entering timestamps that cross midnight, you will need to break them up yourself. In Post Timesheets, each time entry has an editing tool to the right which will allow the modification and creation of new timestamps. The first timestamp should run no later than 11:59 PM and the second time should begin no earlier than 12:00 AM.
The “Additional Employee feature within job records helps track crews by taking the timestamps entered by the main technician and duplicating those timestamps onto the rest of the assigned crew members.
The additional employee’s time cannot be edited from the field but can be edited back in Smart Service like any other timestamp. Alternatively, you could use the “Additional Time” feature inside of iFleet instead of the additional employee feature in Smart Service. This has the downside of not letting the job appear on the helper tech’s device but does let the main employee add timestamps for everyone separately on the device.
The purpose of sending times to QuickBooks could any one or a combination of billing, costing, and payroll. Although you do not need to cut checks from QuickBooks, you may still find this information useful in QuickBooks. Remember, you can always see time data on reports, so you may not need to consider sending time to QuickBooks in the first place!
Both “Other” and “Unaccounted” time is recorded any time the user has clocked in for the day but is not using a travel, production, or lunch timestamp. The unaccounted time value is calculated by that downtime and the time spent on break. When transferred to QuickBooks, this will be logged as “Other” time, which is QuickBooks terminology.
Tracking this value is important since QuickBooks does not have an option for clock in/out values. By posting the unaccounted time with the rest of your timestamps, you’re making sure your employee is compensated for their full time (minus their lunch) that was spent working.
Smart Service and iFleet are designed to capture time and transfer that time data to either QuickBooks or a report for a third party service. Therefore, Smart Service and iFleet are not designed to create paychecks from the times collected. We recommend users manage overtime in their primary accounting software or via a third party service.


