Employees
Use this section to determine what permissions users should and shouldn’t have. Make sure that office users meet the minimum QuickBooks permission requirements listed below before continuing. If you don’t have the ability to do something in QuickBooks, you won’t be able to do it in Smart Service either.
For those of you who have sub-contractors listed as vendors in QuickBooks. You will use this section to create their profiles as well. Although Smart Service refers to them as employees, their vendor status in QuickBooks will remain unchanged.
Looking for QuickBooks User Permissions?
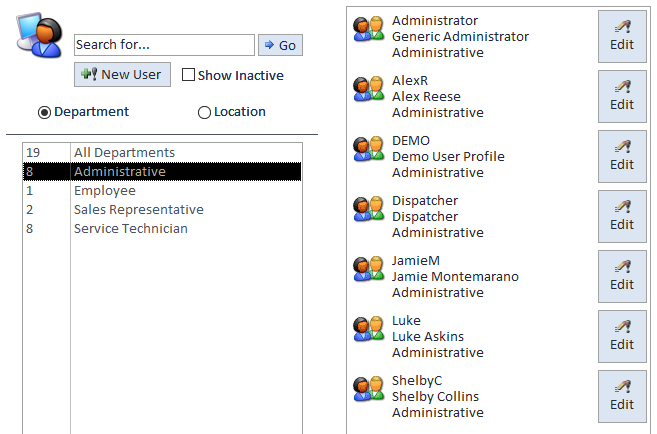
Continue to our article about the recommended QuickBooks user permissions here, just click the image of the user on the left.
When you first start with Smart Service, all active employee profiles in QuickBooks will be brought into Smart Service as employee records. If you choose to delete old employee profiles from Smart Service, make sure to immediately inactivate those same profiles in QuickBooks to prevent them from coming back into Smart Service when running “Get Employees” later.
You also have the ability to click the “New User” option on the left hand side of your screen. Please note that creating a new user in Smart Service does not create an employee profile in QuickBooks. If you need an employee profile in QuickBooks also, we recommend creating the employee there and clicking on “Get Employees” in the file menu at the top left of your screen.
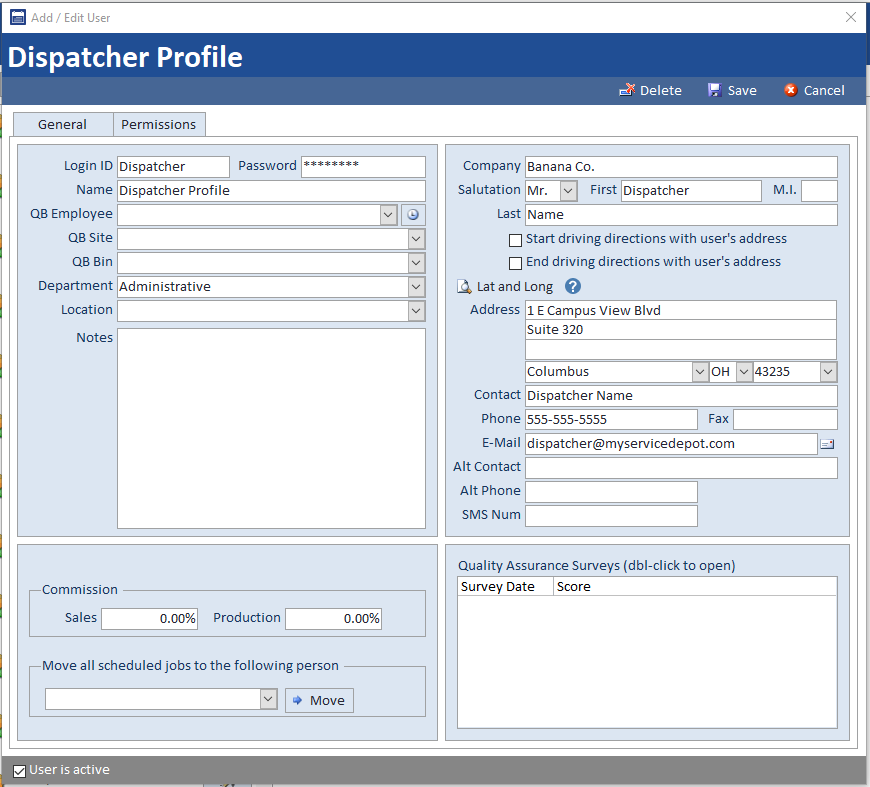
If you click edit on one of your existing employees or choose to create a new one, you will arrive at the following windows. Some of these options will only be for office users, so make sure to read each one.
If you’re an office user, this will be your username for Smart Service. If you’re an iFleet user, this will be the name presented on the schedule for you.
Only office users require a password. There are no complexity or length requirements for your Smart Service password, nor will we make you change your password every 90 days. Any password you enter is case sensitive.
The name placed here will be used when you create a timestamp. This name will also be used to reference you in various other areas of the program.
If you’d like to set up time tracking to the timesheet in QuickBooks, you must select the employee or vendor profile you wish to associate time values with. To the right of this section is a timeclock you can use to set default payroll and / or service items for your employee. Side note, the “Other” option in this window is used for break times.
This option only appears if you have enabled QuickBooks Advanced Inventory. You may choose a default site where this field users takes inventory. This can be changed later on a per item basis.
Department isn’t about what specifically you do for the company, so the owner and account shouldn’t have their own departments. Instead, department is a grouping for the scheduling board. All employees that generally stay in the office can go into the “Administrative” department, those who receive scheduled services or use iFleet can be in the “technician” or “field” department.
You can add new departments by just typing them in. To remove a department, move everyone out of that department and it will no longer appear in the list of options. You have the ability to create as many departments as you like, but keep in mind you must click to switch between departments on the schedule.
If your company has multiple buildings, it’s a good idea to write down which location this employee works at.
You can use the notes field for anything we didn’t already have a place for on this employee’s record.
If you track commission in your company, you can write in this employee’s commission percentages for sales and labor. If your commission is a little more complex, check out our reporting section for commission instead.
Be careful with this option, as it should only be used if an employee is being let go. Here you can select a user to take all scheduled jobs, correspondences, and anything else assigned to this user and move the records to their replacement.
This company and name information will only be used in this employee profile, but it’s a good place to store the user’s information.
For those who purchased Smart Routes, all routing will be done from the office’s address unless this option is checked. If this employee doesn’t leave from the office, you can enter an alternate starting / ending address for them below.
If you have Smart Routes, and this employee starts / ends their route from an address other than the office, enter their starting / ending point here and check the box above.
Any contact information you’d like to store for your employee can be placed here. This could be their information, or an emergency contact.
You can write down a cell phone number and choose the employee’s carrier on the right using the check mark. Doing so will give you the ability to text customer and job information to this employee from Smart Service.
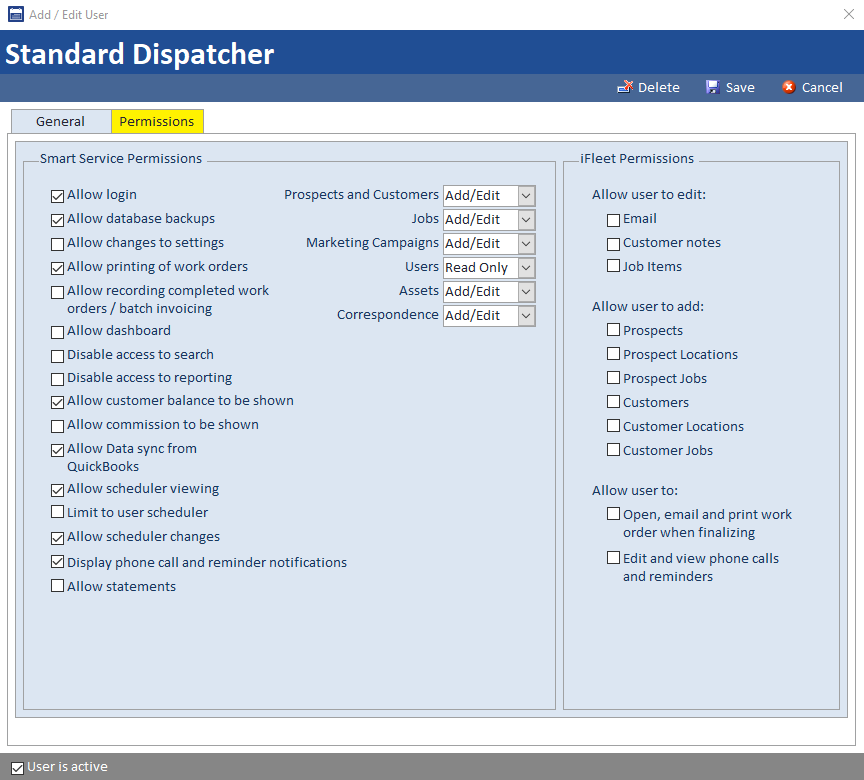
Towards the top of each employee record is a “permissions” tab you can click on to allow / deny access to certain areas of Smart Service. Keep in mind that most of the options available are for office users only.
Read each permission (also listed below) very carefully as they control what a user can and cannot do within the program.
All of these permissions are dependent on the user’s permissions in QuickBooks as well. If your user does not have the required permission level in QuickBooks, you will not be able to complete certain actions regardless of what permissions you have in Smart Service.
Smart Service Permissions
This permission is only necessary for those working in the office. Checking this option will allow users to log into the system using their own name and password.
Remember than in order to use Smart Service they will need to be logged into QuickBooks as well.
This permission is only necessary for those working in the office. Anyone with the “Login” permission should be able to create a database backup.
You can create a backup by clicking the “Back up Database” option under the file menu in the top left hand corner of your screen. If you’d like an automated backup solution for both Smart Service and QuickBooks, check out this product.
This permission is only relevant for those working in the office. It allows users to make changes to the program’s settings, which should be limited to as few hands as possible.
This permission is only relevant for those working in the office. It allows users to print documents from the program
This permission is only relevant for those working in the office. Anyone who will take part in the review and invoicing process should have this permission.
This permission is only relevant for those working in the office. It is meant for those who would like to see an overview of iFleet’s progress throughout the day. You can learn more about what’s on the dashboard by visiting our article here.
This permission is only relevant for those working in the office. Only check this option if you DON’T want this user to access your customer list.
This permission is only relevant for those working in the office. Only check this option if you DON’T want this user to access reporting in Smart Service.
This permission is only relevant for those working in the office. This will display the customer’s account balance at the top of each record.
This permission is only relevant for those working in the office. If you’re using the commission feature from the first employee page above, then you need this permission to assign those commissions.
This permission is only relevant for those working in the office. This option allows users to access the “Get” buttons under file at the top left-hand corner of the screen.
This permission is only relevant for those working in the office. Users who need to see the schedule require this option.
Use this permission if you wish this Smart Service user to only see their own calendar on the scheduling board.
This permission is only relevant for those working in the office. Users who need to make changes to the schedule require this option.
If a phone call or reminder is scheduled for this user, they can receive a popup on their PC when it’s time to complete that correspondence record.
iFleet Permissions
This iFleet only permission will allow the iFleet user to edit the job’s primary email address. Allow this permission if your field users are collecting billing email addresses in the field. iFleet already provides the option of changing where the work order for today is sent, so this permission may not be necessary.
If you gave iFleet the ability to see customer notes via the iFleet tab in settings, giving iFleet this permission will allow the users to add to the private notes section. They will not be able to edit or remove the private notes entered by others.
This iFleet only permission is enabled by default and allows iFleet users to add, edit, or remove line items to the job. This permission is necessary for most businesses unless you wish to prevent your technicians from touching line items or the job contains contract items that should not be altered.
Enabling any of these options allows your field user to circumvent the typical new customer/job process by creating the entity directly from the field. This information will be sent back to the “Jobs added to QuickBooks” section of the office tab for your review, rather than directly to post work orders.
If you have an on-call technician, you should consider the “jobs” permission for that person.
“Open, email, and print work orders when finalizing” means that your iFleet user has options other than only sending the work order back to the office when completing a service. This option is checked by default so the user can send the customer a copy of their work order.
This permission will allow the user to create their own prospects out in the field. You can think of a prospect as a lead; someone who isn’t a customer yet but would like an estimate on something.
This permission will allow the user to create their own prospect locations for prospects out in the field. If your prospect has multiple properties you’ll need to record, then provide this permission.
This permission will provide the user with the ability to create prospect jobs (estimates) out in the field. The user can create a prospect job for any prospect in the database using this feature.
If your technician needs to be able to create a new customer out in the field, provide this permission. Customers created in the field will be synced back to Smart Service.
This permission will allow the user to create their own customer locations for customer records out in the field. If your customer has multiple properties you’ll need to record, then provide this permission.
This permission provides the ability to create your own work orders out in the field. You can create a work order for any customer in the database but those jobs won’t be synced to QuickBooks until they’re approved by the office.
“Open, email, and print work orders when finalizing” means that your iFleet user has options other than only sending the work order back to the office when completing a service. This option is checked by default so the user can send the customer a copy of their work order.
Giving a user this permission will allow phone calls and reminders scheduled for this user to appear in iFleet.
Recommended Permissions
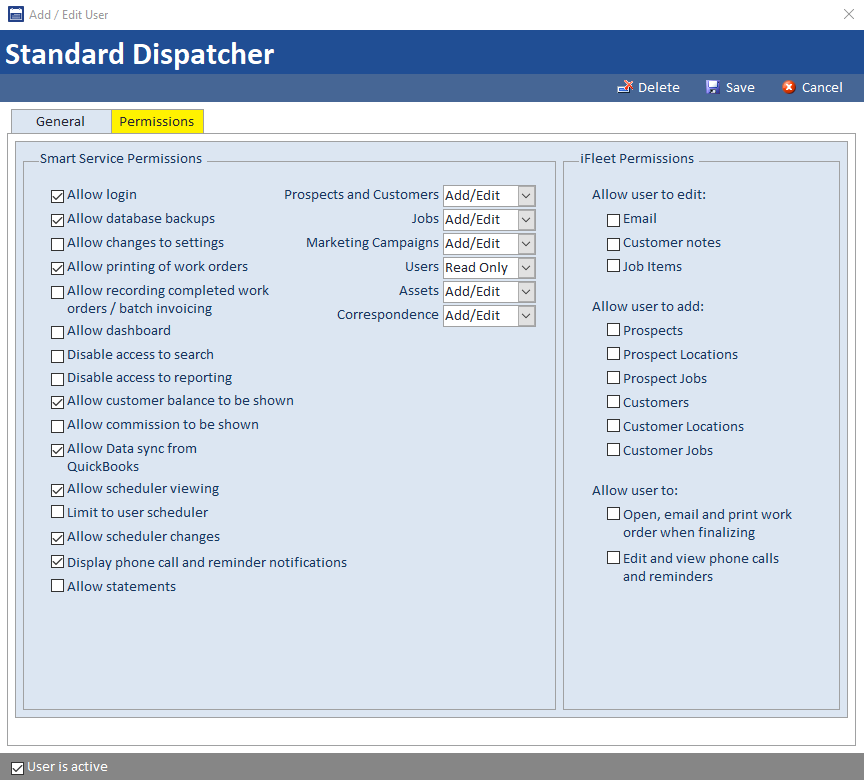
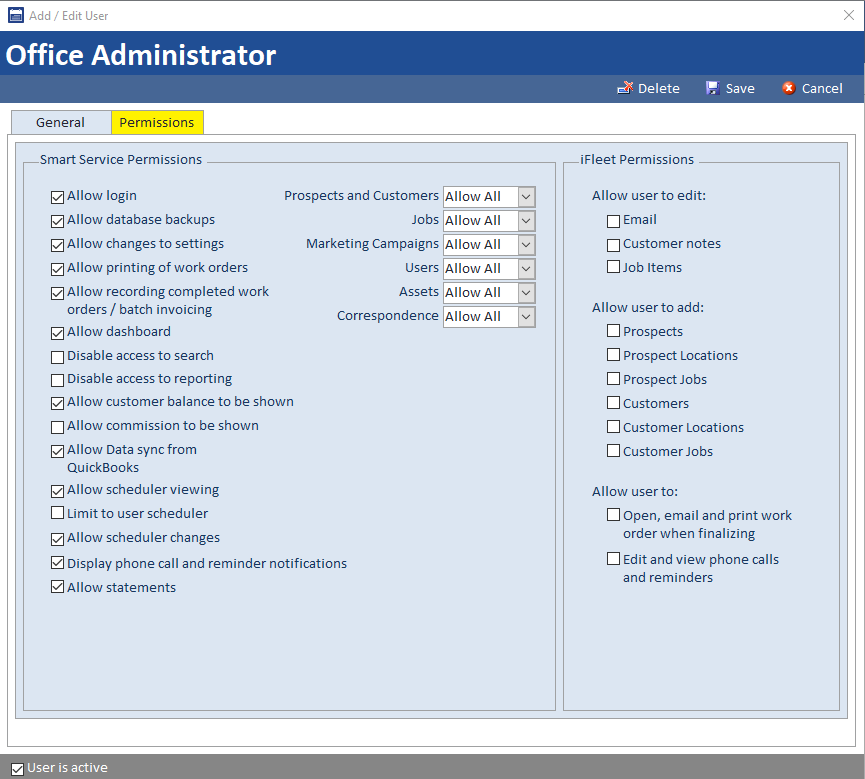
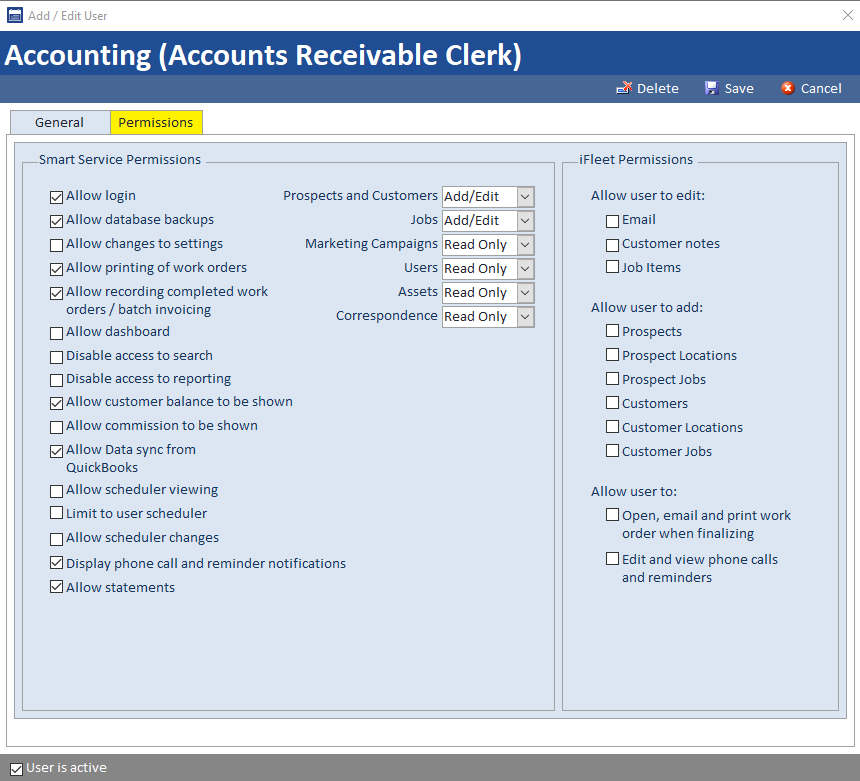
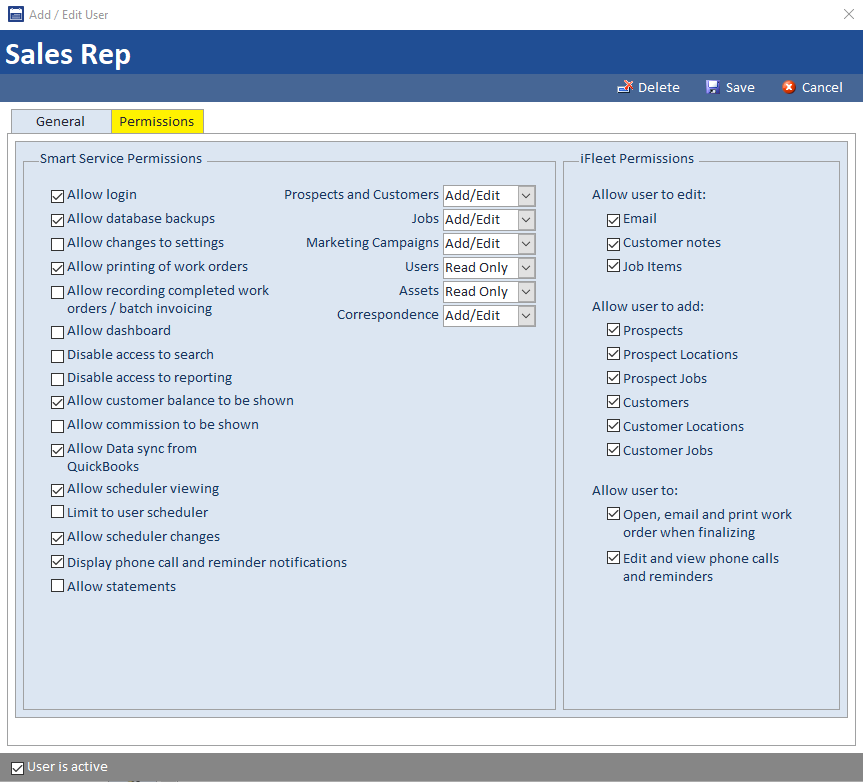
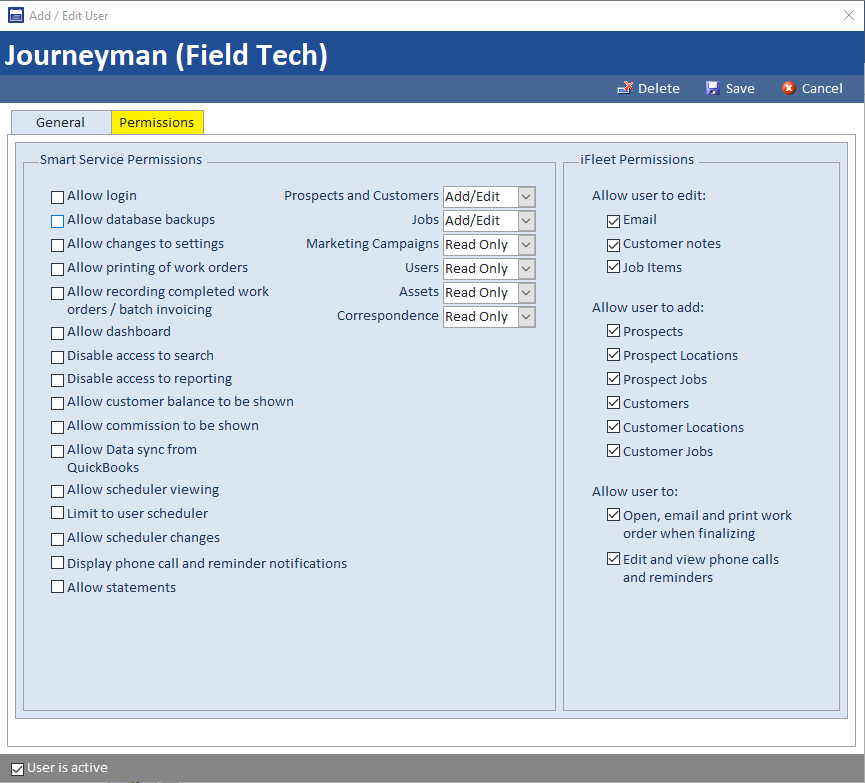
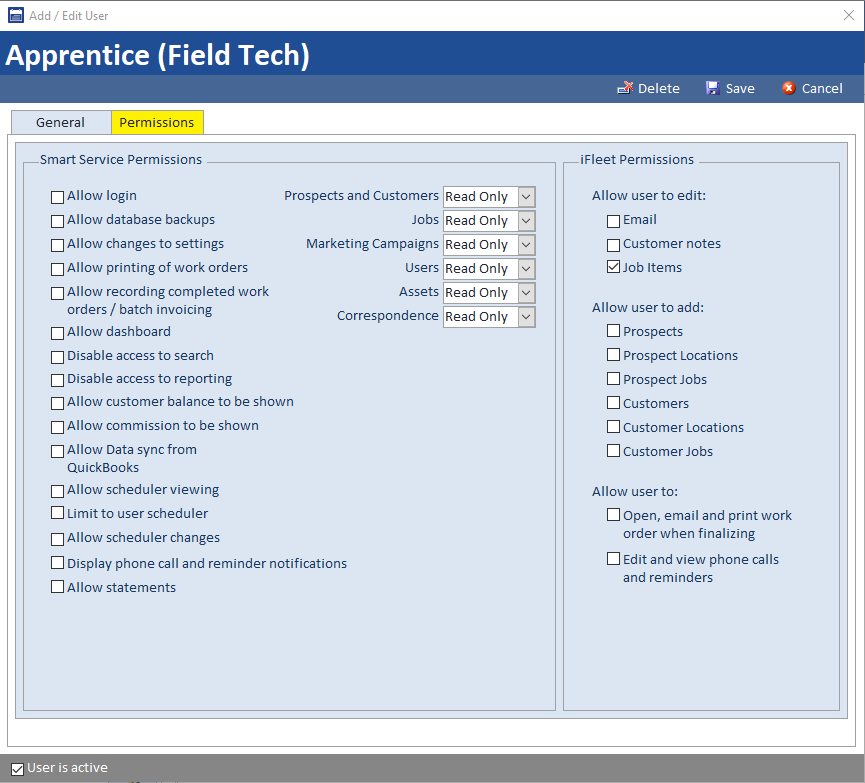
Below are examples of common permission settings based on job title. You can click on the images below to view them full screen. You can provide your employees with more or less than what’s shown below, but these are our recommendations for a smooth experience.
Using the examples below, the office users start at the “Standard Dispatcher”, which can be promoted to “Office Admin”. We have our Sales Rep permissions, followed by Accounting. The technicians follow the same pattern with an “Apprentice” below a “Journeyman”.

