What Can Automated Billing Do?
We’ve designed our automated billing features to help save you time and money on processing costs while also getting your money to you faster. With these features, you won’t have to spend hours each month creating and sending invoices, waiting for customers to make a payment, and manually recording those payments!
With these new features, your business will have the tools needed to generate customizable quotes for your maintenance agreements through Smart Service. From there, you’ll be able to email and collect signups electronically via our Hosted Payment Page where your customers can agree to your agreement terms and place a card or bank account on file for automated billing.
Your office will be notified of the newly-approved agreement so you can verify everything is in order and then give the final approval to start the automated billing process!
When you want to bill your automated contracts, a single click of one button will tell Smart Service to bill all unbilled agreements up to the current date. Not only will we secure funding, but we’ll also automatically email the customer a receipt while we push the invoice and payment to QuickBooks!
Why Should You Automate Billing?
We’re in business because companies like yours want to automate tasks, avoid paperwork, close the gap on invoicing, and move on to bigger and better things. You’ve already optimized your scheduling workflow and your field team, so why not do the same for your contracts?
We see a lot of our HVAC, lawncare, rental, shredding, and plumbing customers working long and tense hours at the end of the month to ensure that all of the service contracts have been reviewed and billed. These features will adjust the focus of that time spent from getting invoices out to managing only the contracts that expire or fail to make payment. Hopefully cutting out steps 1-8 of your 10-step process!
To get the maximum benefit out of this feature, you’ll need your staff and your customers on board. Below are some benefits for your consideration.
Benefits to Businesses
Customers under contract are continuously doing business with you. Customers making automated payments on those contracts are likely to stick with you! If you’re sending out monthly invoices, a customer must choose to make a payment or cut ties. By automating payments the customer must put in the effort to cancel instead of putting in the effort to make a payment.
Having your customers billing information on file and automatically processing for them when their payment is due means avoiding a delay in contacting them for payment. This also prevents service stoppage when you’re waiting on a payment to come in before providing the next service.
Just like the above point, you need to dedicate employee time to send those invoices, process payments, and manage customer accounts. We can trim down the amount of time you spend on those tasks!
How secure is your process for taking customer credit card and account information? We see a lot of small businesses asking customers to write down a credit card number on paper and mail that paper back to the business for the service agreement which adds a lot of risk for both parties!
The Payment Card Industry Data Security Standard (PCI DSS) is a set of standards created by major payment card companies to protect consumers and avoid liability by forcing businesses involved in the payment card ecosystem to implement safety measures and processes.
CardConnect’s devices are protected by CardSecure, which is a combination of point-to-point encryption (P2PE) and our patented tokenization. This ensures that your customer’s payment data is instantly protected at the point of entry, ensuring secure transmission for processing. Using patented, intelligent tokenization, CardPointe reduces the challenges they encounter with PCI compliance for all transactions – both card-present and card-not-present. Only P2PE-certified vendors like CardConnect can deliver this unparalleled level of payment security.
Benefits to Customers
By automating payments you can ensure that you won’t lose service due to a missed payment. Forgetting to pay a bill can also lead to steep late fees which is a conversation neither you nor your customer wants to have.
Incentivize your customers by offering additional benefits for signing up. We’re going to save YOU money on processing time internally, so you can use some of those funds to provide additional benefits to motivate your customers. It’s a positive cycle!
The smooth and regular operation of essential equipment is key to the comfort of your household. Nobody wants to be without hot water or heat. Your customers can relax knowing you’ll be there to keep furnaces, generators, and water heaters running all year long!
Frequently Asked Questions
When Smart Service attempts to process a payment and fails to do so, that failure will be reported to you and an email can automatically be sent to the customer to have them verify their account information. This will be essential for customers who may have an expired card on file, insufficient funds, or other payment issues.
You can! Once enabled, we have an optional setting that will suspend a service agreement and the attached work orders when a payment failure is detected. This will prevent your technicians from visiting customers with suspended contracts.
Once the payment issue is cleared up, one click with reactivate the agreement and the attached services so you can get your technicians out to the customer. This should keep you from servicing customers without current accounts.
We’ve got you covered here, too! You’ll be able to filter contracts expiring soon and send out renewal notices or a new quote for the upcoming agreement renewal. Of course, you don’t have to set an expiration date for your contracts either, we’ll keep billing and help you service your customers until you or they decide to close the contract!
Prerequisites
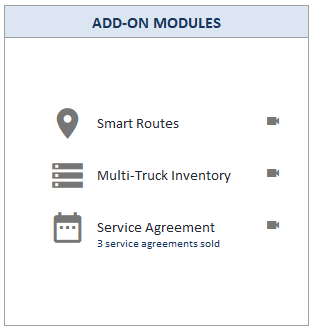
If you would like access to these features, you’ll need access to the Service Agreement Module and CardPointe integration. Both of these add-ons are the foundation on which the automated billing capability was built. You can reach out to our support team here for more information and pricing.
The rest of this article will detail the standard process for our recurring billing feature and how we recommend you use it. Since the following suggestions need to be tailored to your customized contracts and preferences, we recommend you consult our trainers to get a customized workflow for your business. You can meet with a member of our training staff by requesting training here.
Before moving on with this guide we recommend you determine your answers to the following questions and come up with a list of needs/goals.
- Who initiates the conversation about contract signups with the customer? Will the office call after the installation of a new unit? Will the tech offer this as an upsell to new customers? Will the sales rep mention this when quoting a new installation?
- Do you have a copy of the customer-facing documentation you’ll need your customer to fill out? Are there multiple documents they might see?
- Do you have different “levels” or “types” of contracts for your customers to choose from? What are the differences?
- How often do you bill for their contract? We offer options to bill monthly, quarterly, semi-annually, and annually.
- Who is responsible for handling customer changes or requests once the contract is in motion?
- Who is responsible for handling the billing of service contracts? Do they have access to Smart Service?
Settings for Automated Billing
Now that you’re ready to start configuring Smart Service to accommodate your service contracts, we need to change some settings. You will, of course, need access to the Settings section of Smart Service to proceed!
Enable & Configure Service Agreements
Enter Settings and proceed to the “Service Agreements” tab. From there, you can change the name “Service Agreement” to whatever terminology your company uses. Popular choices are “service agreement”, “maintenance contract”, “maintenance agreement”, etc.
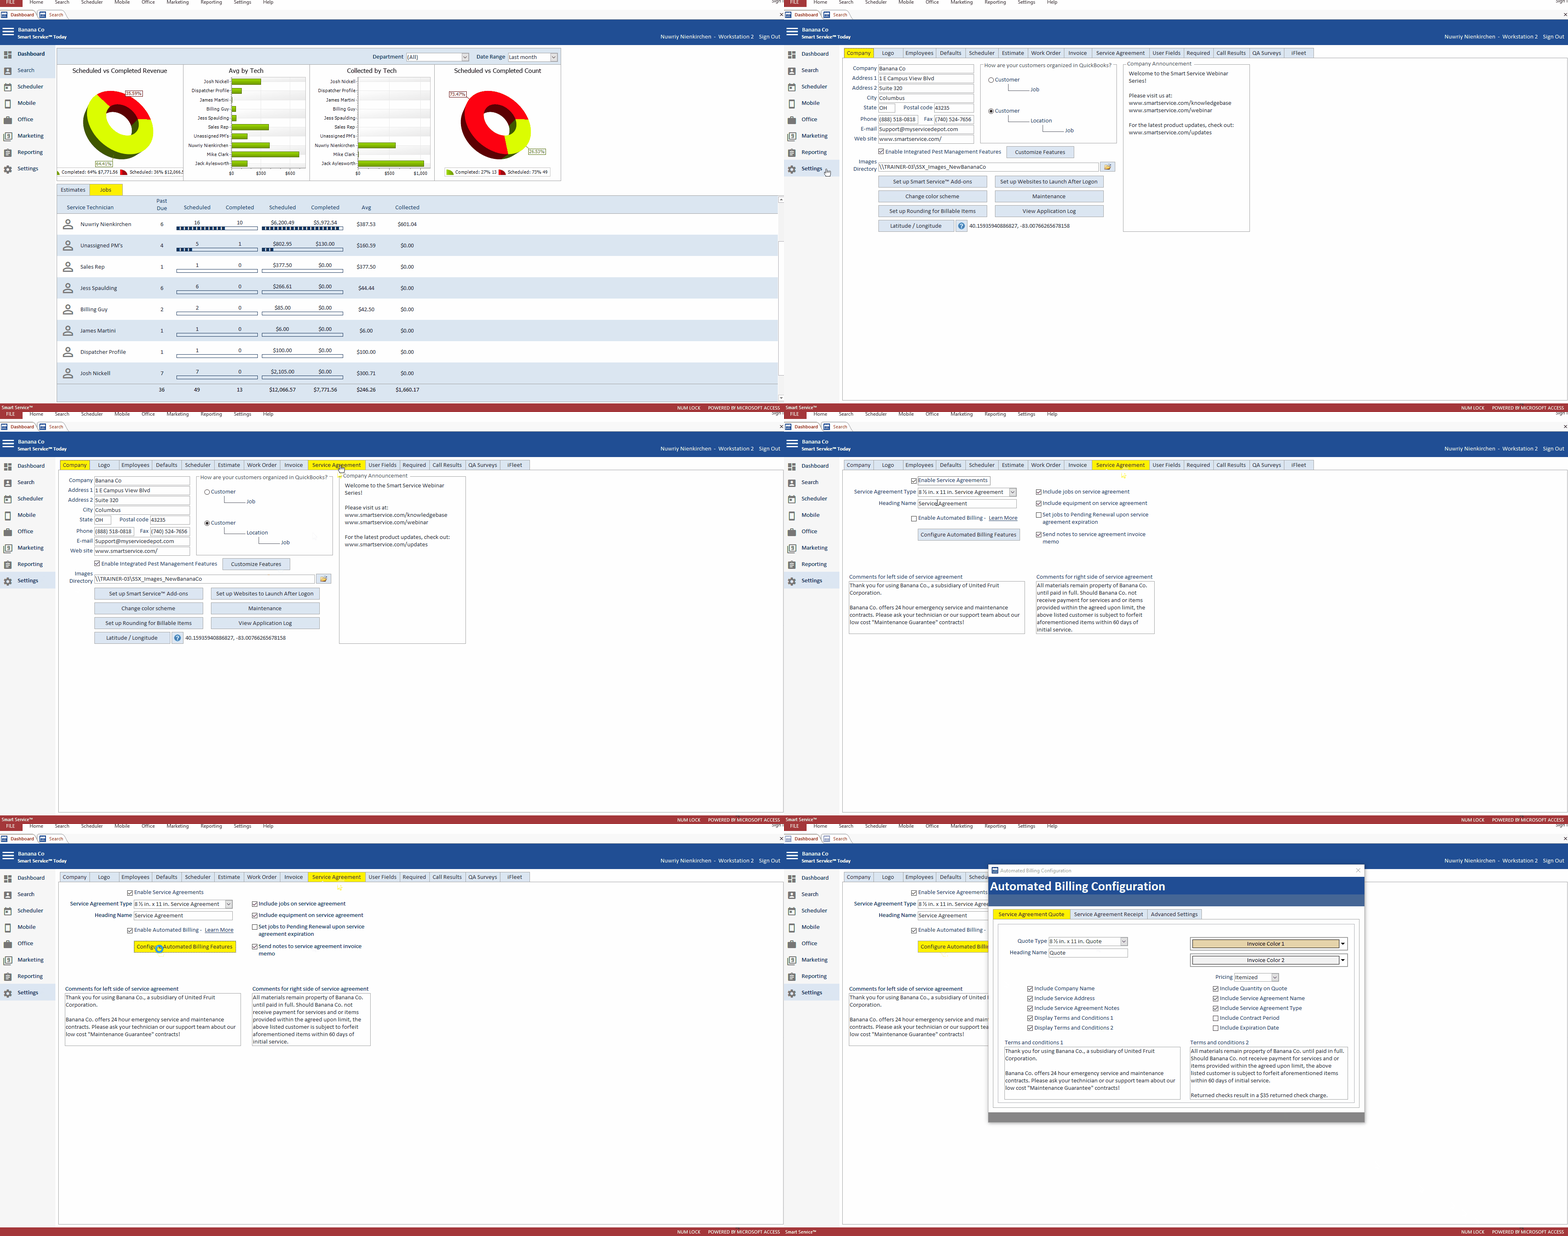
Most of these settings here are for our manually billed contracts. To continue configuring automated contracts, click on “Enable Automated Billing” and then”Configure Automated Billing Features” as shown below.
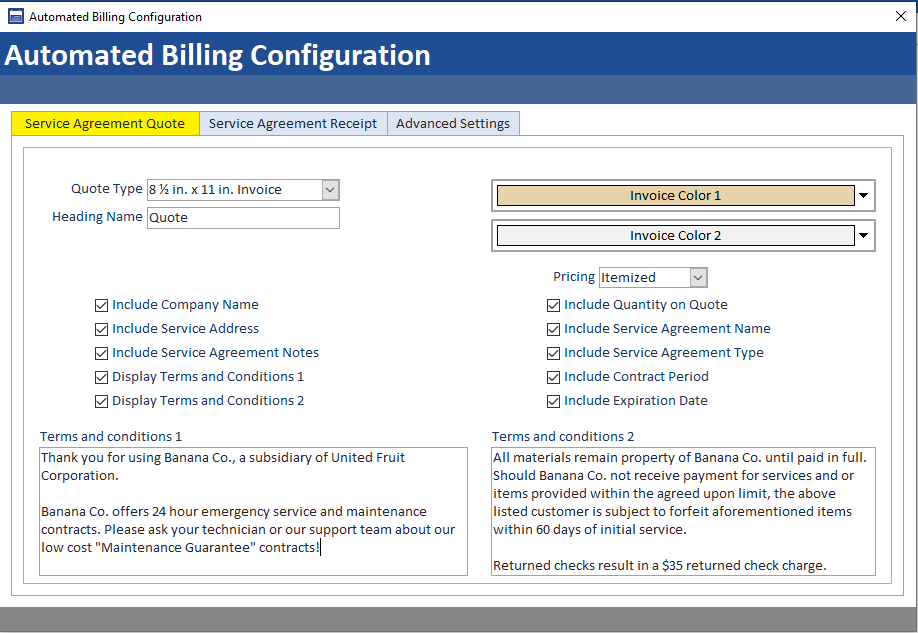
The first step is to customize the service agreement quote. Some context here: The service agreement quote will be emailed to your customer and list the details of their contract as well as direct them to put a card or bank account on file for automated billing via your HPP.
The quote document itself will be attached to the email to the customer and you’ll be able to customize that email in a moment.
For most businesses, you won’t need to make a change here. If we have provided you with a custom CST to replace the default template, you can tell Smart Service to use that customized document instead of the standard document.
We’re calling this a “Service Agreement Quote” but you can alter the name here! This is a customer-facing term and will appear as the document header.
We’re going to pull your logo from Settings>Logo onto the document for you already. However, not every company has the actual company name represented on that logo image. You can choose whether or not Smart Service should insert the company name from Settings>Company onto the document or if your logo image will take care of that.
This would be important information to include if you have different titles of contracts such as different levels or contracts per equipment covered. When you create a service agreement via Smart Service, you’ll be able to specify a “name” for that agreement. Most companies have a generic name such as “Gold Maintenance Agreement” or “Generator Maintenance Contract” etc.
This would be important information to include if you have different types of contracts such as different levels or contracts per equipment covered. When you create a service agreement via Smart Service, you’ll be able to specify a “name” for that agreement. Most companies have a generic type such as a “Gold Maintenance Agreement” or “Generator Maintenance Contract” etc.
Your customer’s billing address will always be included, but if they have multiple service addresses you can enable this setting so you’re specifying which property the agreement covers.
Terms and conditions 1 and 2 will appear on the second page of your quote. 1 will appear as a text block above 2. You can include both boxes if you have a lot of contract terms or you can uncheck box 2 if you won’t need that much space.
When entering your terms and conditions you can use CTRL+Enter to make a line break. You could also copy and paste the text into these fields. Lastly, you’ll have the opportunity to include these terms and conditions as a hyperlink on the HPP later in this article.
We recommend you adjust these colors to compliment your logo once you’ve reviewed a test contract. Here you can change the colors of the quote document.
You can specify “itemized” or “lump sum” pricing for your service agreement quotes. Itemized pricing will show the cost per billing cycle of each item listed on the contract whereas lump sum will only show the total due per cycle.
This goes along with the pricing setting above it. You can choose whether or not the quantity of each item listed as part of the contract is shown to the customer.
This only applies if your business will have a set length of time before the contract expires and must be renewed. If your contracts remain active until the customer cancels or price updates are needed, don’t check this setting.
We would define the “Contract Period” as the contract term length such as a 6-month contract, annual contract, etc.
This only applies if your business will have a set length of time before the contract expires and must be renewed. If your contracts remain active until the customer cancels or price updates are needed, don’t check this setting.
If your contracts DO expire, this setting will show the expiration date to the customer. This date is something you’ll specify later when creating their contract.
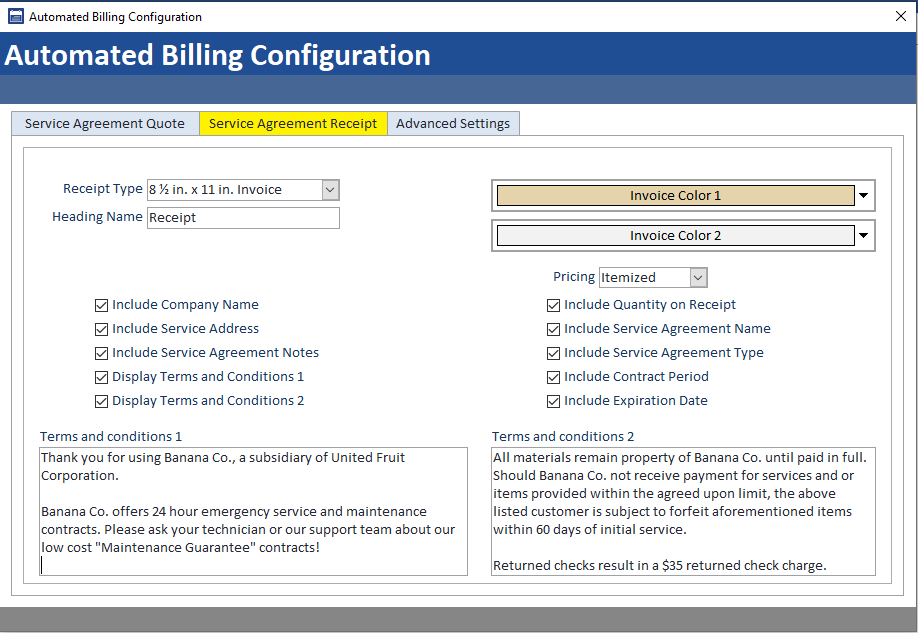
For most businesses, you won’t need to make a change here. If we have provided you with a custom CST to replace the default template, you can tell Smart Service to use that customized document instead of the standard document.
We’re calling this a “Receipt” but you can alter the name here! This is a customer-facing term and will appear as the document header.
This would be important information to include if you have different titles of contracts such as different levels or contracts per equipment covered. When you create a service agreement via Smart Service, you’ll be able to specify a “name” for that agreement. Most companies have a generic name such as “Gold Maintenance Agreement” or “Generator Maintenance Contract” etc.
This would be important information to include if you have different types of contracts such as different levels or contracts per equipment covered. When you create a service agreement via Smart Service, you’ll be able to specify a “name” for that agreement. Most companies have a generic type such as a “Gold Maintenance Agreement” or “Generator Maintenance Contract” etc.Toggle Content
Terms and conditions 1 and 2 will appear on the second page of your quote. 1 will appear as a text block above 2. You can include both boxes if you have a lot of contract terms or you can uncheck box 2 if you won’t need that much space.
When entering your terms and conditions you can use CTRL+Enter to make a line break. You could also copy and paste the text into these fields. Lastly, you’ll have the opportunity to include these terms and conditions as a hyperlink on the HPP later in this article.
We recommend you adjust these colors to compliment your logo once you’ve reviewed a test contract. Here you can change the colors of the receipt document.
You can specify “itemized” or “lump sum” pricing for your service agreement receipts. Itemized pricing will show the cost per billing cycle of each item listed on the contract whereas lump sum will only show the total due per cycle.
This only applies if your business will have a set length of time before the contract expires and must be renewed. If your contracts remain active until the customer cancels or price updates are needed, don’t check this setting.
We would define the “Contract Period” as the contract term length such as a 6-month contract, annual contract, etc.
This only applies if your business will have a set length of time before the contract expires and must be renewed. If your contracts remain active until the customer cancels or price updates are needed, don’t check this setting.
If your contracts DO expire, this setting will show the expiration date to the customer. This date is something you’ll specify later when creating their contract.
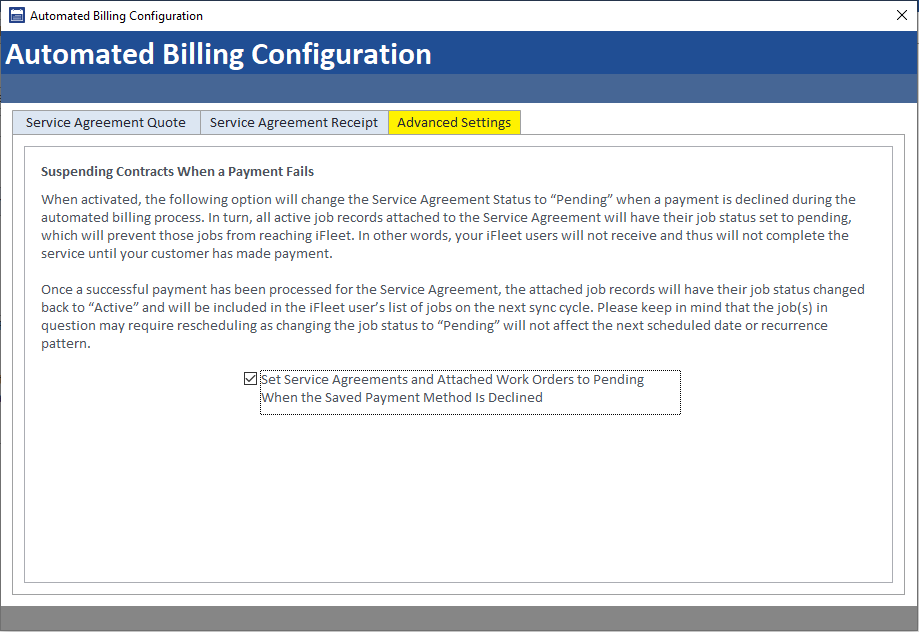
This last feature is optional! The “advanced Settings” tab will include additional features and customization to this part of Smart Service as we grow and develop. Right now, we have an option that will halt services to contracts that have expired or failed to make payment before their next service visit was due.
You should only enable this setting if you wish to stop service to a contract when no payment has been made from the customer. Remember, Smart Service will automatically reach out to the customer and ask for updated payment information if a payment fails.
The text displayed in the screenshot is as follows:
When activated, the following option will change the Service Agreement Status to “Pending” when a payment is declined during the automated billing process. In turn, all active job records attached to the Service Agreement will have their job status set to pending, which will prevent those jobs from reaching iFleet. In other words, your iFleet users will not receive and thus will not complete the service until your customer has made payment.
Once a successful payment has been processed for the Service Agreement, the attached job records will have their job status changed back to “Active” and will be included in the iFleet user’s list of jobs on the next sync cycle. Please keep in mind that the job(s) in question may require rescheduling as changing the job status to “Pending” will not affect the next scheduled date or recurrence pattern.
(Optional) Customize Document Templates
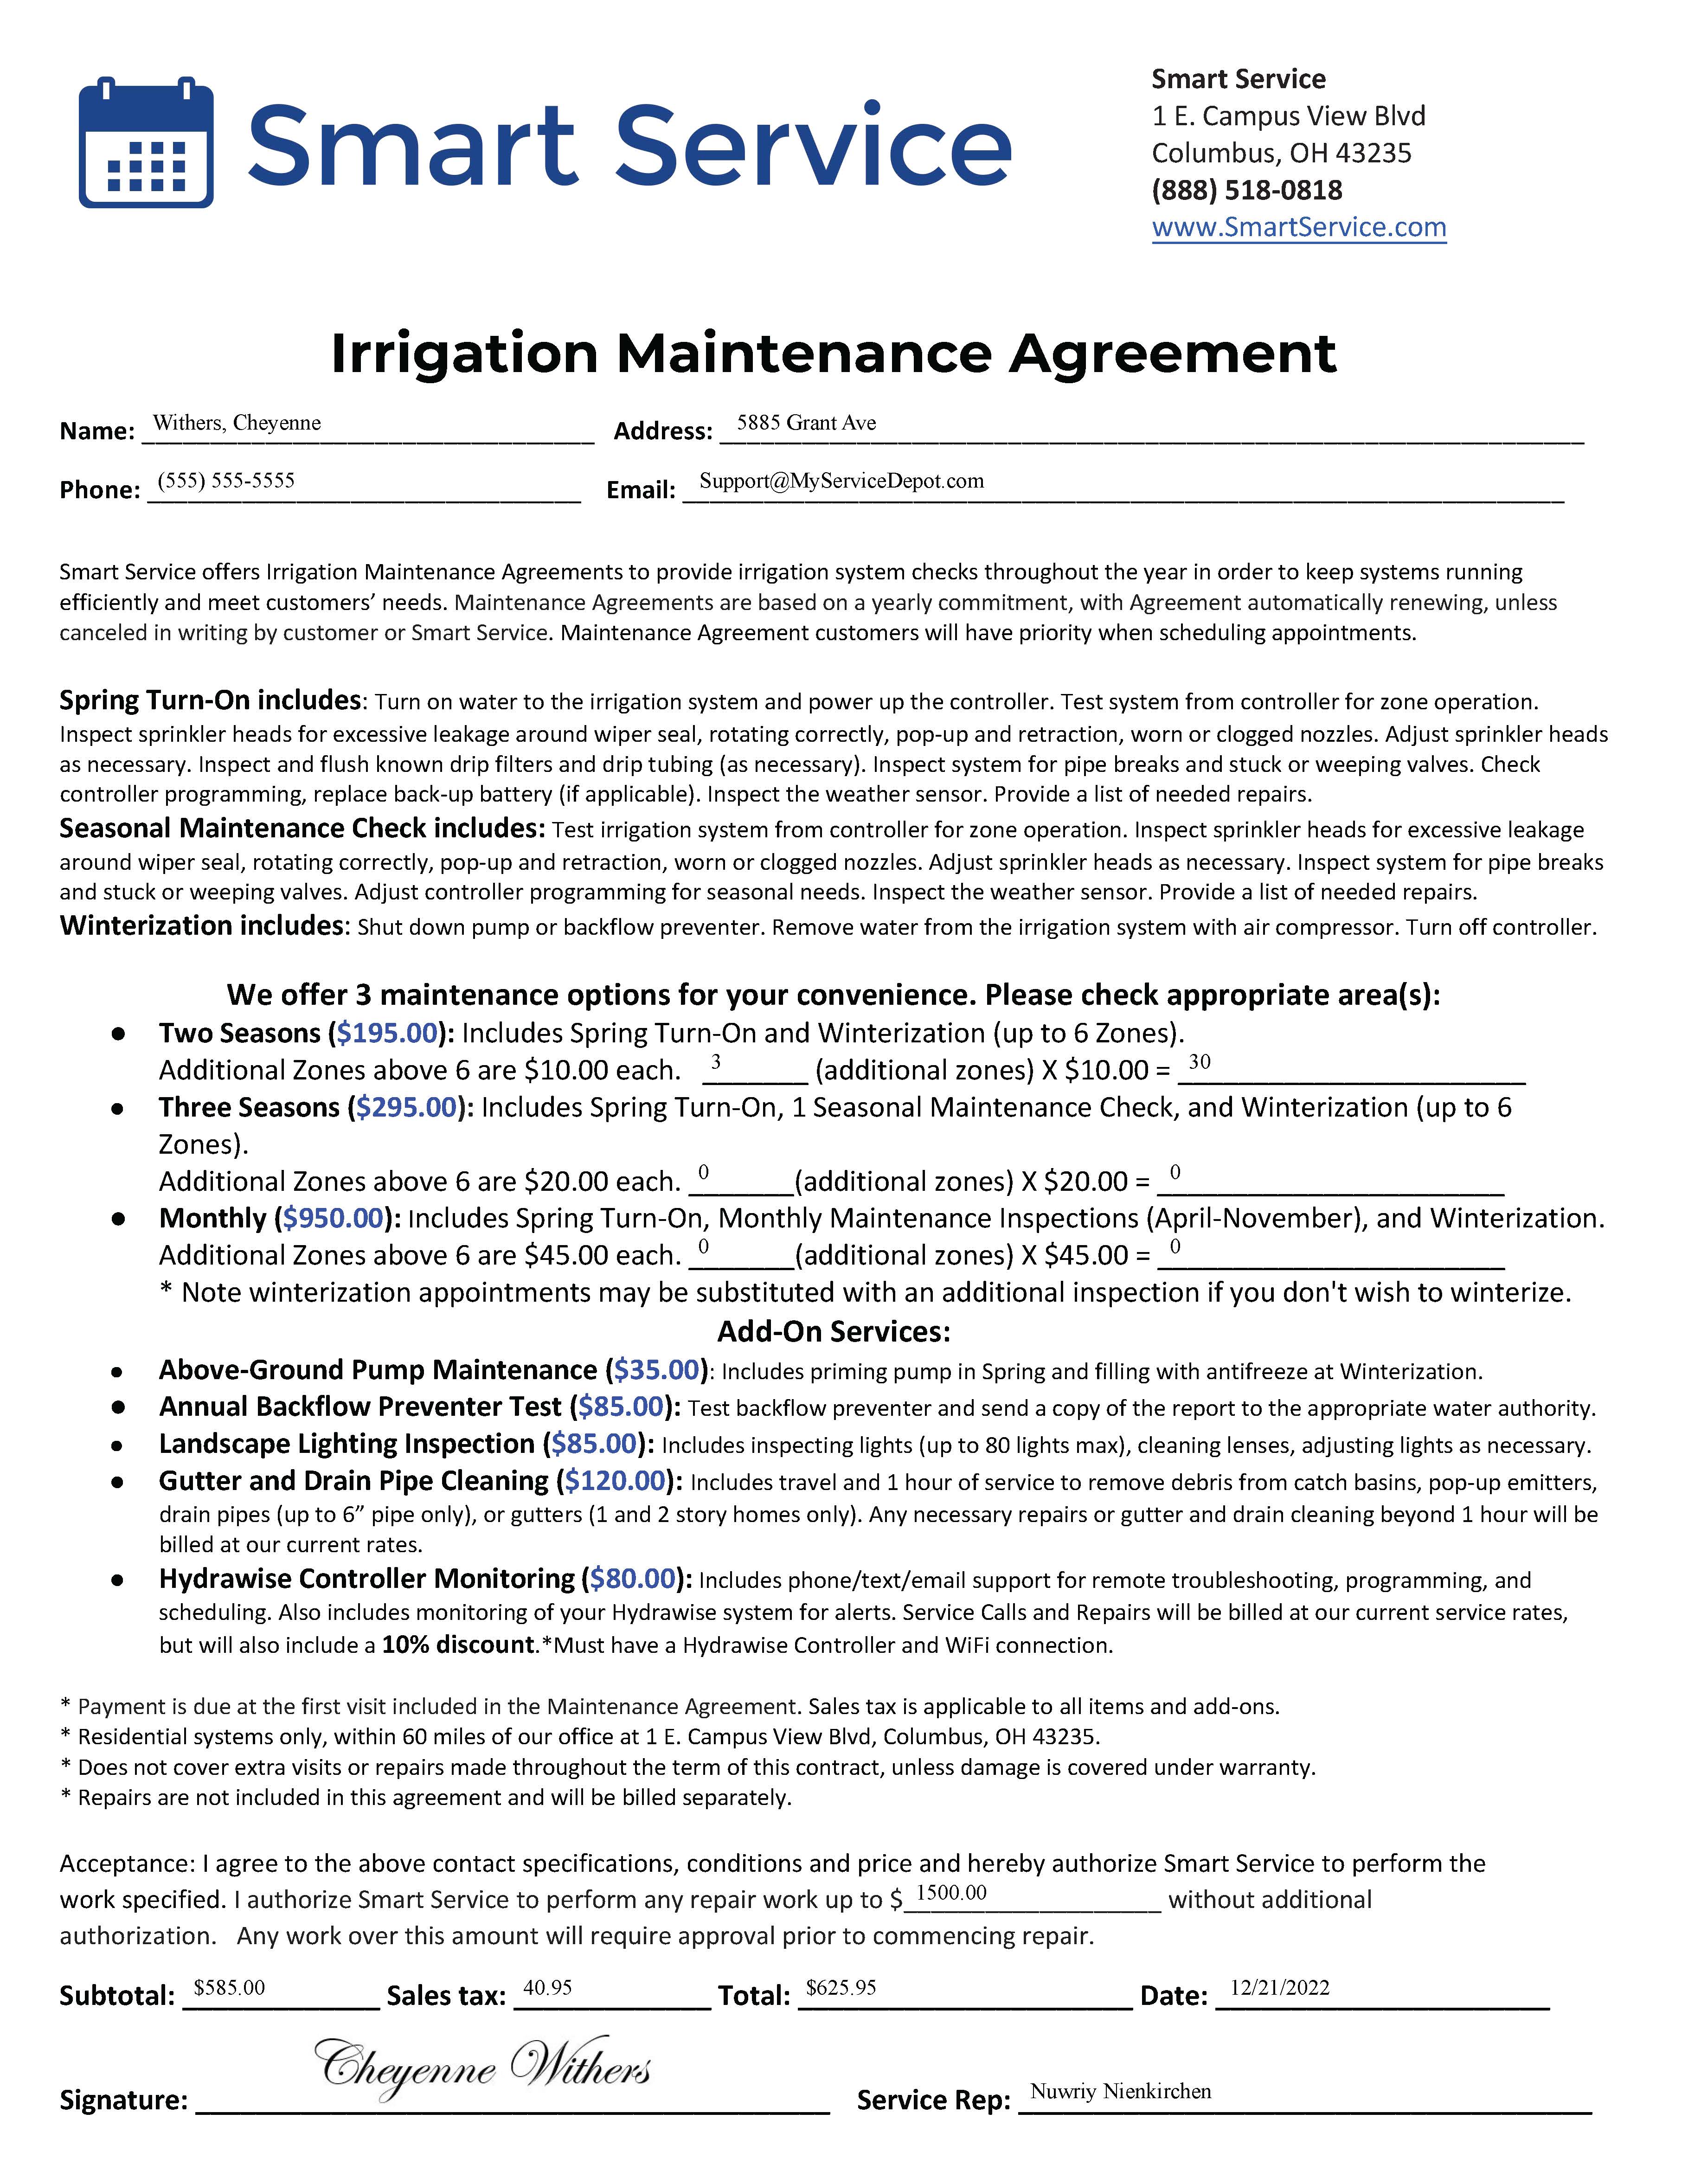
Both your employees and your customers are likely familiar with a particular document template. Our Custom Development team can create a copy of that document that works with Smart Service and iFleet! If you can provide us with a copy of your existing documents, we can get started on including those documents where you’ll need them.
The rest of this article will reference a service agreement quote template, invoice, and receipt. Any of the “default” documents that come with the system will be able to be customized to match your existing documentation.
If you’re interested in getting a customized document added to your Smart Service, please reach out to us using one of the methods below. You can provide us with a copy of your documents and a brief description of where in your process you would use them.
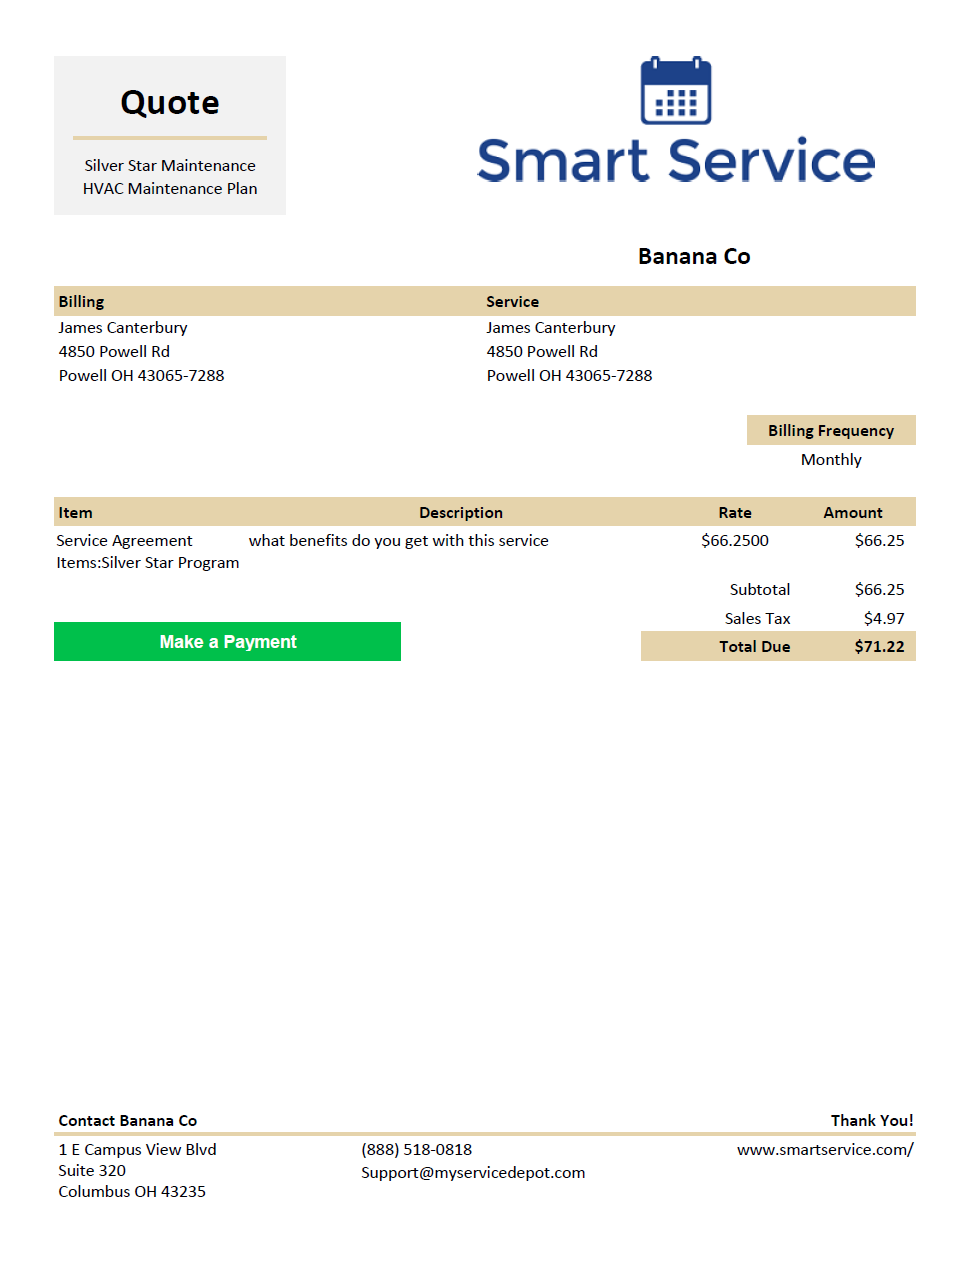
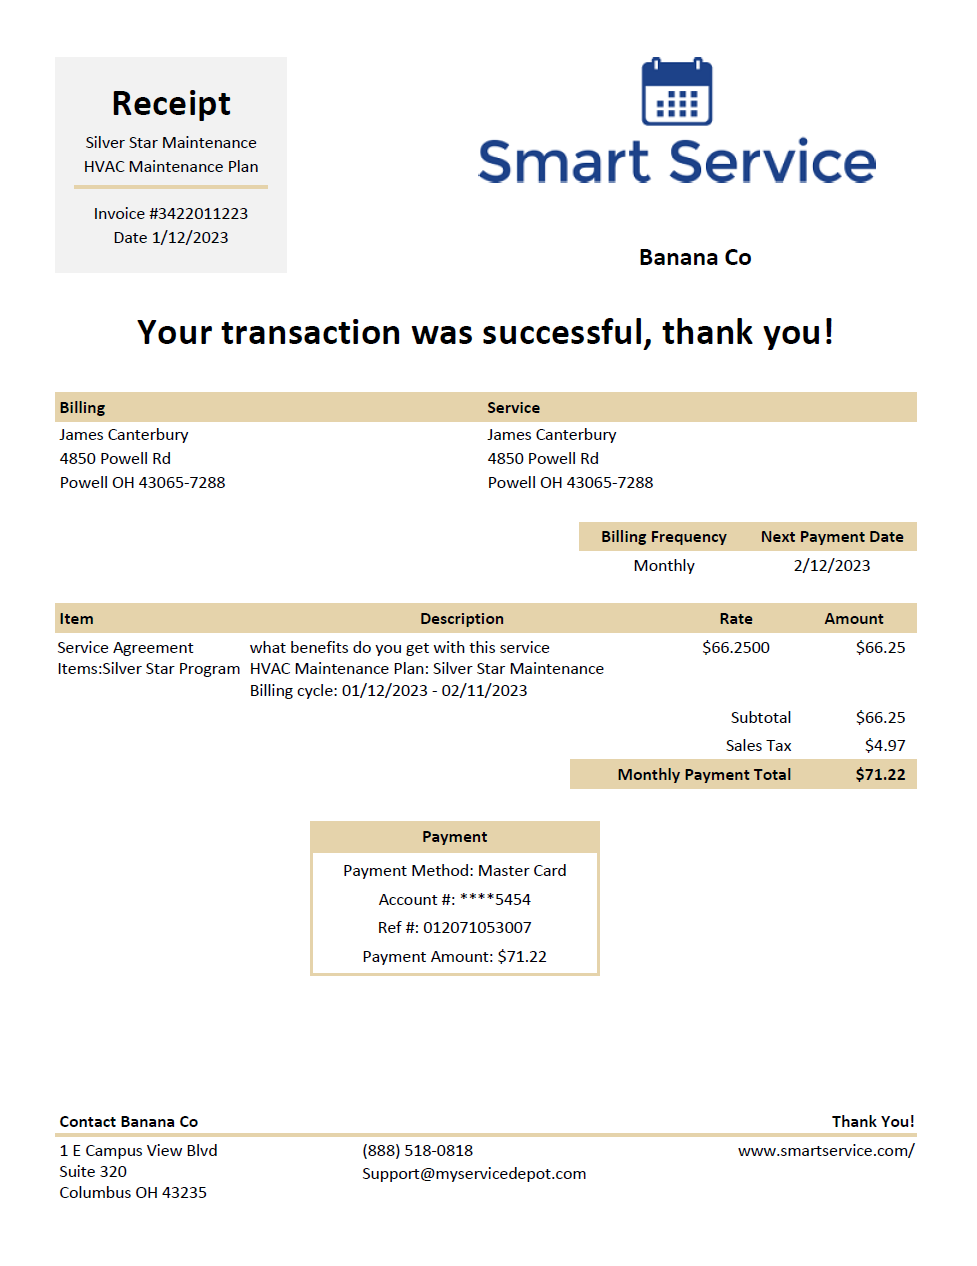
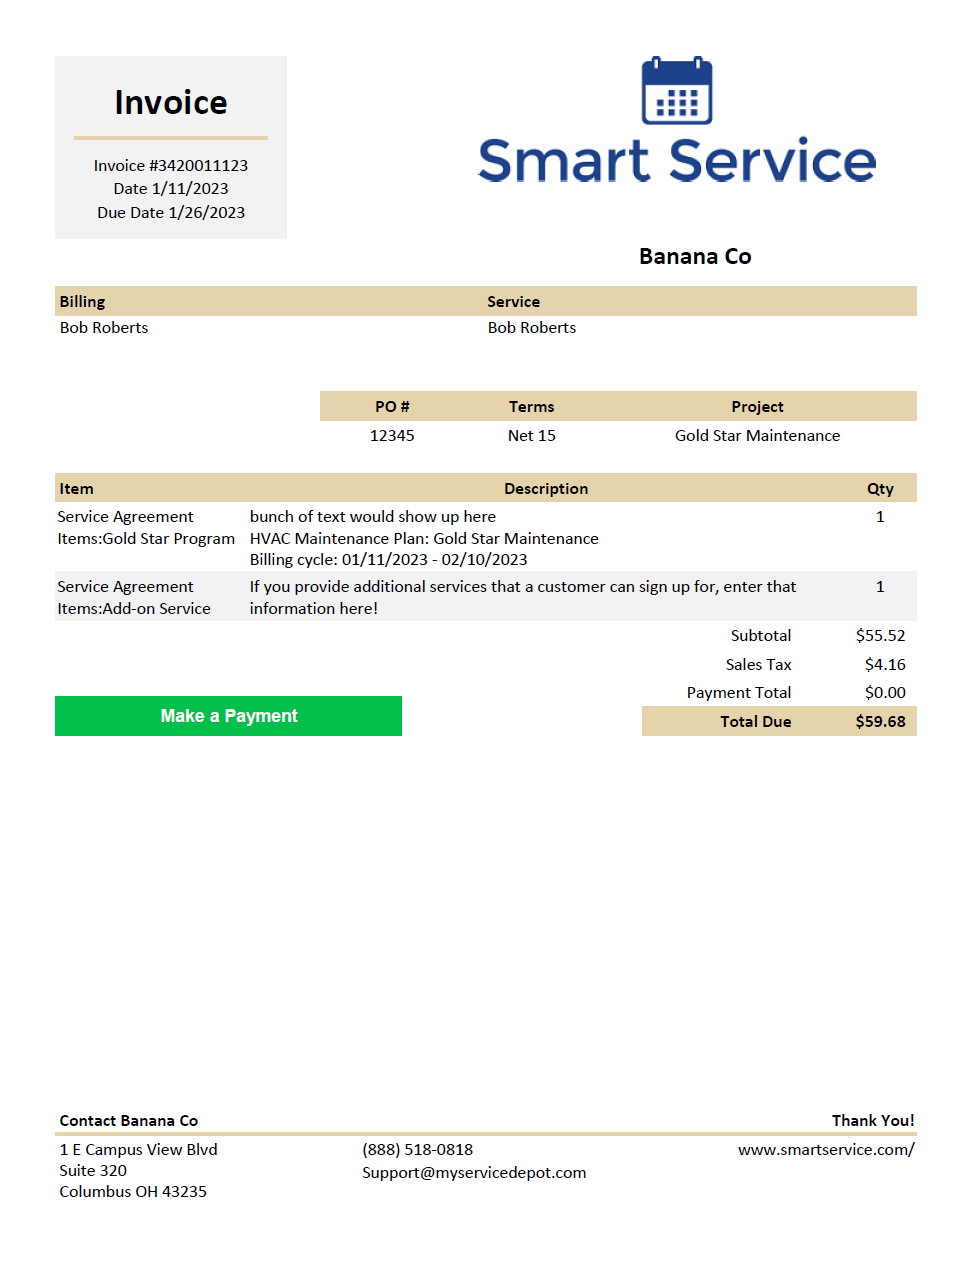
To assist you in making a decision on whether or not your business will need customized documents, we’ve added images of the default document templates to the left.
These default documents do have some customizable options which are shown in the “Enable and Configure Service Agreements” section of this article.
Insert Automated Email Templates
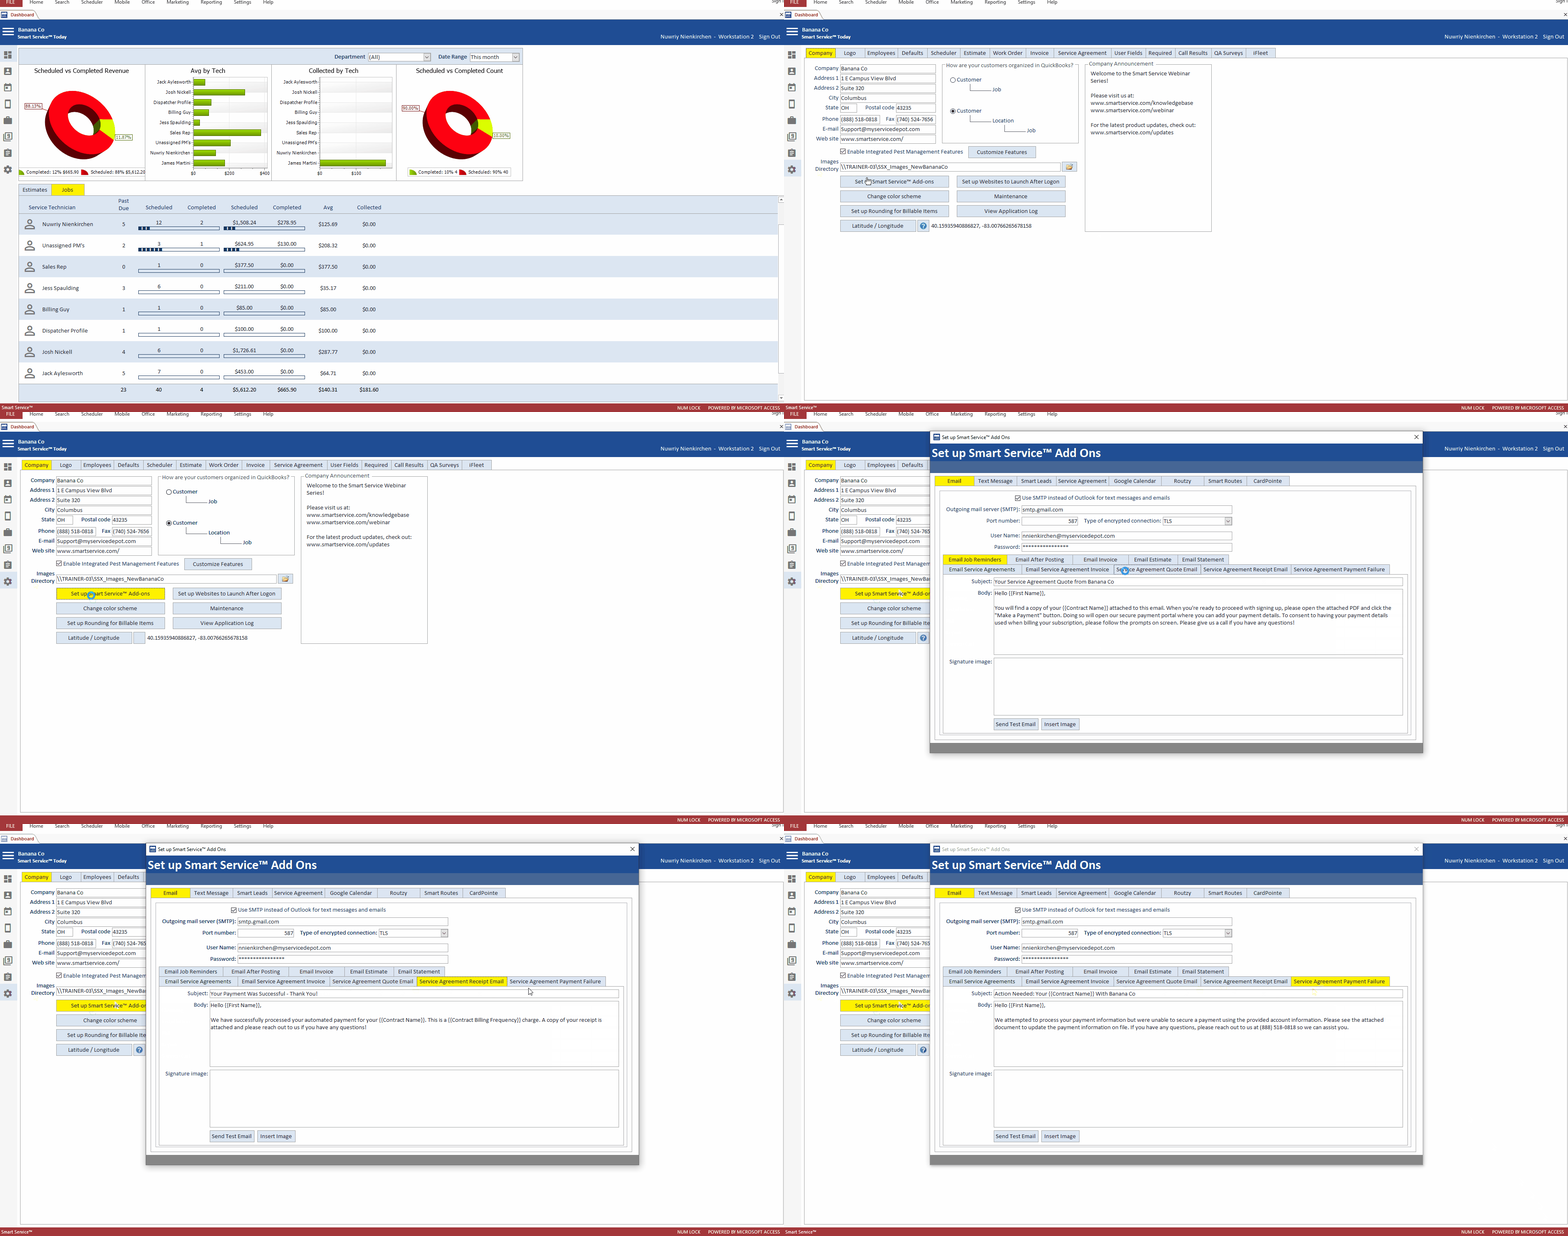
Now that your documents are customized and in place, you should create the template emails that will accompany the documents. These templates can be modified via Settings > Company >Set up Smart Service Add-Ons as shown below.
You’ll need to set up 3 different email templates that will be used fairly often throughout the automated billing process. If you haven’t set up email templates like these before, you can right-click in the email subject or body to insert data from the customer’s record. For example, using the {{First Name}} option in an email template will actually go and grab the customer’s first name from their profile and add it to the email when sent.
Below is a brief description of when these email templates would be sent to your customer by Smart Service. We would advise setting yourself up as a customer in Smart Service and running through the automated billing process so you and your staff are familiar with what your customer would see when you’re using this feature day-to-day.
This template will accompany the first email to the customer asking them to sign up for the service agreement. Once your customer has expressed interest in getting a service agreement from you and is ready to make their first payment they’ll receive this email with the attached quote.
Your service agreement quote will show up as an attachment to the email. To make a payment you should encourage your customer to open the attached PDF document and click the “Pay Now” button to make a payment. Clicking that button will take them to your HPP where they can enter their account information, sign up for automated billing, and read your terms and conditions.
Each billing cycle, one of your Smart Service users will click one button to bill the service agreements on auto-bill. If the customer’s payment is successful, they’ll receive this email template with a receipt attached as a PDF.
Sometimes a customer will have insufficient funds, an expired card on file, incorrect account information, etc. If Smart Service detects a failed payment when running the auto-billing function, we’ll automatically email your customer a new invoice so they can update their payment information on file.
You might have customers that would like to cancel their contract or contest their payment. We will show your terms and conditions as well as your company’s contact information on all of these documents but you should consider including additional instructions for those customers who would like to speak with you about their payment or contract.
(Optional) Customize Your Hosted Payment Page (HPP)
This could take the form of adding your logo, a link to your terms and conditions (if you have them hosted on your website), and possibly an option for customers to agree to your terms before they can submit payment.
Additional customization can be requested by logging a ‘Support’ ticket, within your company’s CardPointe merchant portal, and selecting ‘Hosted Payment Page Inquiry’ with your company’s request for customization or changes. Find out more about submitting CardPointe Support Tickets, here.
Recommended Workflow
Let’s take a moment to review the overall process for using the Service Agreement Module. The service agreement itself will be entered into Smart Service and has the primary function of invoicing the customer and securing payments for the agreement. At the same time, you’ll be creating work orders as usual so your field team can visit the customer and carry out your end of the contract. However, you won’t be billing from the work order, we’ll instead attach the work order to the service agreement and bill from there instead.
We’ll have more information about how work orders change when attached to service agreements but there are a few key reasons for this workflow you should know now.
- Most industries will need to visit the customer periodically for inspections, repairs, etc. as part of their end of the contract. The job will be how your iFleet users are notified to visit the customer and where they’ll still record photos, notes, etc.
- If you do visit your customers as part of your agreements, we want to make sure the inventory used comes out of your stock when you use it, not when the billing cycle is invoiced.
- You might want to track cost (how much you pay for the things you gave your customer as part of the agreement and the time you spent on-site) on a per-visit basis. We can use this information later to compare to the income of the contract and determine our profit.
So after we’ve set up the billing side of the contract via the Service Agreement Module, we’ll schedule some work orders to make sure your iFleet users know when to provide the PM services promised in the contract.
Creating the Service Agreement
For your first service agreement, we recommend setting up a fake customer using your information so you can see both your business process and what the customer will see on their side of the transaction.
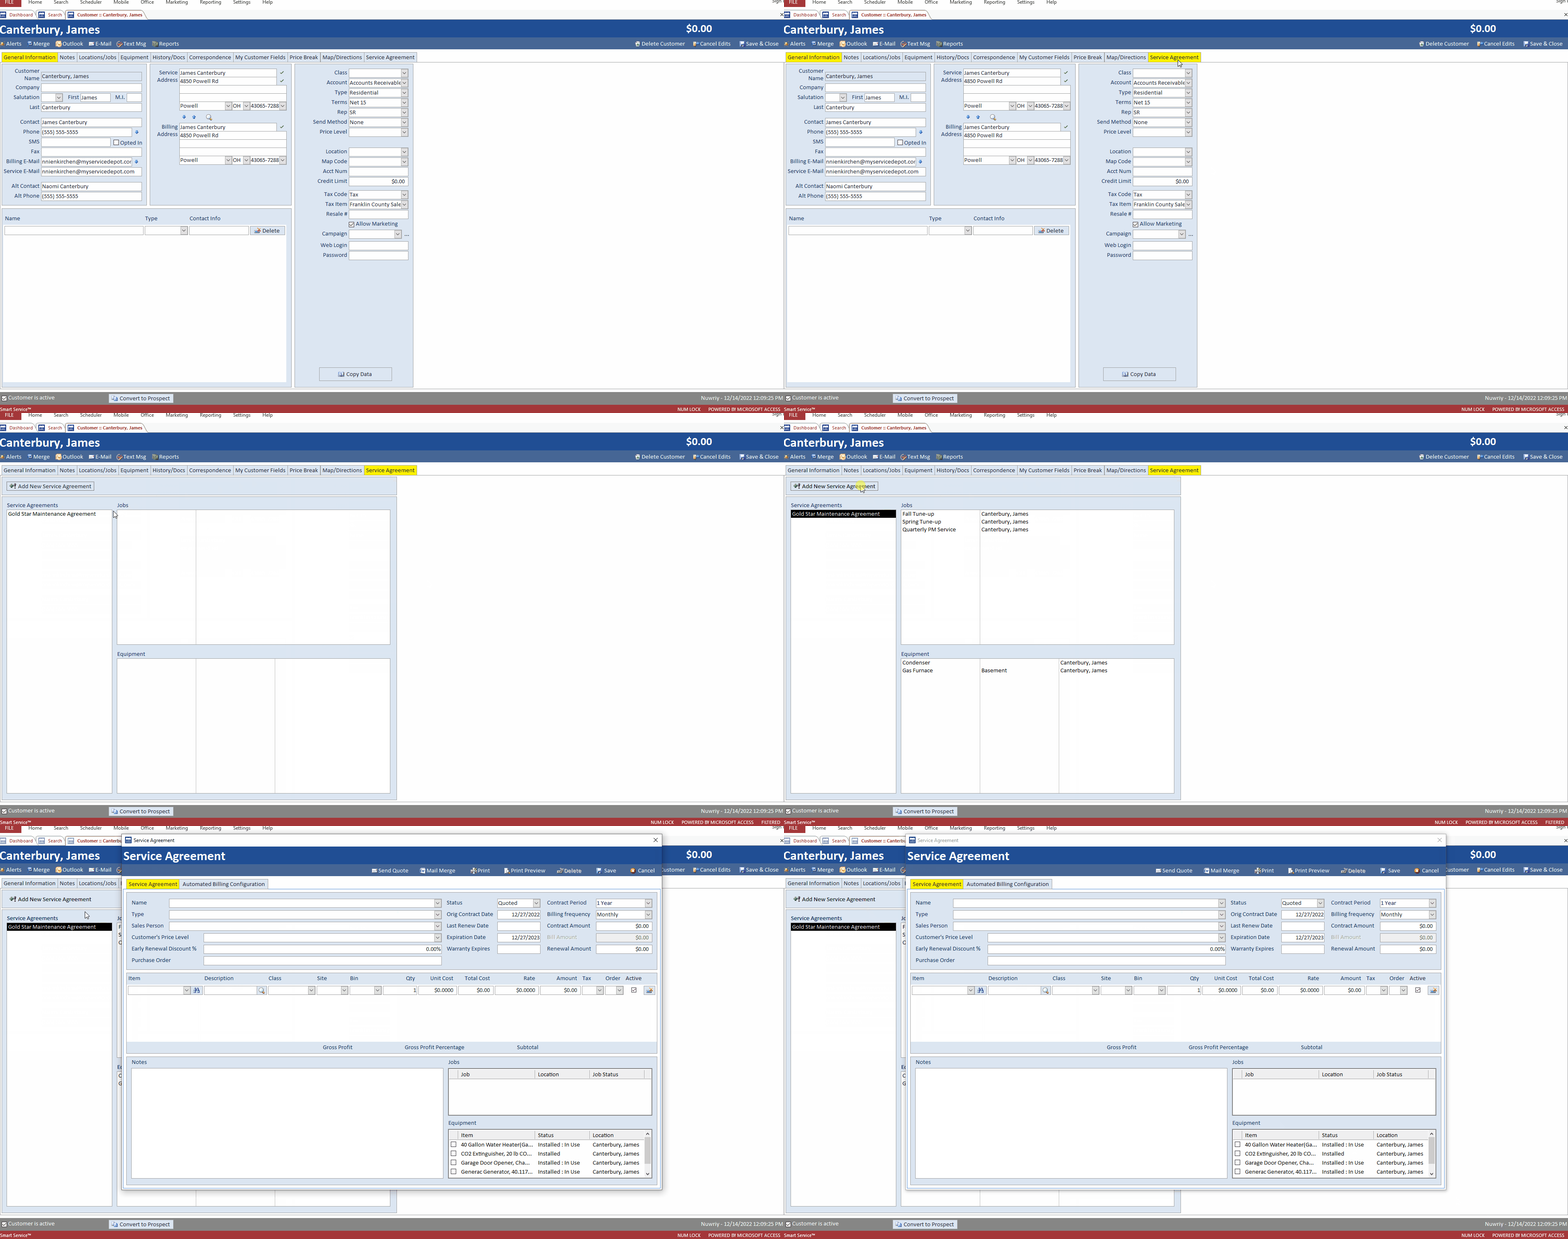
Once you’ve created a customer record for yourself you can set up the contract by clicking the “Service Agreement” tab on that customer or location. Please note that you had the option to change the name “Service Agreement” so your tab might have a different title from the default.
This tab (shown above) will display the customer’s service agreements. Clicking on an existing agreement once will show you which jobs and equipment are tied to that agreement. Clicking twice will open the agreement for further observation or modification.
Since you need to create a new agreement for your customer, click the “Add New Service Agreement” button at the top of the tab.
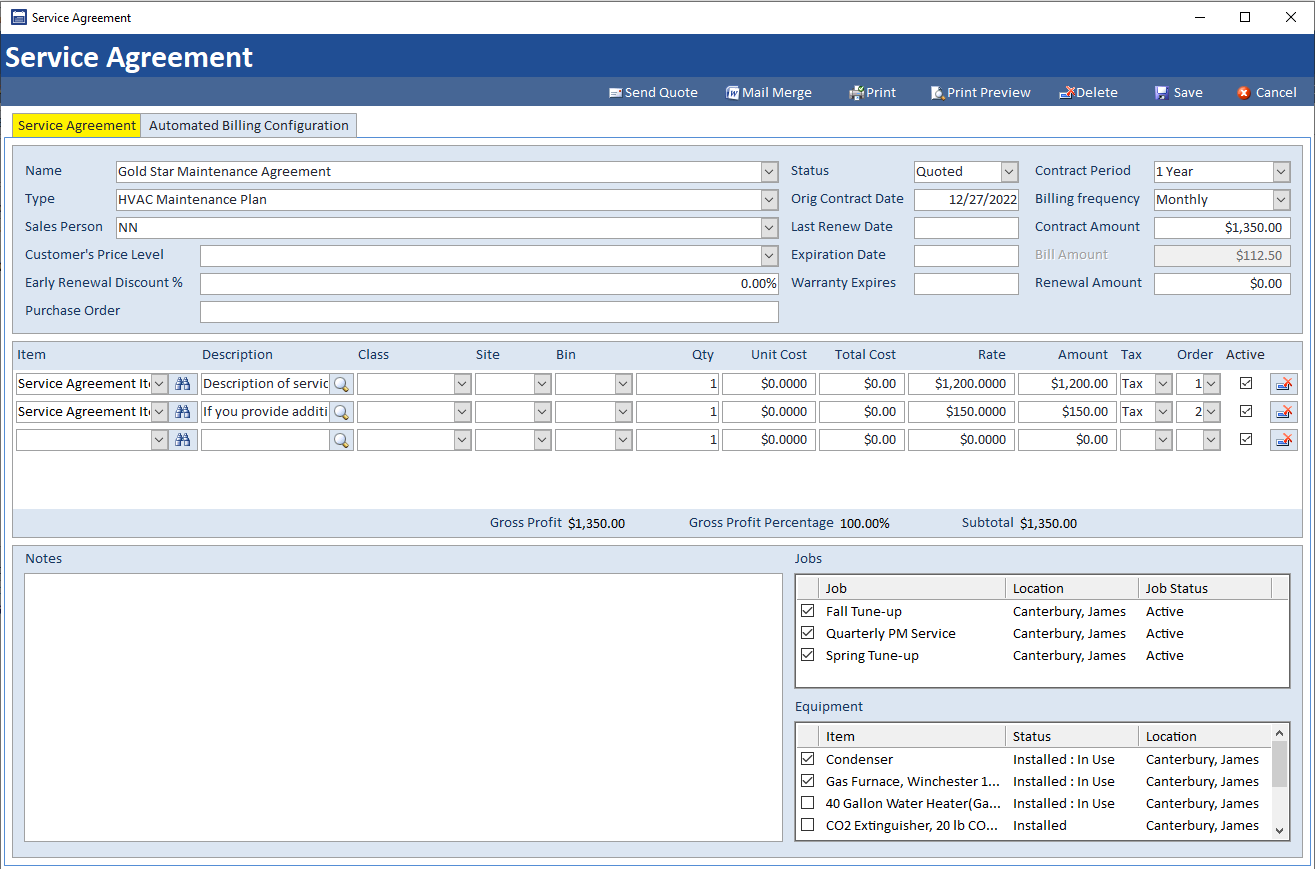
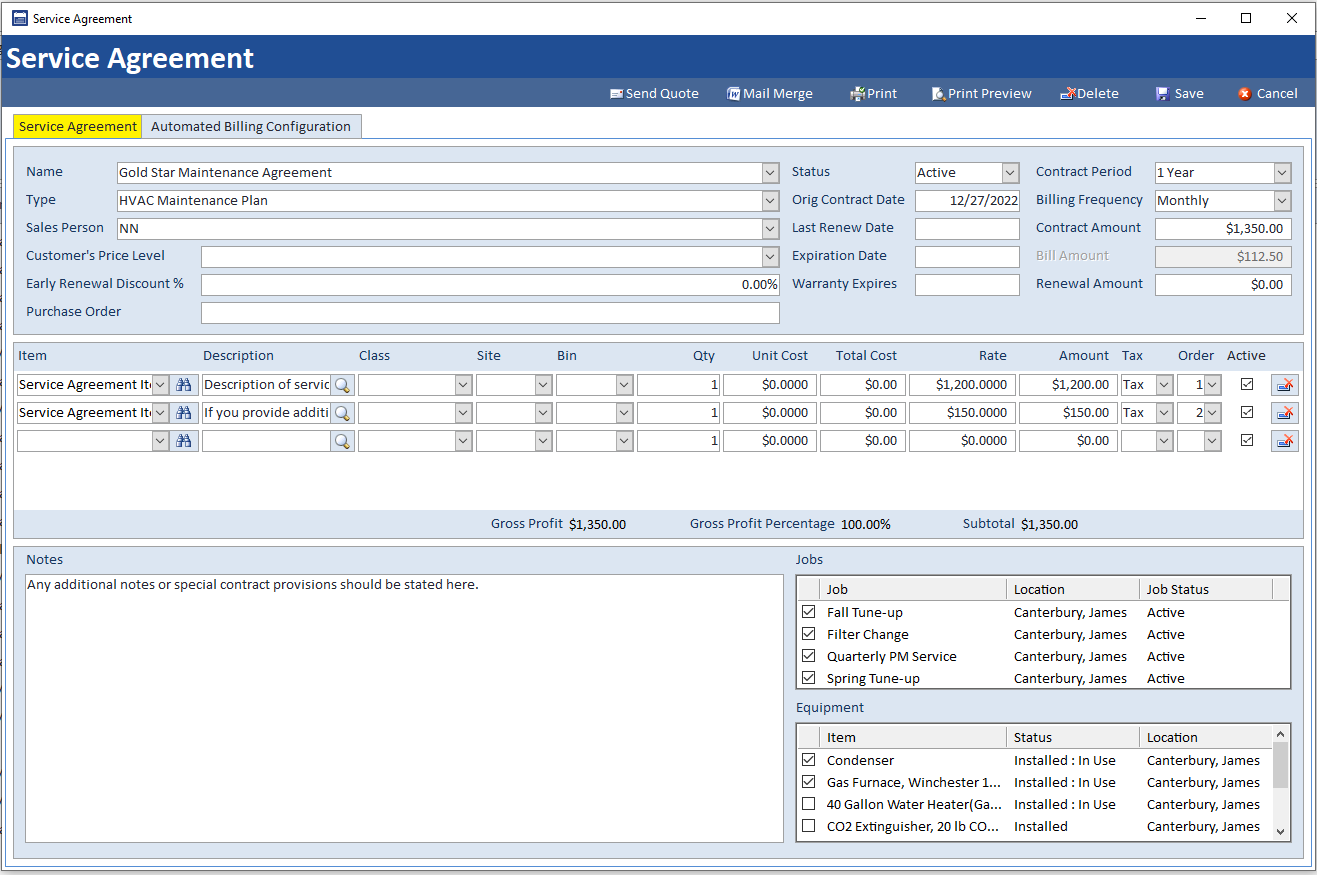
This section here is where the majority of the service agreement data entry will take place. When you need to input data about a new service agreement, you’ll want to add that information here. You and the rest of your staff should agree on what data goes in which field. We’re going to recommend uses for each field below but your company may collectively decide to repurpose some of these options.
Each service agreement can have a custom name if you’d like, but we recommend entering names in one of the following fashions:
- Contract Types: If you offer different packages (like a silver or gold star) you could name your agreements after the package.
- If you offer different types of agreements on a per-equipment basis, name the agreement after the equipment type.
The options you choose here are interchangeable with the service agreement “type” field listed below. An important note to make, when attaching a job to an agreement later, these two fields will be the only ones displayed to identify the customer’s different agreements.
Each service agreement can have a custom type if you’d like, but we recommend entering types in one of the following fashions:
- Contract Types: If you offer different packages (like a silver or gold star) you could create types named after the package.
- If you offer different types of agreements on a per-equipment basis, add the type of equipment serviced here.
The options you choose here are interchangeable with the service agreement “Name” field listed above. An important note to make, when attaching a job to an agreement later, these two fields will be the only ones displayed to identify the customer’s different agreements.
If one of your sales reps is responsible for the sale or maintenance of this contract you can select their name and initials here. Only those listed as a “Sales Rep” in QuickBooks will be displayed as an option here.
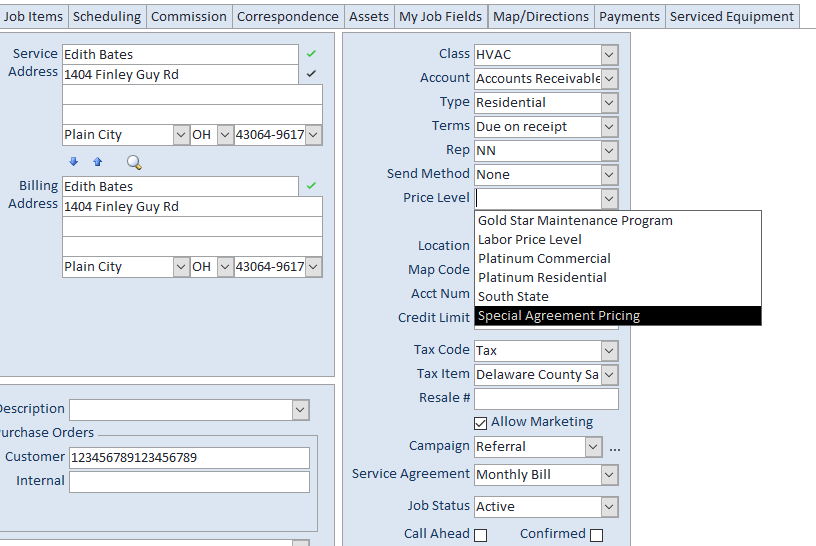
A price level is a percentage increase or decrease for either all items or a particular set of items, depending on what version of QuickBooks Desktop you have. You can add a price level to the agreement, which will modify the pricing on any job attached to this agreement. Price levels are not available for QuickBooks Online users at the time of this publishing.
You can write in a percentage that will be discounted if your customer renews their agreement before its expiration date. If you do not offer a discount, leave the percentage at 0.
If there are purchase orders in QuickBooks you’d like to reference when viewing this agreement you can write those PO number(s) in this field.
The status of this agreement can be active, canceled, or expired. By default, the status will be active. If you’d like to enter in previous contracts the customer might renew later, make sure to switch this status to canceled or expired.
If there are jobs attached to this service agreement when it is marked as canceled or expired, those jobs will automatically change to a “pending” status, which prevents them from being sent to iFleet.
This option will default to today’s date, but you can click inside the field to enter the date the customer originally entered this contract.
If the customer has had this agreement with you for more than one contract period, you can add the last date they renewed their contract with you here.
Adding an expiration date will cause the contract to expire if it is not renewed. If your contracts remain perpetually active and do not expire, you do not have to enter an expiration date here.
If there are jobs attached to this service agreement when it is marked as canceled or expired, those jobs will automatically change to a “pending” status, which prevents them from being sent to iFleet.
If your agreement covers a specific piece of equipment that is covered by a warranty, you can enter the warranty expiration date here.
The contract period defines the length of time between when the contract is created/renewed and when it will need to be renewed again. If your contracts do not expire, this field will work together with the “Billing Frequency” field below to determine the bill amount.
“Billing Frequency” determines how long a given billing cycle between invoices should be.
The contract amount is determined by the sum of all line items added in the section below. The next section of this guide will show you how to get the correct total value of the contract since you cannot edit this field directly.
Based on the contract period, billing frequency, and the sum of your line items, a bill amount will be generated.
If there is a fee associated with renewing the customer’s agreement aside from the billing amount sent on your billing frequency, enter that amount here.
Adding Line Items
Now it’s time to add pricing to the contract so we can get a quote sent out and start getting paid! The line items added to the contract should be representations of the services your customer receives as part of the contract. In other words, you should create service items to represent the services provided instead of listing what parts are included with the contract.
For a moment, assume that you’re setting up an annual contract that would be billed monthly. The customer has purchased a service contract for their furnace and an add-on service they opted for. Although that contract covers a quarterly filter change, emergency service calls, and some other minor repairs, but the contract should have only service items with the amount to be collected over the contract term.
In our example above, the contract will cost the customer $1200.00 over the course of the year, so I’ll add a “Service Agreement” line item with a total price of $1200.00. The add-on service also purchased will be listed on the contract with the total for the year.
Smart Service will take the grand total of the service agreement and use the contract period divided by the billing frequency to determine the billable amount per cycle. Since our contract above is a total of $1350.00 over the course of a year and the billing frequency is set to monthly, the customer will receive an invoice for $112.50 per month. If the contract period was changed to 2 years (total spread over 24 months), the bill would be $56.25 per month.
If your service agreements don’t carry a firm expiration date we recommend setting the contract period for one year and using the line items to reach the total you want per billing cycle.
Check Your Steps!
Before you continue sending the quote out to the customers, you should have a service agreement with a name, type, contract period, billing frequency, and at least one line item.
Sending the Quote to Your Customer
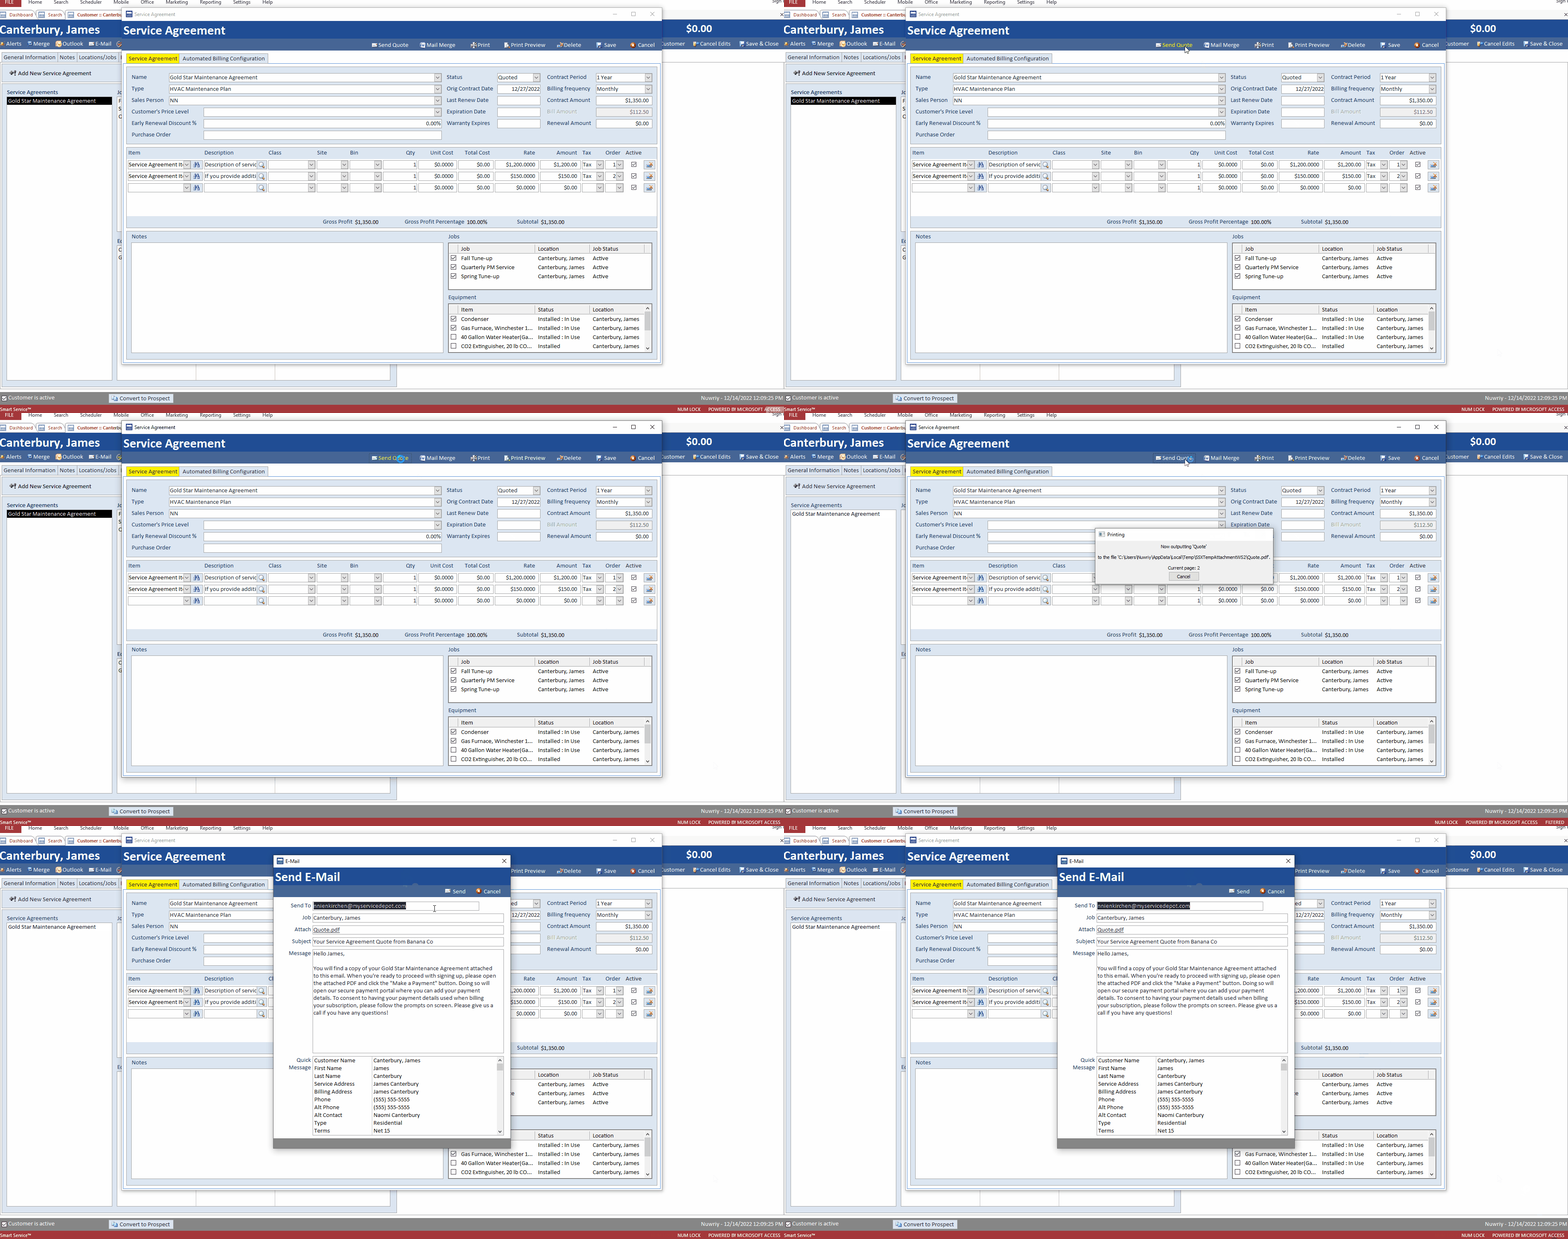
If you have a quote ready to go and your email template set up in Settings, it’s time to get that quote out to the customer! At the top of your service agreement, there’s a “Send Quote” button. If you changed the terminology “Quote” in settings then you might see a different button name on your screen. As shown below, clicking the “Send Quote” button will bring up your email template with the attached quote. By default, we use the parent record’s billing email address as the destination for the quote. You can change the destination address for this one particular quote email on the screen you’re looking at.
After clicking send, Smart Service will use the email account configured in Settings to dispatch the quote to your customer. You may wish to follow up with the customer in case they have questions about making an online payment and signing up for automated billing. The service agreement itself will retain a status of “Quoted” until the customer makes the payment, at which point it will change to a “Sold” status automatically.
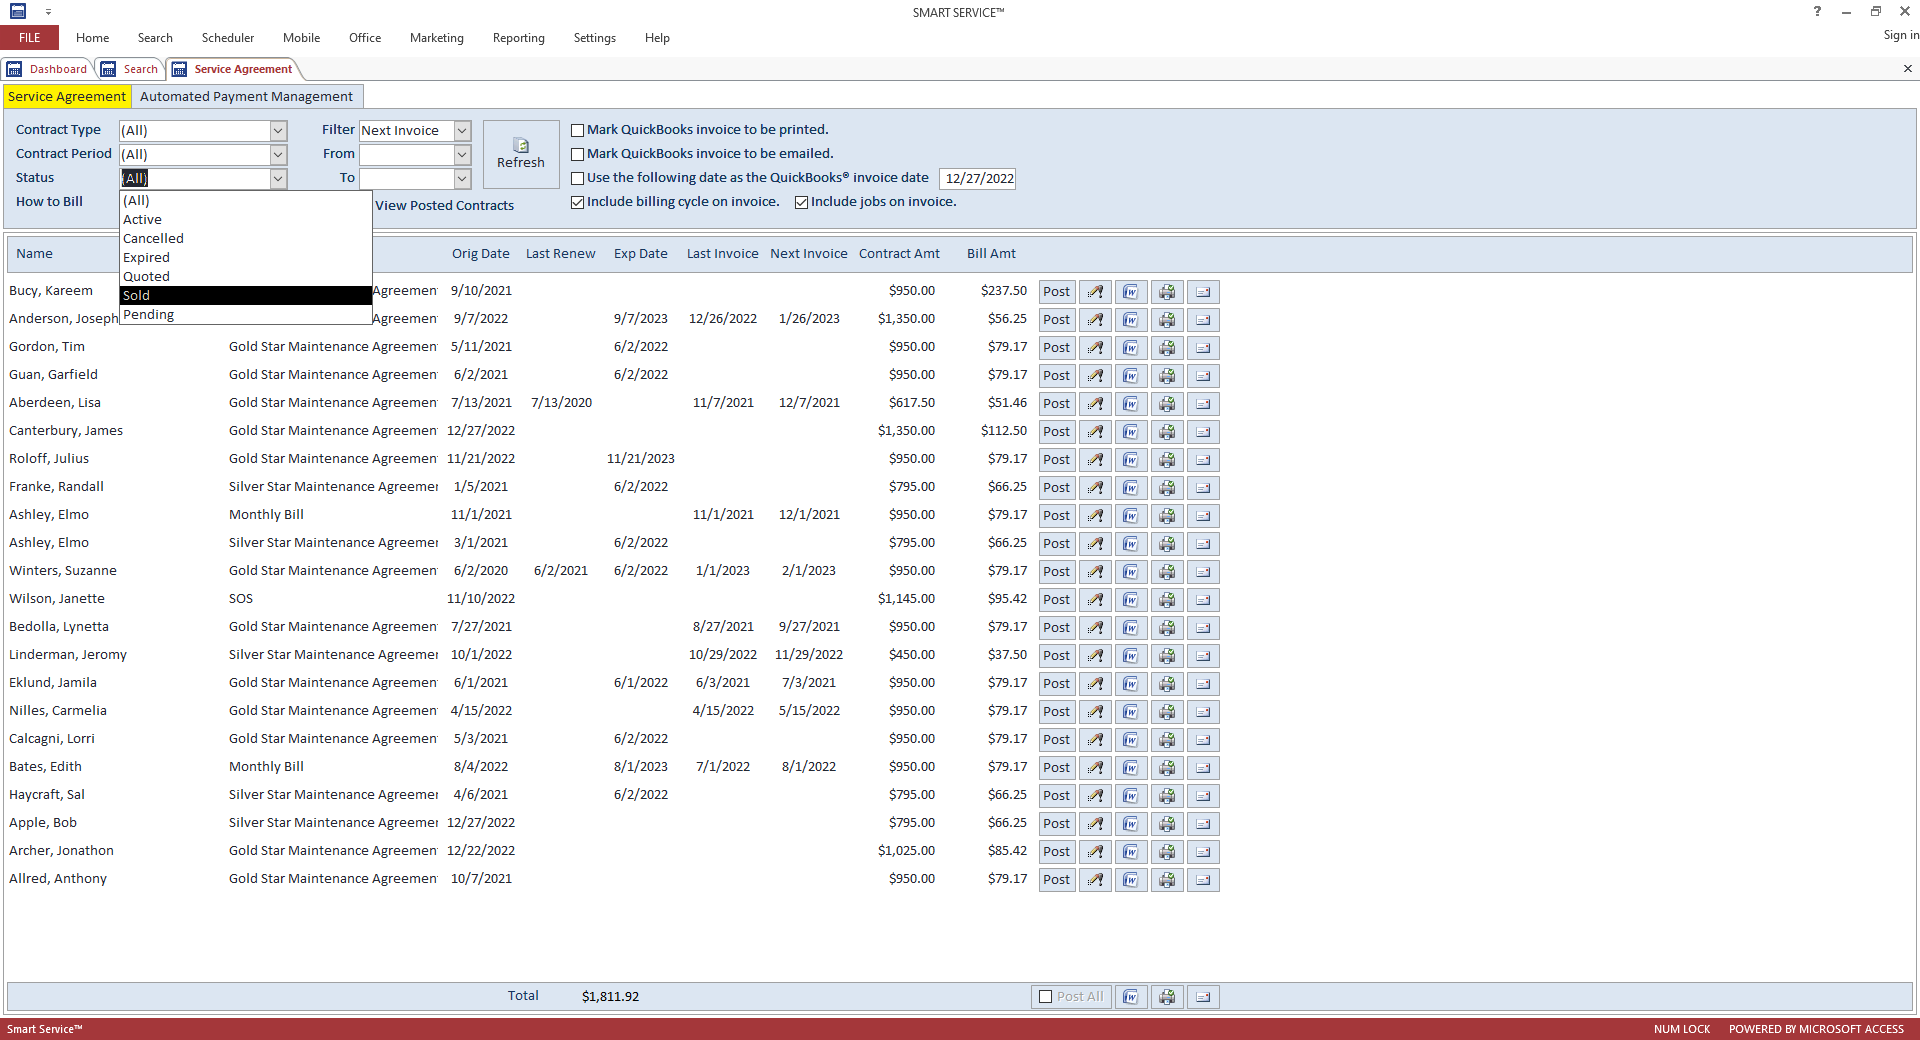
If you would like to revisit any of your contracts that haven’t changed from “Quoted” to “Sold” you can use the Service Agreement screen from the office to check up on them and resend the quotes.
You will also see a notification when a sold contract is ready for processing in the office screen next to the name “Service Agreements.”
Converting "Sold" Service Agreements
Once your customer makes payment on their service agreement, the service agreement’s status will automatically change from “Quoted” to “Sold” and a notification will be displayed on your office screen. From there, we’ll need to double-check their data entry, set up a billing pattern, and change the contract to an “Active” status so the system can automatically bill that contract.
You can use the traditional Service Agreement Module screen to find your quoted and sold contracts. Since they haven’t been formally set to automated billing yet you won’t be able to see them in the “Automated Billing Management” tab just yet.
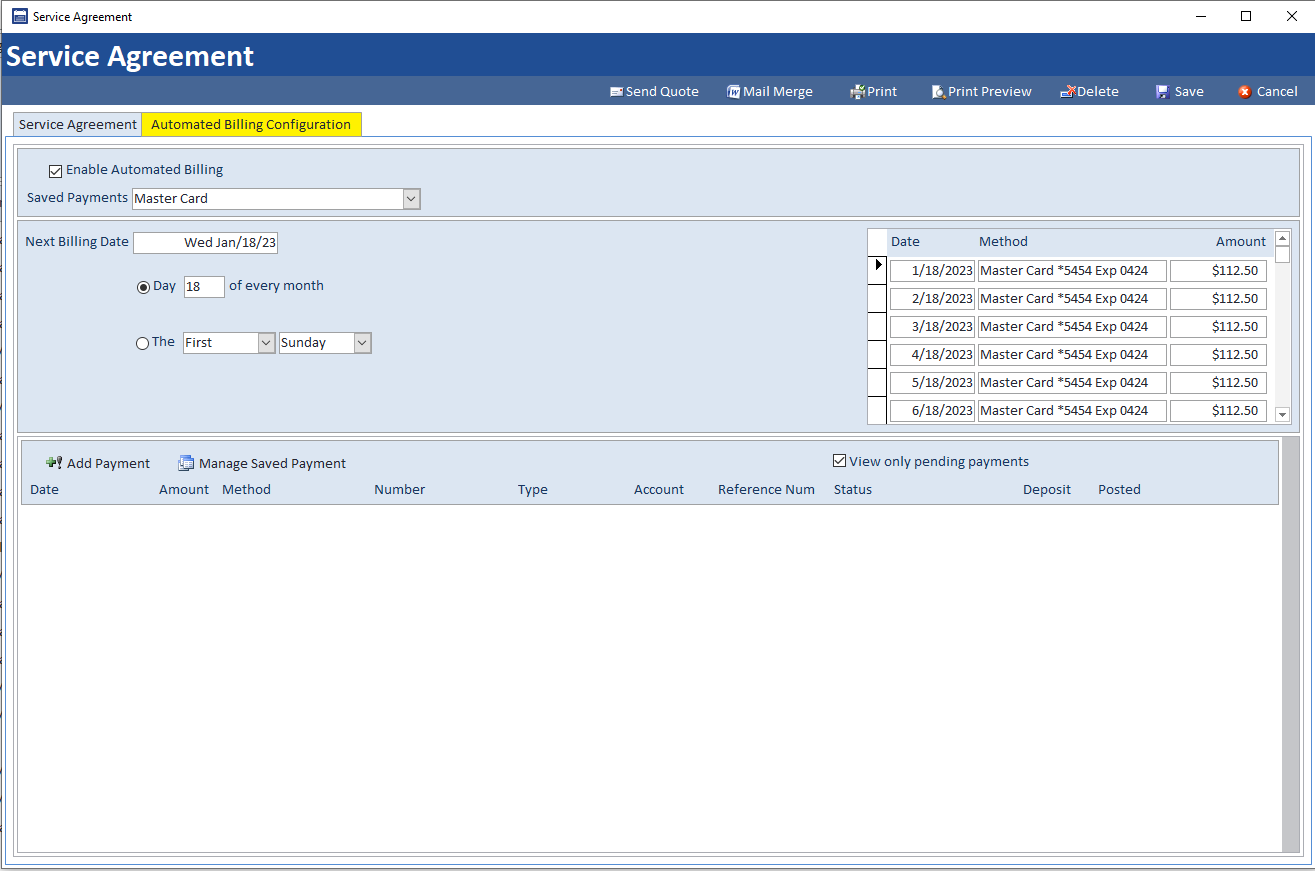
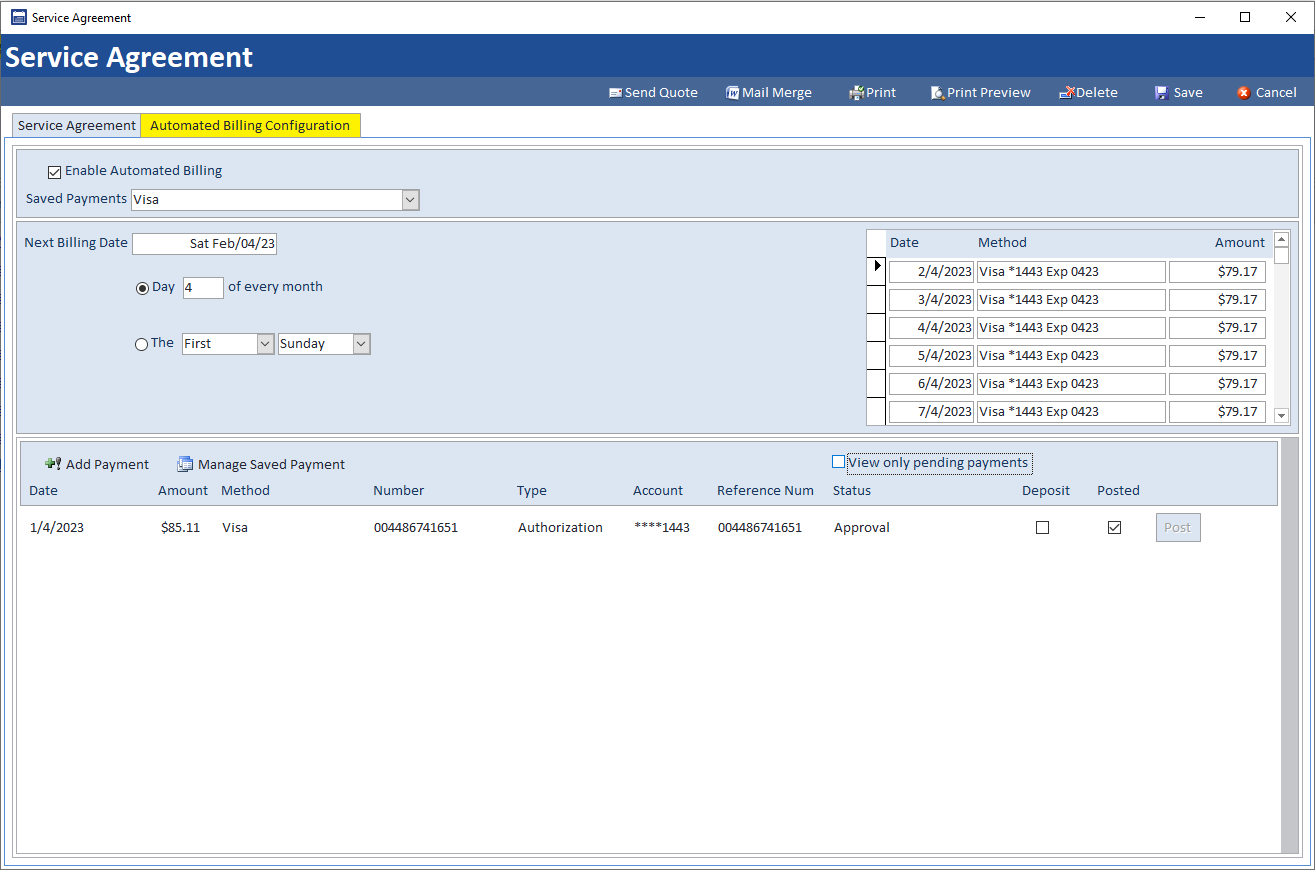
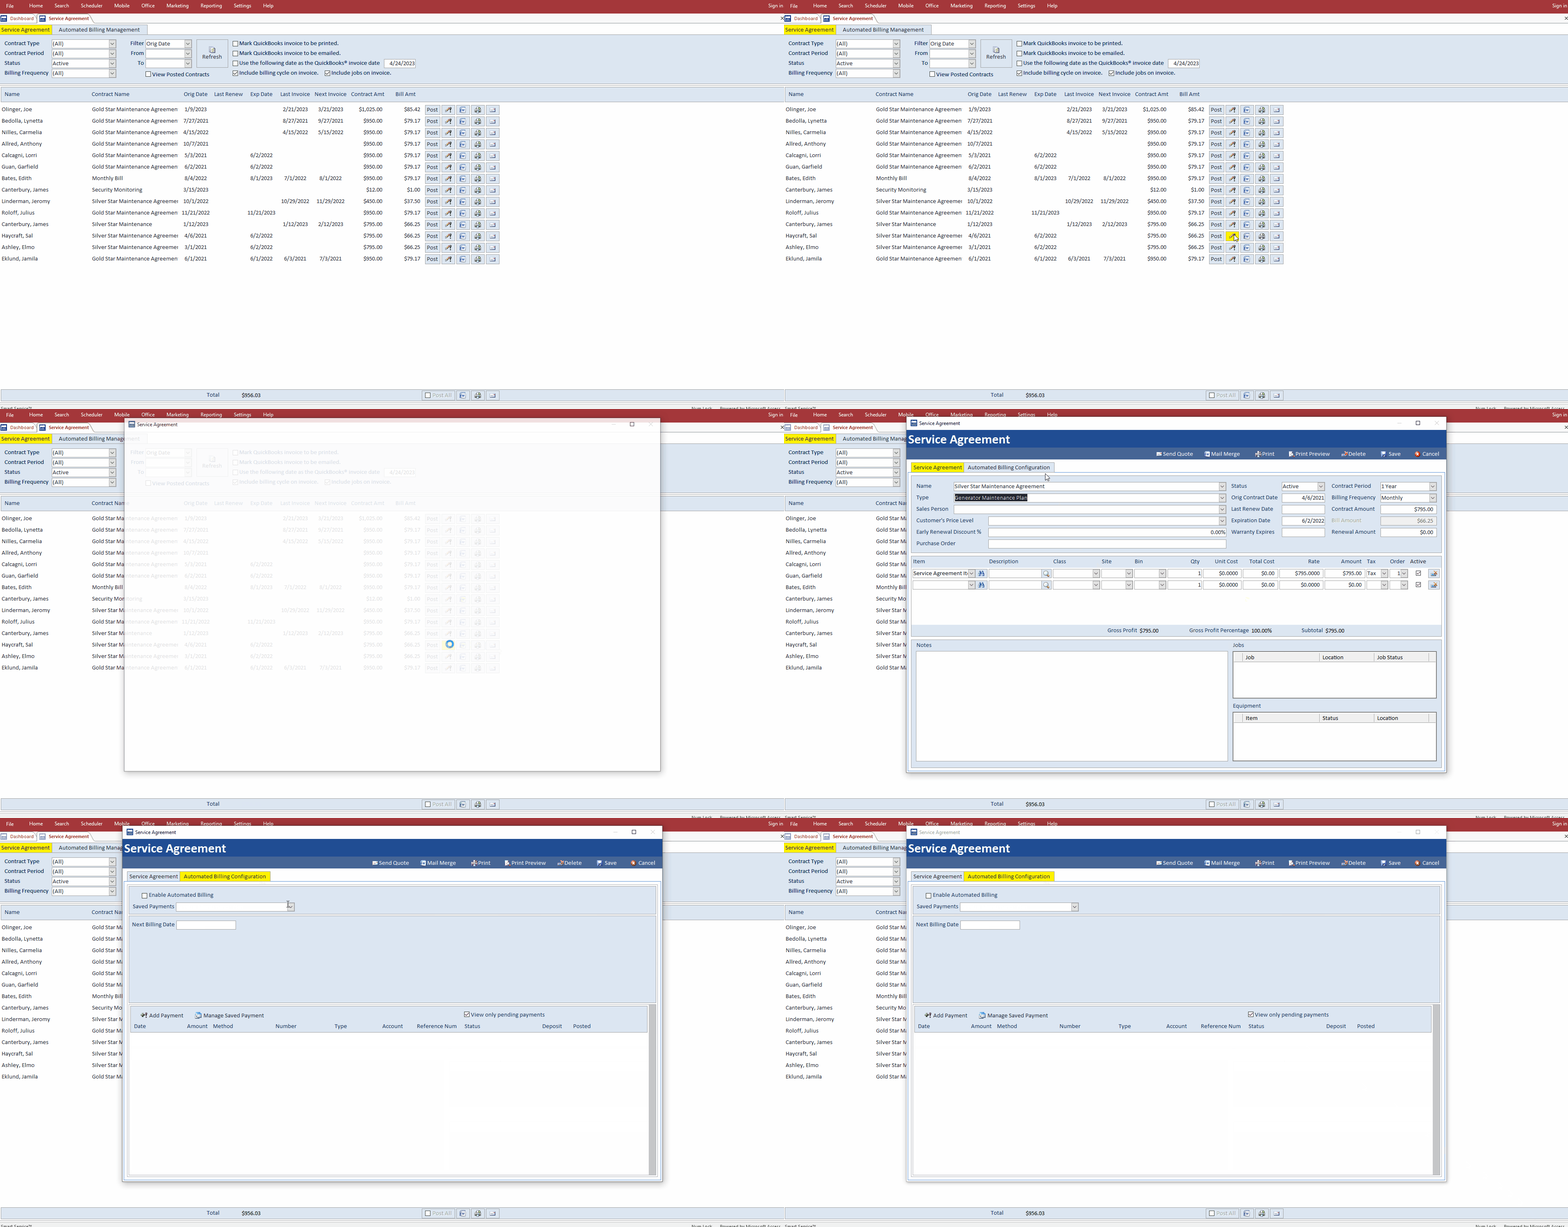
Once you’ve located your “Sold” contracts, we need to focus on finishing their contract setup and posting their initial payment and invoice. Use the edit tool (as shown below) to open the contract and complete the setup. The first step will be to change the contract from “Sold” to “Active” status. Afterward, click on the “Automated Billing Configuration” tab and make sure there’s a saved payment method listed and a billing schedule set up.
Since we already have the first payment, we should make the “Next Billing Date” field today, or at least soon. When the customer made payment initially that payment was secured and sent to your bank but Smart Service won’t push the invoice or payment to QuickBooks until that “Next Payment Date” is the current date or earlier.
On the second screen, “Automated Billing Configuration” we needed to select the saved payment method for the contract, ensure that “Enable Automated Billing” is checked, and that we have a “Next Payment Date” entered.
With your service agreements set up and ready to go, Smart Service will start checking for qualifying contracts to auto-bill when you open the program or visit the service agreements screen. Users with permission for automated payments will see this popup (shown below) which will trigger the automated payment system.
In order to process the service agreement you just activated, close and reopen the service agreement screen. You already took the customer’s initial payment so the resulting prompt on the screen won’t attempt to run a second payment. Instead, it will detect the unposted payment, create an invoice, and send both to QuickBooks.
When instructed, Smart Service will start looking for any contracts that are active, have “Enable Automated Billing” checked, and have a due date of today or earlier. It will then attempt to process a payment with the saved payment method on file.
When successful, we’ll secure the payment, post both an invoice and payment record in QuickBooks, and email the customer a receipt automatically. If you visit the “Automated Billing Configuration” tab of that service agreement again you can access their payment history and resend receipts when needed.
When the customer’s saved payment method fails, we’ll still create an invoice in QuickBooks for your records but we’ll then email the customer a copy of their contract so they can update their payment information via the HPP.
Check Your Steps!
Our next step is to set up services to fulfill your end of the contract. Make sure your customer's agreement is active, has a billing schedule, and has a saved payment method ready to go before we start reserving time for their maintenance visits.
Scheduling Work Orders for Service Agreements
Depending on your industry, you likely need to visit the customer periodically to uphold your end of the service agreement. The good news is you don’t have to change much about how you currently schedule these work orders when you’re using our Service Agreement Module! There will be some slight changes to your process to properly record these services, which we’ll cover in this section.
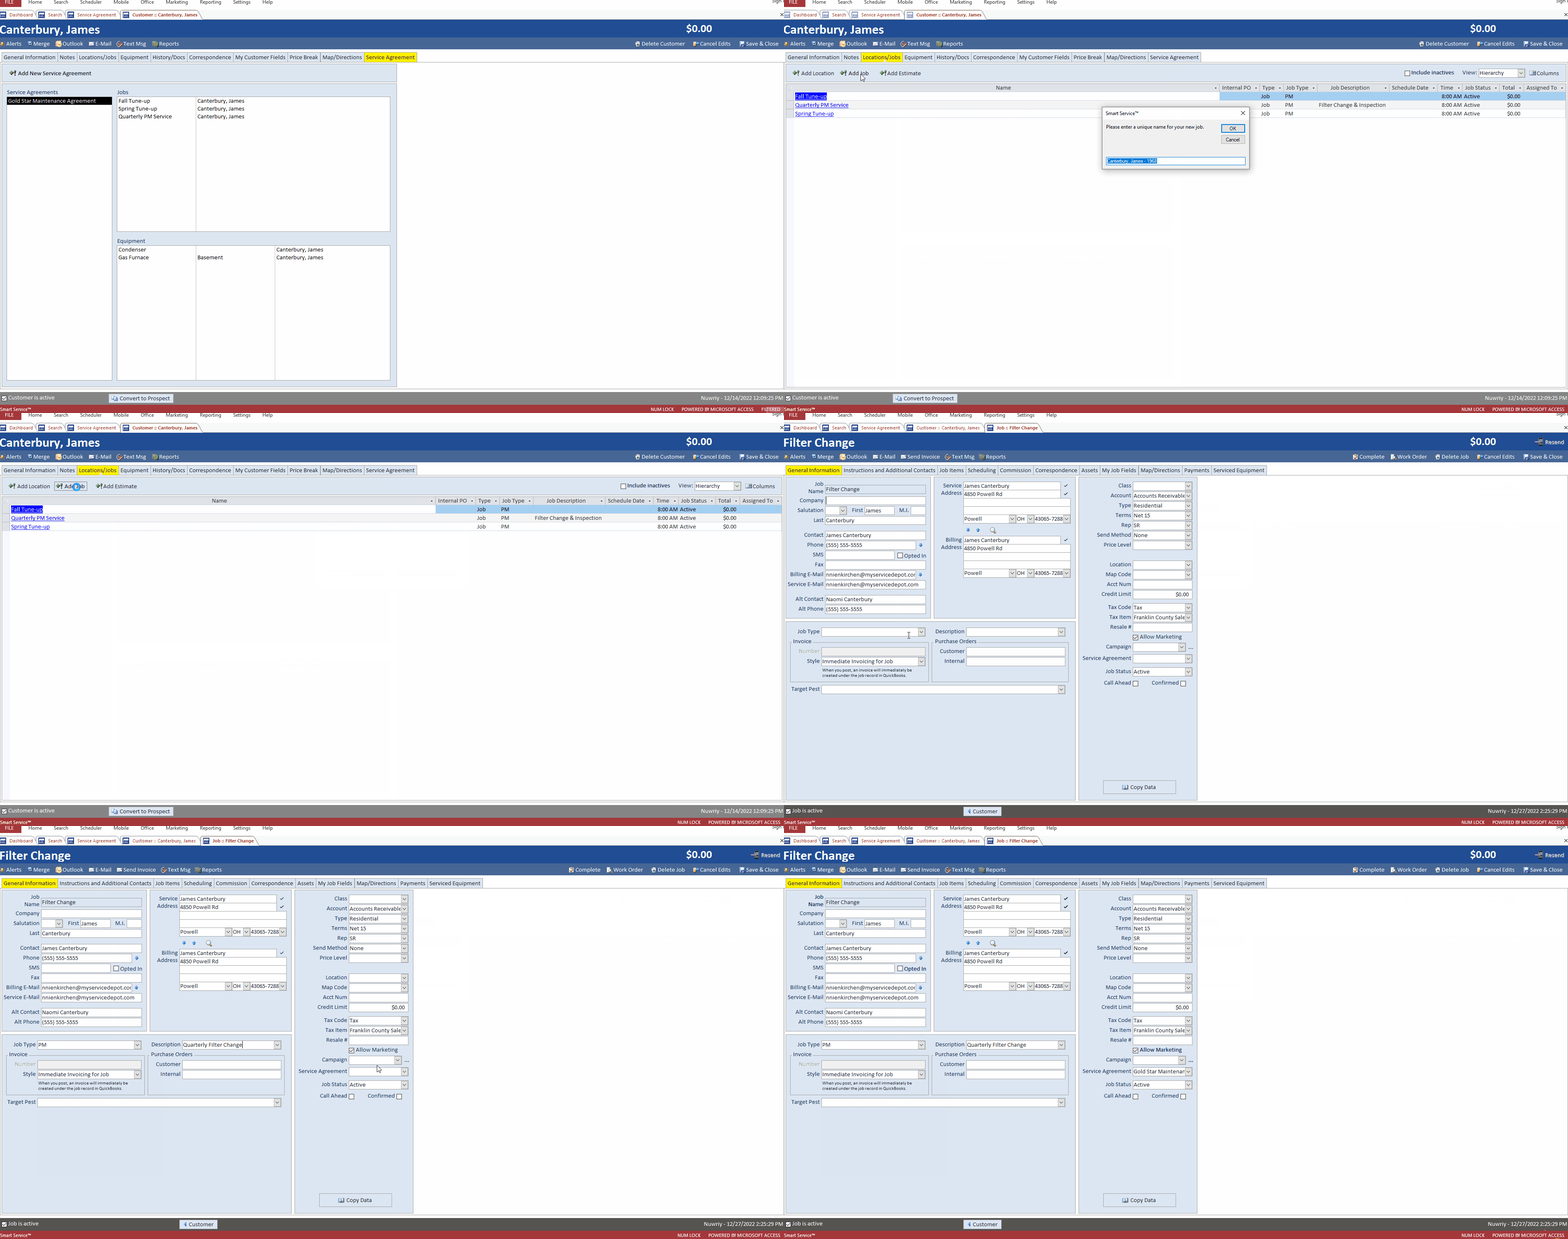
You will still create a work order in the usual fashion. This could be via the customer’s “Locations/Jobs” tab as shown above, or via the Scheduler. In the example above we have chosen to alter the work order’s name to reflect which service from the service agreement this work order will represent. You can do this too but you should still enter a job type and description as you would for any other work order entered into the system.
If you have some customers on service agreements and some who aren’t on service agreements, we recommend using two different job types for this. For example, you could have “preventive maintenance” (PM) and “preventive maintenance service agreement” (PMSA) as your job types.
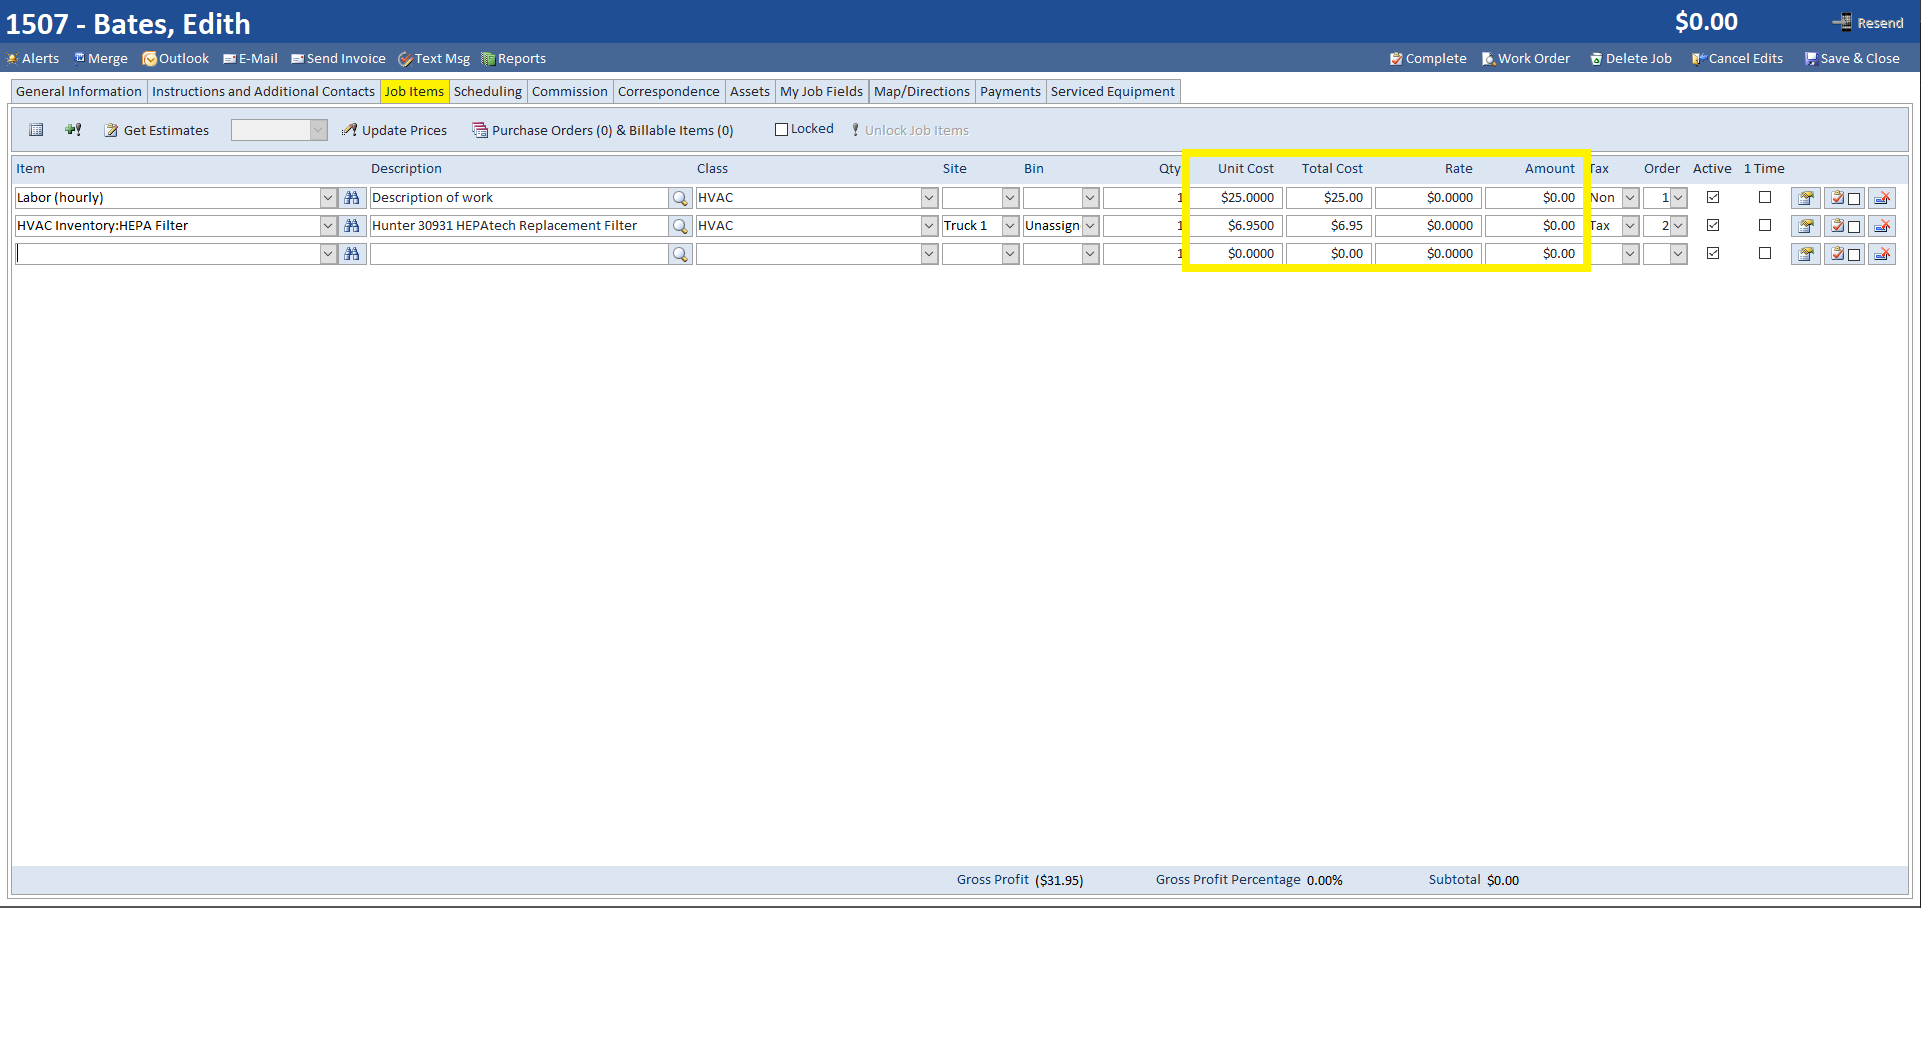
The most important part of this process will be getting the job items right. Remember that the automated billing features will take care of the changes and invoicing for the contract; the job is here to make sure cost is captured and that your staff knows what to install when they arrive on site.
Since this work order is attached to the service agreement, I want to capture the cost of my service agreement with this customer during the course of the agreement. I will assign the line items I need to remove from inventory and install on the customer’s site as well as my cost but not the amount to be charged to the customer.
If you are tracking inventory, this step will be crucial as the items should not be pulled from the inventory when those items are used and not when the contract is billed.
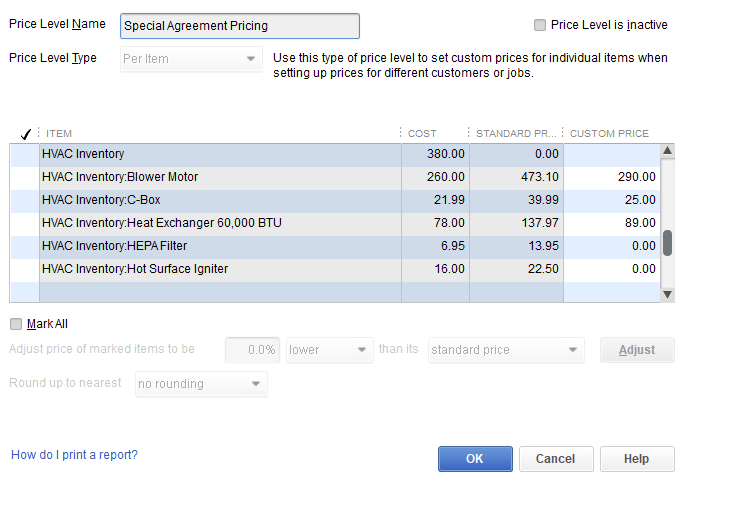
If your business uses QuickBooks Desktop you can automate this process a bit by using price levels. A price level will automatically adjust the pricing of line items on work orders and invoices from your standard pricing to whatever you set up with the price level.
Since I have QuickBooks Enterprise, I can set custom pricing per item and zero out the price on items covered by their service agreement.
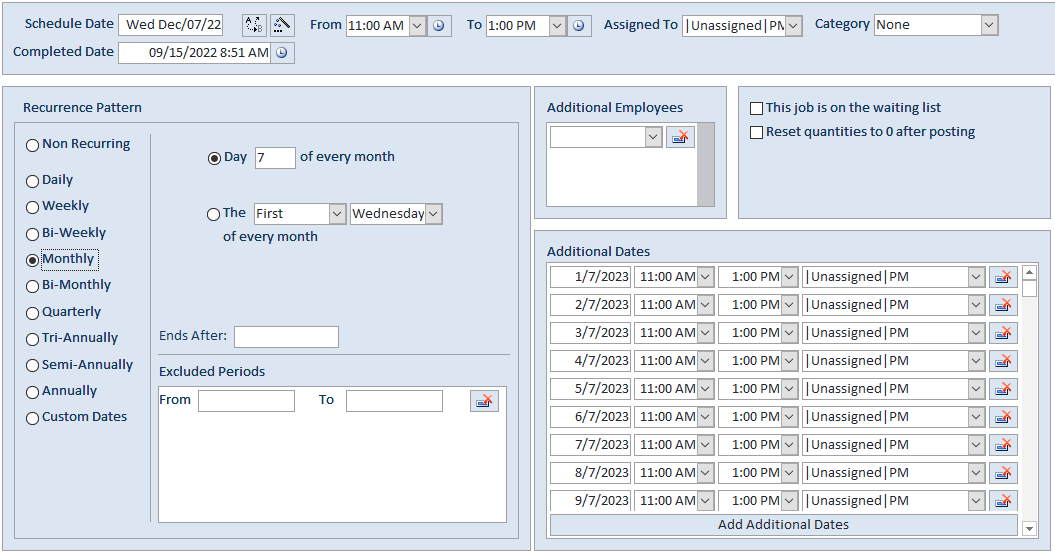
Lastly, we need to schedule these services so we can actually visit the customer and uphold our end of the agreement. Some of you will have recurring visits matching the example in this article and some will have one-time services included in the agreement that occurs at the request of the customer, or both!
If you have a one-time service, you can schedule the work order then save and close. If you need a recurring work order you can set up a series of visits using the recurring dates feature, as shown below.
Smart Service has options to help with scheduling recurring services. Since there are a lot of ways you might schedule these recurring work orders, we’ve created a webinar that you can watch here to show you all the tools at your disposal.
Your office and field team should treat these PMSA jobs like any other job as far as scheduling, reviewing, and posting goes. When you push a work order with a $0.00 total to QuickBooks, it will show up as a paid invoice. This means that we’ll still have a history record for the visit and an invoice that tracks time and costs in QuickBooks for reporting later.
Since you used a unique job type (like PMSA) it should be easy to filter these work orders in the Post Work Orders screen or spot them to make sure they’re set to a $0.00 amount if all services rendered were covered by the contract.
Managing Failed Payments
Occasionally, a customer’s payment method on file will decline for a number of reasons. When this occurs, Smart Service will automatically resend a copy of the quote and your email template so the customer can enter new payment information. While this is helpful, you may also wish to find these at-risk contracts and reach out to the customer.
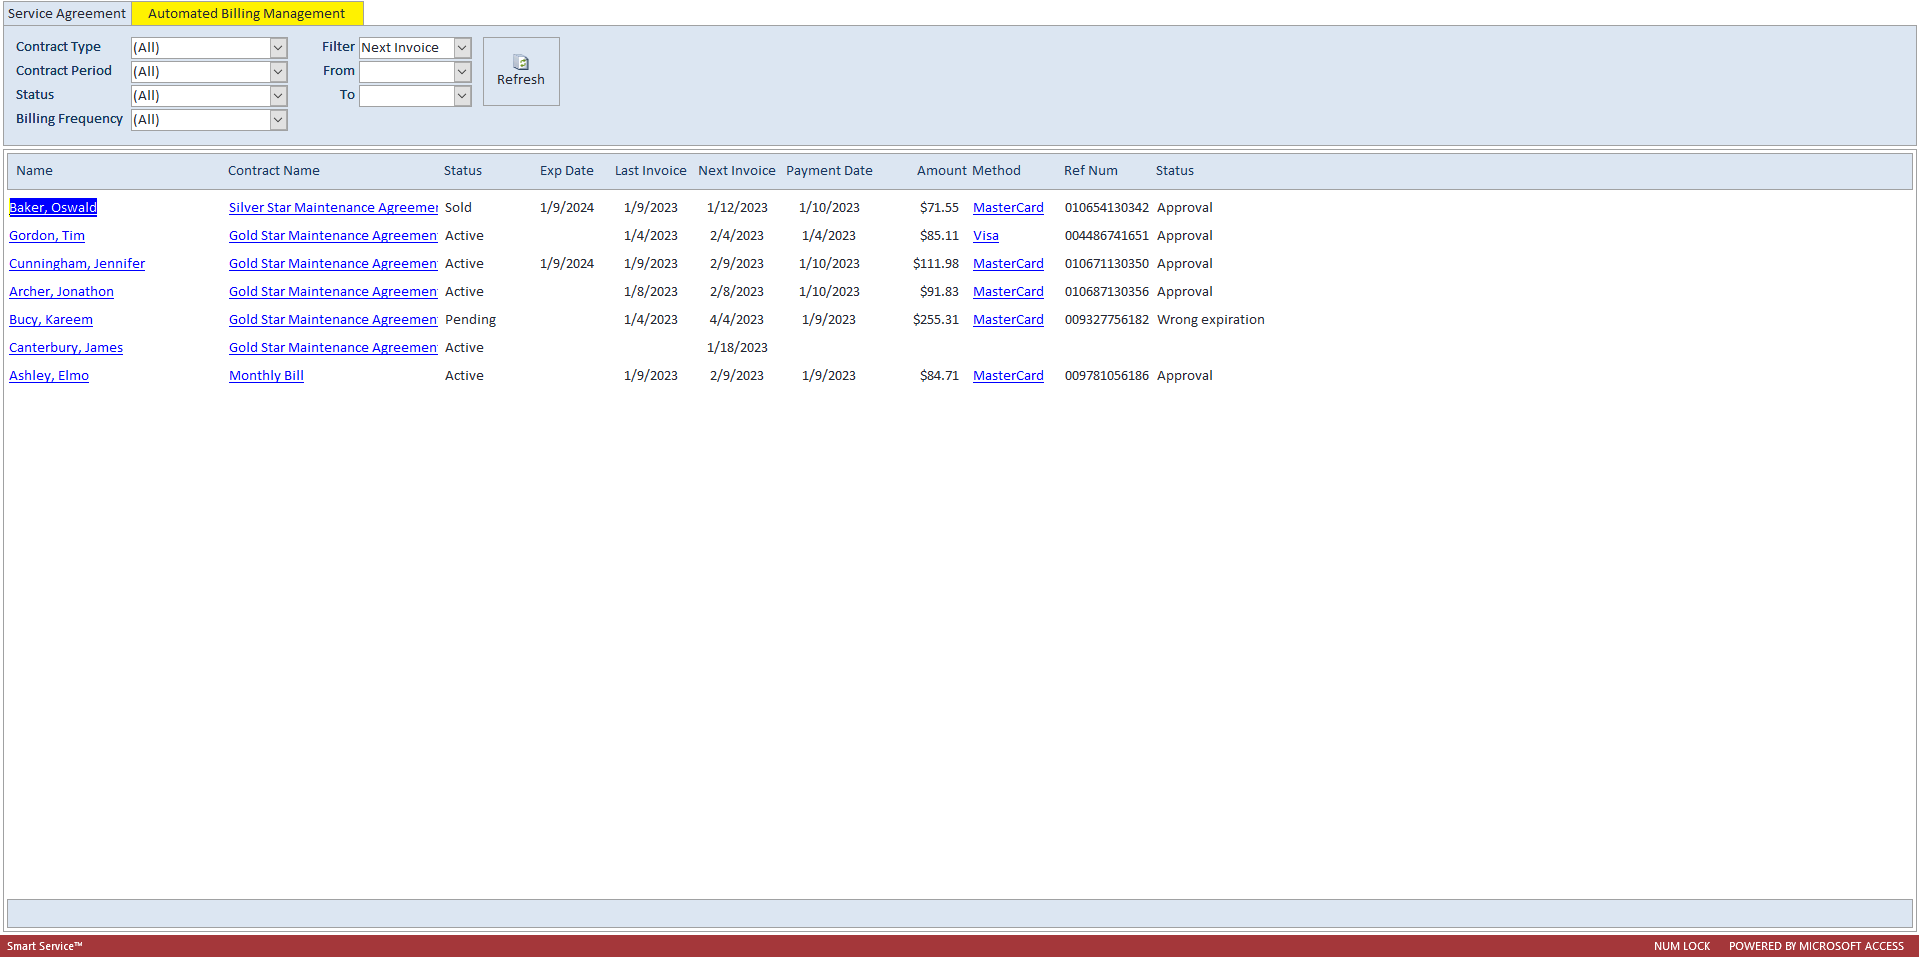
This is where the Automated Payment Management screen (shown below) comes in! You can access this screen by visiting “Service Agreements” in the office screen and tabbing over to “Automated Billing Management.”
From this screen, you have full visibility of your automated contracts, their status, and the status of their last payment. You can use the filters at the top to find any at-risk accounts and make modifications.
If your make contact with a customer who would like to use a different payment method for this billing cycle but not keep that payment method on file, they could either pay the quote that was automatically emailed to them and choose to NOT save the card on file or, you could open their service agreement and manually take a one-time payment.
Both of those options would result in the contract failing to process on the next billing cycle and requiring either a new payment method on file or another manual adjustment.
If a customer would like to be taken off automated billing entirely and your company’s terms and conditions allow this (or your country’s laws require an opt-out option), you can uncheck the “Enable Automated Billing” option in the customer’s service agreement to turn this automated contract back into a standard contract.
Clicking here will open the customer record and facilitate changes to their account information primarily for the purpose of updating the customer’s billing email address on file. Remember, the customer’s billing email address is where receipts and renewal quotes will be sent by the automated billing system.
You can open the customer’s service agreement by clicking here. If you’re looking to make modifications to the customer’s payment method, take a manual payment, or take an agreement off of automated billing, click here.
The current status of the service agreement is listed here. If you have any “pending” contracts, please see the note about pending service agreements below.
Here you can see the date of the last invoice automatically processed for the contract. If this field is blank, then you have yet to process an invoice for this contract.
This date is determined by the billing cycle and recurrence date pattern entered into the service agreement. If you don’t see a date here, open the contract and make sure the billing dates are set up properly or the system won’t know when to attempt a transaction next for this contract.
This shows the last date a payment was attempted for this service agreement. When using the automated billing system, this should match the last invoice date unless a payment was entered manually on another date.
This is the amount to be billed per billing cycle and is determined by the total of the line items entered into the contract and the billing frequency over the contract term.
This is the payment method used in the last transaction for this agreement. By clicking here you’ll see the option for voiding or refunding the payment.
When a transaction is processed, CardPointe automatically shares this transaction number with the customer and with you so you have a way to identify the payment either party is requesting information about.
This is the status of the last payment. CardPointe has a number of statuses to indicate failure to make a payment. If this column says “Approval”, then the payment was secured successfully.
A Note on Pending Service Agreements
If you have elected to use the setting that changes a service agreement to a “pending” status upon failure to secure payment, keep an eye out for this status. When a contract is set to pending, all of the work orders attached to the contract are pending and thus are not sent to iFleet. Once the payment issue has been resolved and you have set the contract status back to active, the attached work orders will, in turn, be set back to active.
However, this may create a situation where the customer’s bill was due on the first of the month and their service visit was scheduled for the second of the month, and since the contract was pending due to payment failure and not resolved until the third, the service scheduled for the second was not sent to iFleet until the third.
When a contract goes into “pending” status for several days, check the scheduled dates of the attached work orders when the payment issue is resolved to make sure you have their services scheduled properly.
Daily Workflow in Review
There’s a lot that goes into managing an automated billing system that also controls your scheduling and dispatching, so let’s review what we need to do on a daily basis from this point forward. Below is a list of duties you should assign users to take care of daily to make sure that your business is staying on top of these service agreements. Once you have selected a user (or users) to receive the profile permissions for automated billing, decide who will handle these items:
- Contracts initiated by the field team, who will be watching for those and entering them into the system as they come back from iFleet?
- Who is responsible for sending out the initial quotes/signups for the contracts to the customers?
- Who will configure the sold contracts and make them active?
- Who will run the auto-bill prompt daily and check on contracts with failed payments?
- If you have expiration dates, who is responsible for renewals?
Your business is unique and may have other concerns/responsibilities that need to be assigned to staff to ensure a smooth workflow. We recommend meeting with your staff to discuss your objectives and reaching out to one of our trainers to create a game plan!
Converting Service Agreements to Automated Service Agreements
Already familiar with our service agreements but new to automated service agreements? No problem! You can switch your current service agreements over to automated service agreements easily.
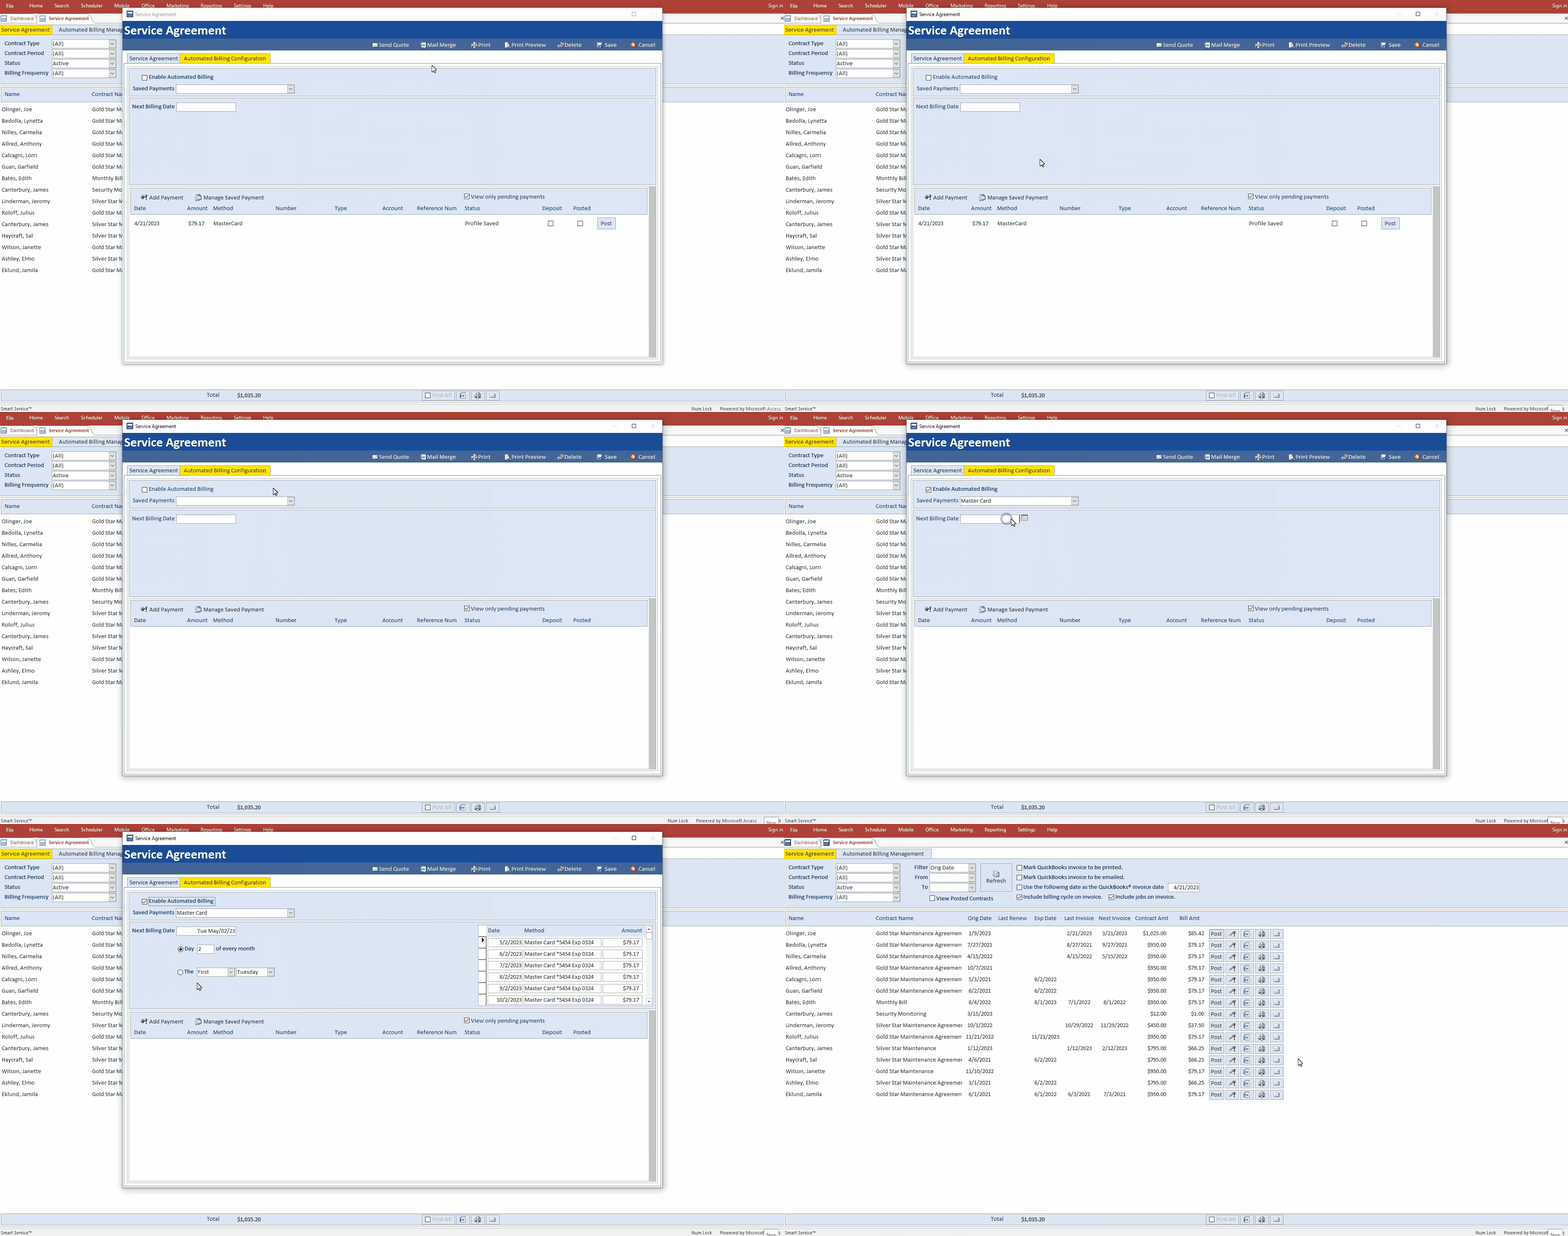
The most important thing to consider is whether or not you’ll need to reach out to the customer during this process. If you already have a payment method on file for them in Smart Service and their consent to use that method for their service agreement, you can make the change to automated billing without having to bother the customer.
For the smoothest transition, we recommend you don’t make these adjustments close to the end of the billing cycle. Once the changes are made to the contract, the automated billing feature will pick them up and bill them as intended. No need to add increased stress to your billing team by timing this with the upcoming billing cycle!
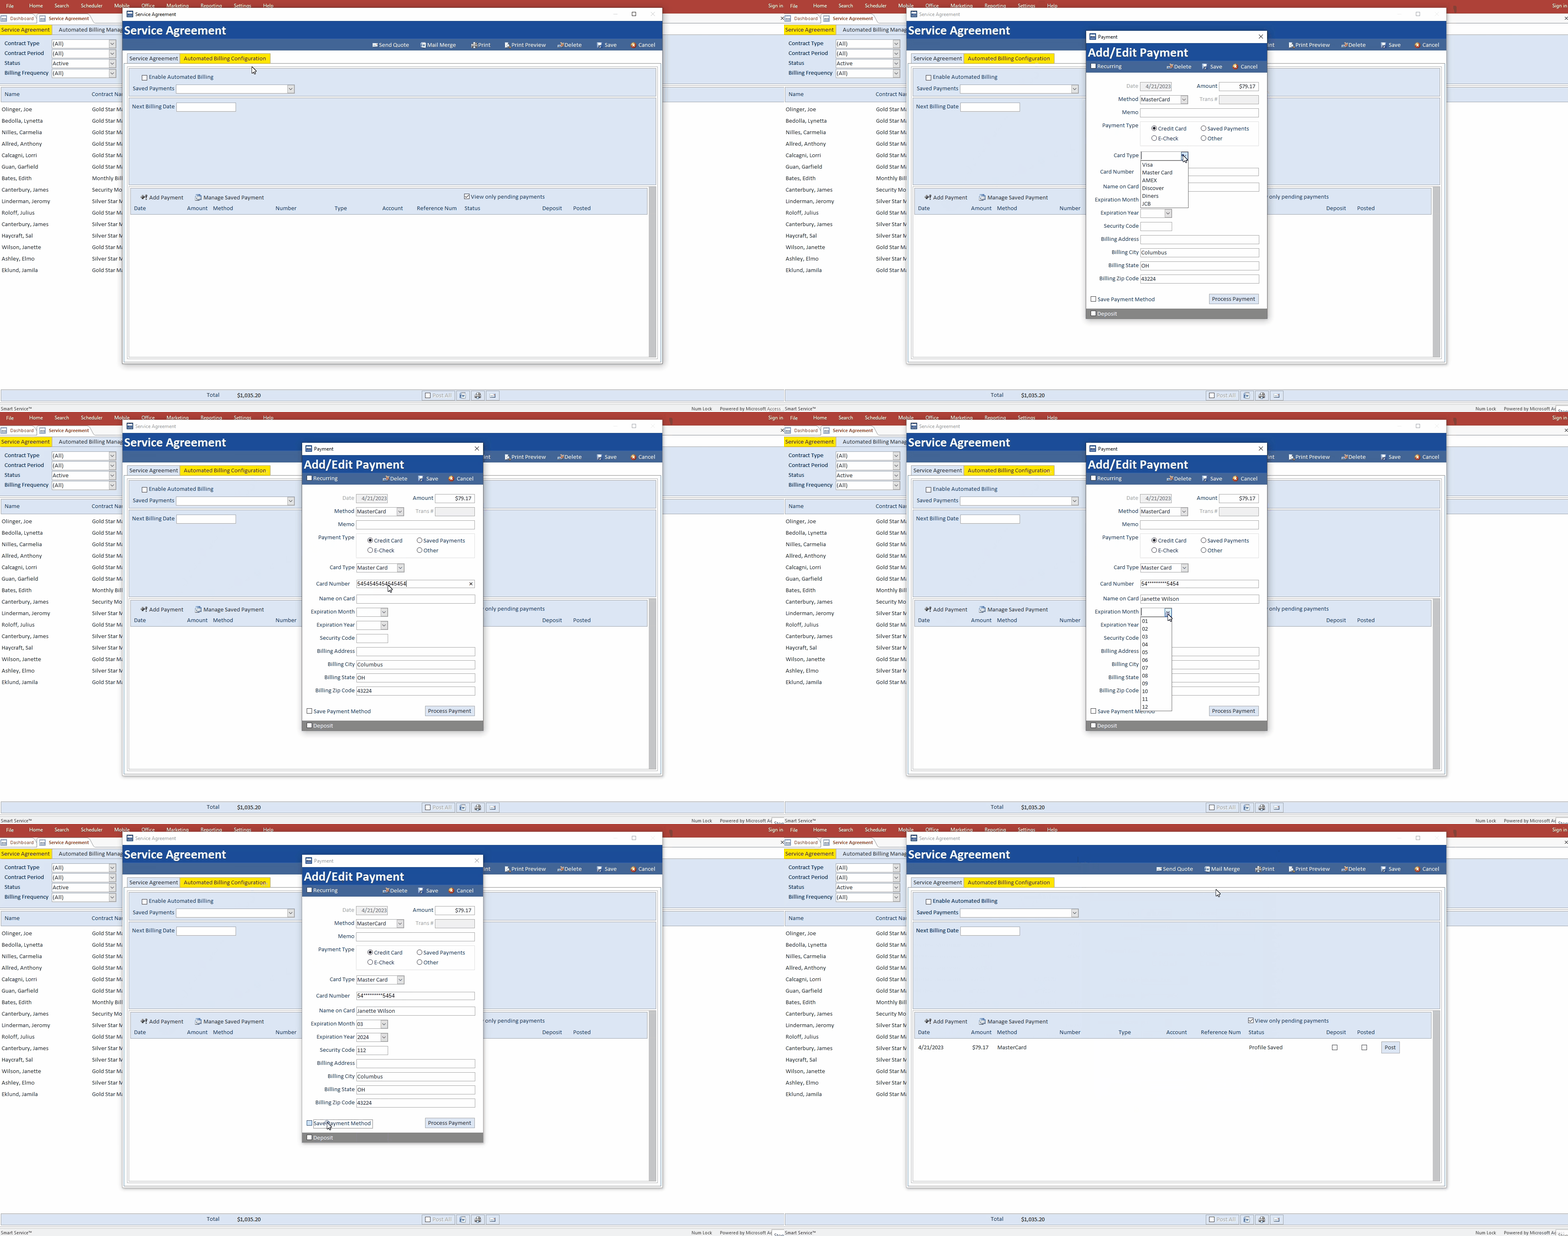
Our next step will be to create a saved payment profile for the customer using the account information you already have available. You can use the “Add Payment” feature to create a saved payment profile without processing funds.
Once you have saved the payment profile, you can click on the payment again to delete it. This will not delete the saved profile information of the customer. From there, we can finish converting this contract.
Smart Service will need to update this window to display the new information. In the GIF below, notice that we clicked the tab header again to refresh the page and continue to the next step.
Using these above steps, your manual service agreement has been converted to an automated service agreement! If you have any questions about the above process, please reach out to us by calling (888) 518-0818 and dialing option 2 for the support team.

