Texting Customers with Smart Service

We offer a text messaging feature as an add-on to the base program, which is available for purchase. Smart Service will provide a number local to your area for sending messages, and texts can be bought in prepaid bundles.

The purpose of this feature is to allow businesses to send text reminders of upcoming visits, reply to messages sent by customers, and notify the customer when the iFleet user is on the way to them. 

How to Activate Text Messaging

Versions of Smart Service 102 and higher support the text messaging add-on. To activate your text messaging center, please call the support desk at (888) 518-0818. We do not charge to activate the feature, but we do need to purchase a local number for you to use. 

Your company will then have the ability to purchase text message segments through the “Text Messaging” window within Smart Service itself at the top left-hand corner of the window.

Clicking the “Purchase Messages” option will open your browser and guide you through our purchase portal. The message segments are sold in bundles of 2,500, 10,000, 25,000, and 100,000.  Please review our next section below to understand the specifics of how we bill messages before using our text messaging features.

How We Bill Text Messages

All text messages sent and received by Smart Service are processed by a third party company called Twilio. While you use Smart Service to compose and read text messages, Twilio is responsible for processing your messages. With that in mind, we have provided a list of Twilio’s guidelines for sending and receiving messages, as well as how you will be billed for the messages.

To summarize the rules and pricing of text messages:

  1. Both messages sent and messages received will decrease your texting balance.
  2. You cannot send or receive a picture message.
  3. No message can exceed 1600 characters.
  4. Messages under 160 characters cost approximately a penny.*
  5. Messages (which contain alphanumeric characters only) exceeding 160 characters will be sent in 153 character segments, each segment costing approximately a penny.*
  6. Messages (containing special characters like emojis) exceeding 70 characters will be broken into 67 character segments, each segment costing approximately a penny.*

*Depending on which message segment bundle is purchased, the individual rate per message segment sent may vary. For example, purchasing 2,500 message segments at $37.50 results in message segments costing $0.015 each.

For those looking for the finer detail on what characters cause messages to cost more, please see the charts below. Twilio’s rules and regulations regarding GSM-7 Character Sets and USC-2 Character Sets can be found at these links. You can also use this interactive tool from Twilio to estimate the number of segments (and thus, the cost) of your message.

Messages containing only GSM-7 characters will be split into 153 character message segments if the total character count of the message contains more than 160 characters. Messages containing GSM-7 characters with a total message character limit of 160 or less will be sent as one message segment.

  • LF is a Line Feed control.
  • CR is a Carriage Return control, or filler.
  • ESC is an Escape control.
  • SP is a Space character.

GSM-7 Character Set Extensions which must be escaped by the text messaging application will count as two characters to display properly but are still considered to be in the GSM-7 Character Set.

  • FF is a Page Break control. If not recognized, it shall be treated like LF.
  • CR2 is a control character. No language specific character shall be encoded at this position.
  • SS2 is a second Single Shift Escape control reserved for future extensions.

A message containing any UCS-2 characters will cause text messages to be divided into 67 character message segments, which would cause the price of the message overall to increase. In day-to-day usage, this would include all Emojis. You can use this tool to determine whether or not your message counts as GSM-7 characters, of if UCS-2 must be used to send or receive the message.

Texting Customers & Compliance

Before sending text communications to your customers, make sure you and your users understand the rules and regulations governing business text messaging. How you obtain customer consent — and what level of consent is required for each message type — is a legal requirement, not just a best practice.

Before texting your customers, please read and understand the CAN-SPAM Act. If your company operates in or provides service to Canada, also review Canada’s Anti-Spam Law (CASL). Smart Service requires customers to be explicitly opted in before any SMS is sent to them, and customers can unsubscribe at any time. Smart Service takes no responsibility for who you opt in for text messaging.

How Opt-In Consent Works in Version 127.4

Starting in version 127.4, Smart Service includes a new SMS opt-in confirmation screen that staff must acknowledge before SMS can be enabled for any customer. This screen provides a visual example of the opt-in workflow along with the required disclosure language.

The confirmation screen and its disclosure language are also available at any time at: https://www.myalert.biz/policies?id=appoptin

The recommended opt-in workflow is as follows:

1. Read the Consent Script to the Customer 

During the initial service scheduling call, staff read the following script before enabling SMS notifications:

“Would you like to receive text message reminders and updates about your appointments with [Your Company Name]? Message and data rates may apply. You can opt out at any time by replying STOP.”

2. Acknowledge the Opt-in Confirmation Screen

After the customer agrees, the staff member must acknowledge the new opt-in confirmation screen in Smart Service. This screen displays the disclosure language and a visual example of the opt-in workflow before SMS can be enabled.

SMS Confirmation

The SMS Verbal / Written Consent Confirmation screen — staff must click Confirm before SMS can be enabled for the customer.

3. Check the Consent Box

Once the script has been read in full and the customer has agreed, staff confirm consent by checking the opt-in box in the customer’s record. Smart Service records the staff member’s name, the customer, and the date and time consent was given.

4. SMS is Now Enabled for that Customer

Consent remains valid for all future service-related messages unless the customer opts out by replying STOP. Messages may include appointment reminders, technician arrival updates, and information exchanges such as gate codes. Message frequency will vary based on how often the customer schedules service. Receiving SMS is always optional and is never required for service.

SMS is only enabled after the confirmation screen is acknowledged and the consent box is checked. Do not skip this step. The software records each consent action, and this audit trail is required for A2P 10DLC compliance.


A2P 10DLC Registration & Compliance

All businesses using Smart Service’s SMS features must complete an A2P 10DLC Business Profile Registration. When your company purchases the SMS add-on, you will be prompted to complete this registration automatically — and you will continue to see this prompt upon login until it is finished.

What's New: Automated Campaign Registration

Starting with version 127.4, when you complete the Business Profile Registration form, the Smart Service backend server automatically submits your Twilio campaign registration on your behalf — including all required campaign properties, message samples, and consent documentation. You no longer need to configure these separately.

The new Business Profile Registration form collects the information required by Twilio and The Campaign Registry (TCR) to register your 10DLC messaging campaign. Business name, address, and other details must match what is registered with your EIN (US) or CCN/BN (Canada), or the registration may fail.

The Business Profile Registration for Texting Services (SMS) form — complete all fields and click Check Entries, then Submit to register your campaign automatically.

Privacy & Terms of Service Policy Pages

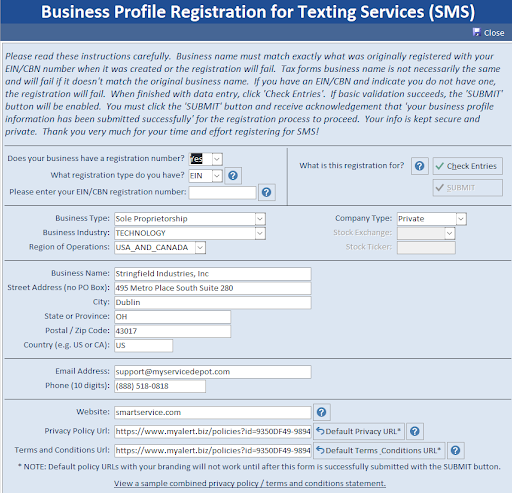
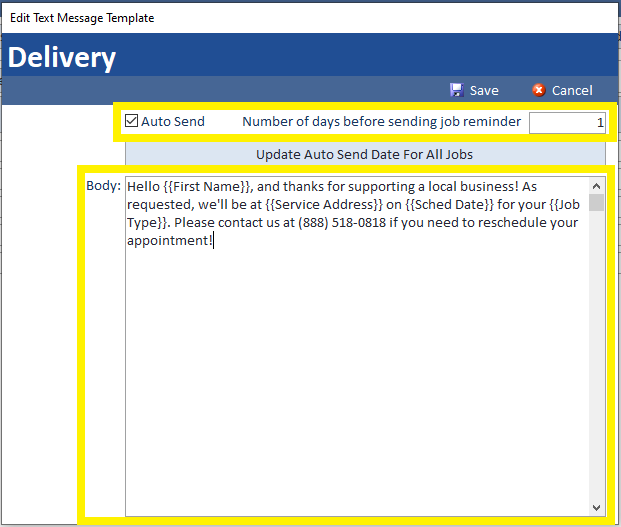
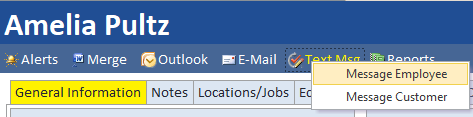
Twilio requires that every registered campaign include a Privacy Policy URL and a Terms & Conditions URL. Smart Service provides default URLs for you automatically — no separate website or policy page is required to get your campaign submitted and approved.

That said, you are strongly encouraged to use your own privacy and terms & conditions pages if you have them. If your existing pages meet or exceed the policies shown in our sample pages, enter those URLs in the form instead of the defaults. If you’d rather use our default pages now and add your own to your website later, that’s fine too — it isn’t required for approval.

To use the default pages, the Privacy Policy URL and Terms & Conditions URL fields are pre-filled for you (the Default Privacy URL and Default Terms & Conditions URL buttons will restore them if needed). Note that these default URLs will not become active until after the form is successfully submitted.

Complete the form and click Check Entries to run validation. Once your entries pass, the Submit button becomes available; clicking it sends your data to our servers and activates your unique policy page hosted by MyAlerts. The URL will follow this format, with the id value unique to your company:

https://www.myalert.biz/policies?id=YOUR-UNIQUE-ID

A sample of what the generated policy page contains is available here:

https://www.myalert.biz/policies?id=44E83BFA-1473-4ABD-856D-0DA3832EDEF6

Use the same URL for both the Privacy Policy and Terms & Conditions fields — this is expected and correct.

Your generated policy page will include your company name, SMS number, contact information, and all required disclosures, including opt-out instructions and data-sharing policy. The page is hosted by Smart Service via the MyAlerts messaging infrastructure.

What the Campaign Registration Covers

The following campaign properties are submitted to Twilio automatically on your behalf when you complete the registration form. The values below are based on a real example — your submitted campaign will reflect your own company details:

Campaign Property

Value Submitted

Campaign Description

Confirm service appointment details including date and time. Notify when the service technician is en route.

Embedded Links

No

Embedded Phone Numbers

No

Age-Gated Content

No

Lending / Loan Content

No

Privacy Policy URL

Your generated MyAlerts policy URL

Terms & Conditions URL

Your generated MyAlerts policy URL (same)

Sample Messages Submitted With Your Campaign

Two sample messages are submitted as part of your campaign registration to demonstrate the type of SMS your customers will receive. These samples match the service-appointment-notification use case:

Message Sample 1 — Appointment Reminder

A technician from [Your Company] will be arriving tomorrow between the hours of 8 AM and 5 PM. Please call [phone number] if needing to reschedule. Reply STOP to unsubscribe from these messages.

Message Sample 2 — Technician En Route

Hello. Your technician from [Your Company] is on their way. Please call [phone number] if you have any questions. Reply STOP to unsubscribe from these messages.

Every message your business sends must include opt-out language such as “Reply STOP to unsubscribe.” Smart Service message templates are pre-configured to include this language automatically.


Why Is This Important for Your Business?

A2P 10DLC (Application-to-Person, 10-Digit Long Code) is the system US carriers use to register and vet business SMS traffic. Without a completed and approved campaign registration, your messages are blocked by Twilio entirely — they won’t be delivered, and your customers will never receive them.

Message Deliverability

Registered campaigns receive higher throughput and are far less likely to be filtered by carriers.

Legal Compliance

Registration demonstrates compliance with CTIA guidelines and carrier requirements, protecting your business from liability.

Customer Trust

Proper consent collection and documented opt-in workflows build trust with your customers and reduce opt-out rates.

Audit Trail

Smart Service records who granted consent, when, and which staff member collected it — protecting you if consent is ever disputed.

For US customers, the CTIA Messaging Principles and Best Practices document (page 12 in particular) outlines the types of messaging content and the level of consent required for each. For Canadian customers, CASL distinguishes between express and implied consent for different message types.

To facilitate compliance, Smart Service securely collects your Employer Identification Number (EIN) (US) or Canadian Corporation Number (CCN) alongside your legal business address, industry, and business type. This information is used to verify your identity with the vetting authority and is transmitted directly to Twilio, who relays it to The Campaign Registry (TCR).

Will Smart Service Store Your Data?

Smart Service’s responsibility is to facilitate the secure transfer of your registration information to our partner Twilio, who in turn relays it to The Campaign Registry (TCR) for 10DLC campaign vetting.

Smart Service does not store your EIN or CCN/BN on our servers. Beyond the secure transfer of this data to Twilio, it is not retained.

The following table summarises what is and isn’t retained:

Data Type

Stored by Smart Service?

Where It Goes

EIN / CCN / BN

No

Passed securely to Twilio → TCR

Business name, address, industry

Yes

Stored locally / used to generate policy pages

Customer SMS consent records

Yes

Stored locally in your Smart Service database

Staff member, date & time of opt-in

Yes

Stored locally in your Smart Service database

Generated policy page content

Yes

Hosted by Smart Service via MyAlerts infrastructure

Customer opt-in consent records — including the staff member who collected consent, the customer record, and the date and time — are retained within your Smart Service installation as part of the compliance audit trail. This data never leaves your environment and is not shared with third parties.

Your generated policy page is hosted by Smart Service via the MyAlerts Messaging Infrastructure and is accessible at the unique URL generated during your registration. This page satisfies Twilio’s requirement for a public-facing Privacy Policy and Terms & Conditions URL. Its purpose is campaign vetting and approval; once submitted, the page content is essentially static and is expected to remain accessible, though its continued availability is not guaranteed.

Questions about data privacy or your campaign registration status? Contact Smart Service support at (888) 518-0818 or [email protected].

Customers Withdrawing Consent

If the customer has chosen to opt out of receiving text messages from your business, you will see the following prompt if you attempt to message them again. This will prevent you from accidentally sending them text messages in the future.

To sign a customer up for text messaging, make sure the SMS field is filled out on their profile and the “Opted In” box is checked. You can use the copy data to copy their number to their existing records. 

Set up Message Job Reminders

Once this feature is enabled for your business, you can enter “Set Up Smart Service Add-ons” in your settings window to get started on creating message templates for reminders and quick responses. Message templates are created per job type; if you aren’t using job type yet, you may wish to create them now. 

Once you’ve selected a job type and pressed the “Edit” button to the right, a pop-up window will appear asking you to create a template message.  

You can right-click inside the field to enter field codes, which will display the customer’s information when the message is sent to the customer. Use these codes when you wish to display things such as the technician scheduled to perform the work or when the job is scheduled. Once your template is complete, click save.

You can instruct Smart Service to automatically message this job reminder to your customers before their service by checking the “auto-send” checkbox and adding in the number of days in advance of the job the reminder should be sent to the customer. If you add 1 day, the text will go out 24 hours before the job, 2 days is 48 hours, etc.

You can create a different template per job type, or copy and paste your template into multiple job types. All job types must have a template set up in order to send job reminders later. If you intend to use that feature, please make sure each jot type has a template.

Remember that including emoji’s and other UCS-2 characters will make each message cost more money. This is especially true when job reminders will likely be sent out to several customers.

Sending Message Job Reminders

Once your settings are in place, you can enter the “Message Job Reminders” screen at any time via Job Preparation in the Office Screen. From this screen, you must use the filters at the top left to tell Smart Service which customers you’d like to text. You may filter these jobs by the scheduled technician, date range, class, customer type, and job type.

Please keep in mind that only customers who have opted in for text messaging will be displayed on this screen. If you’re missing any services, visit the job and verify that the customer has the “Opted In” box checked and an SMS number entered.

Once you’ve made your selection, you may text each customer individually by clicking the “Message” button to the right or text all selected items at once by clicking “Mark All to be Auto-Sent” at the bottom right corner of the screen and following the prompts. Here are a few helpful tips to consider when using this feature:

  • The checkmark at the top left of the screen allows you to select/deselect the entire list
  • Click the exclamation button on the left to add an SMS number to any job missing one
  • Dates of recurring jobs are presented individually here, which can lead to multiple texts sent

Message Shortcuts

To the right of the “Text Message Job Reminders” window, you have the option to create quick response messages called “Message Shortcuts”. When sending text messages, you can bring up a list and choose on of your message shortcuts by right clicking where you’d typically compose your response.

How to Text Employees

Users also have the ability to set up texting for employees. This feature is intended to send vital information that may not be contained within iFleet, or other important company messages. When choosing a phone number to use, you may wish to consider setting up your employee’s personal device. This depends on what device your employee will notice your message on first. Since each employee can only have one SMS number assigned, choose wisely.


To add an SMS contact number for a given employee, open Smart Service settings, browse to the employee profile in the employees tab and write an SMS number in the “SMS Num” field.

Please keep your employee’s cellular plan in mind, as not all cellular plans include unlimited messaging. Additional rates may apply when using this texting feature.

You can send a text to your employees from any customer, location, job, or prospect record. Select the “Text Msg” option under the record name in the top left-hand corner of the screen.

Text Message Center

The text messaging center can be accessed by either trying to text a customer or by clicking on the “My Text Messages” option at the top of the office screen.

The text message center will display all text messages sent and received by Smart Service. You can use this window to initiate new messages or check messages received by customers. 

Message threads will appear on the left-hand side of the screen and cannot be deleted. You can click on message threads to open the corresponding conversation to the right. If a contact name is not listed on the message, you may wish to ask via message who has contacted you.

Clicking on one of these conversations will display the chat on the right-hand side with the latest message listed at the top of the screen.

You can compose your message at the bottom of the message window. Pressing ‘Enter’ on your keyboard will also allow you to send the message to the customer. Consider the message cost (listed above the send button) before sending your message.

This option will send your message to the customer. Please review the estimated cost for the message before using this option. The ‘Enter’ key also sends your message.

This will place your message in the chat window, but not send the message to the customer. Use this feature to provide context about the message chain to other Smart Service users.

There are additional internal notifications available at the top right-hand corner of the screen. Use these to communicate with other Smart Service users.

Use this option to let other users know that you are claiming this message chain and responding to the customer. This will move the message from the “All Texts” to the “My Texts” section on the left of your screen.

When a message chain has ended for the current moment, you can apply the “Resolved” status. This will place the message back into the “All Messages” section if the customer responds.

Use this option to transfer this conversation to another Smart Service user if you are unable to continue the conversation with the customer and require another user to take over.

Texting Employees without the Texting Module

Unlike the texting module, this feature only allows you to text your employees job information. Smart Service’s default package contains the ability to text your employees customer and job information. In order to use this feature, you will need the “Email Job Reminders” feature enabled with your company’s email address.

To add your employee’s phone number, enter their Smart Service user profile via the “Employees” tab in the settings window. Enter their number in the “Text Address” field at the bottom of their profile as shown below. The number does not require and special formatting to work.

Below are the addresses for sms and mms messaging. For some carriers, additional charges may apply for either sms or mms. Please check your cellular carrier’s terms and conditions before using this feature. If possible, we recommend using the mms address as sms messaging may be limited to a set number of characters for your carrier.

  • AT&T
    • @txt.att.net (SMS)
    • @mms.att.net (MMS)
  • Boost Mobile
    • @sms.myboostmobile.com (SMS)
    • @myboostmobile.com (MMS)
  • Cellular One
  • Comcast
  • Consumer Cellular
    • @mailmymobile.net (SMS)
  • Cricket Wireless
    • @sms.mycricket.com (SMS)
    • @mms.cricketwireless.net (MMS)
  • C-Spire
    • @cspire1.com (SMS)
  • Google Fi
    • @msg.fi.google.com (SMS & MMS)
  • Metro PCS
    • @mymetropcs.com (SMS & MMS)
  • Republic Wireless
    • @text.republicwireless.com (SMS)
  • Sprint
    • @messaging.sprintpcs.com(SMS)
    • @pm.sprint.com (MMS)
  • T-Mobile
    • @tmomail.net(SMS & MMS)
  • Tracfone
    • @mmst5.tracfone.com (MMS)
  • U.S. Cellular
    • @email.uscc.net (SMS)
    • @mms.uscc.net(MMS)
  • Verizon
    • @vtext.com (SMS)
    • @vzwpix.com (MMS)
  • Virgin Mobile
    • @vmobl.com (SMS)
    • @vmpix.com (MMS)
  • Bell Canada
    • @txt.bell.ca (SMS)
  • Chatr
  • Fido Solutions
    • @sms.fido.ca (SMS)
  • Koodo
    • @msg.koodomobile.com (SMS)
  • MTS (Manitoba Telecom Services)
    • @text.mts.net (SMS)
  • Rogers Communications
    • @pcs.rogers.com (SMS)
  • Sasktel
    • @sms.sasktel.com (SMS)
  • Telus
    • @msg.telus.com (SMS)
  • Virgin Mobile
    • @vmobile.ca (SMS)
  • WIND
    • @txt.windmobile.ca (SMS)