Smart Service Settings
The Setup section of Smart Service is used to control how the the program will interact with your company’s day-to-day activities. Remember that all changes made to this section are global and will affect all users and how information is transferred to your QuickBooks file.
Company
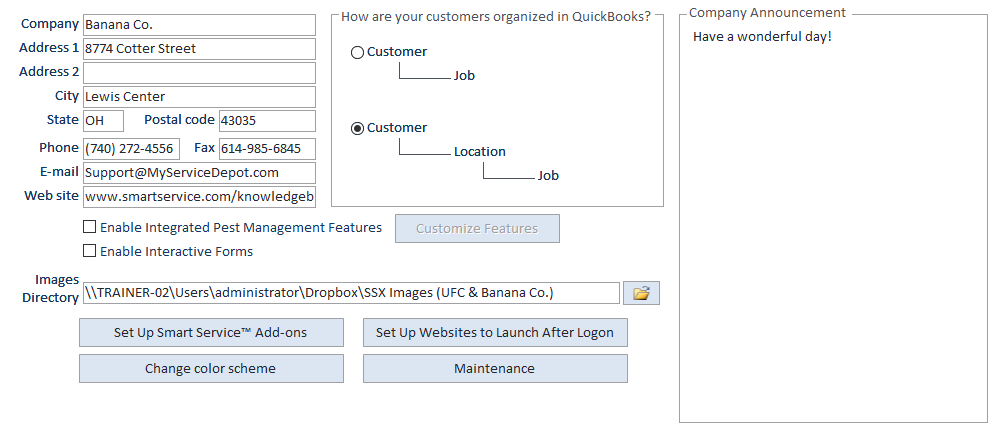
The first section of Smart Service Setup is where you should specify your company’s contact information. The data you enter here will be used to create a header that will be used on all of your customer facing documents from Smart Service.
By default, this will be set to the top option, however, if at least one of your customers has more than one address they might request service at, be sure to switch this option to the Customer>Location>Job tree. If you are used to working in QuickBooks, you are not familiar with the term “location” as this is something new Smart Service has introduced. A location is a child record under the customer, typically used to represent one of the buildings a customer owns. This way, service history and work created for that building can be stored under that building, rather than being combined with other building’s history. If you are unsure about this setting, we would recommend checking it just to be safe, as having this option enabled will not change or limit either QuickBooks or Smart Service if it is not used.
This feature is intended to help pest control companies using paper work orders. Activating this option and entering the “Customize Features” option will allow you to customize a small spreadsheet which contains your target pests. From there, you can customize what those pests are, products commonly used, treatment location, and treatment methods. Please note that this feature is intended to create a checklist for your technician to use, all billable items must also be noted in the “Job Items” section if you intend to bill the customer for them or subtract from inventory.
This option is for customers who would like a favorite website to become a tab in Smart Service. By entering that website’s URL into this section, upon logging into Smart Service next time you will see the desired website in its own tab next to the “Help” tab at the top, left-hand corner of the screen.
Setup Smart Service Addons
This section contains the settings for all of the Smart Service Additional Modules. Click on the links below to view the article associated with each section.
For those who would like to email from Smart Service, including job reminders to customers and texts to employees. This module comes with the base program.
For users who would like leads generated by your website to populate Smart Service. Click here to learn more about Smart Leads.
For those who have service contracts with customers and preventative maintenance agreements which are billed separately from service. You can check out this popular module here.
For those looking to view their Smart Service schedule on the go, Google Calendar will ensure any items placed on your Smart Service schedule are displayed in google on your mobile devices. If you already have iFleet, you can learn about Google Calendar here.
Routzy is the sales CRM counterpart to iFleet. What sets Routzy apart is its ability to create and schedule prospects and estimates from the field. Routzy also allows a user to create and manage their own correspondences and events. Click here to check out Routzy.
For companies looking to find the most efficient driving route through all of their stops, we have a product for you! Click here to learn more about Smart Routes.
Smart Service has its own inventory tracking system available for truck inventory. You can learn more about this feature by clicking here.
Logo
Use this section of the program to upload a copy of your company’s logo for use in Smart Service. If your company is using iFleet or Routzy, this section will not add the logo to the devices also, please visit the appropriate iFleet guide or the Routzy Guide to view instructions on adding your logo to iFleet or Routzy.
If you have a copy of your logo handy, follow the directions below to add it to the program yourself:
- Be sure to save your logo as a .PNG file.
- Resize the logo in Microsoft Paint.
- Copy and paste it into this box using the keyboard “Control+C” to copy and “Control+V” to paste.
If you have issues adding your logo, please call our Client Support Team so we can assist you further.
Employees
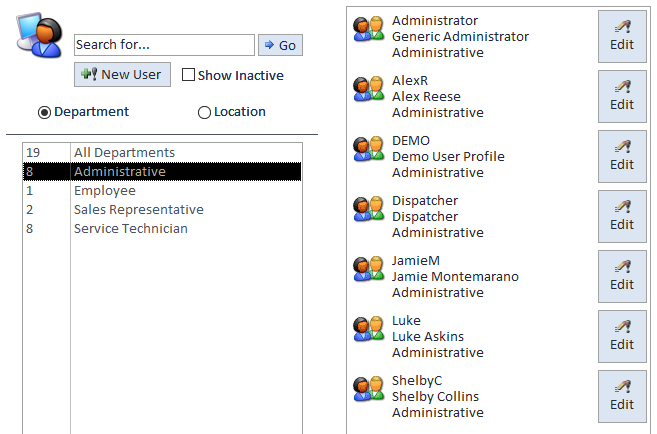
Use this section to determine what permissions users should and shouldn’t have. Make sure that office users meet the minimum QuickBooks permission requirements listed below before continuing. If you don’t have the ability to do something in QuickBooks, you won’t be able to do it in Smart Service either.
For those of you who have sub-contractors listed as vendors in QuickBooks. You will use this section to create their profiles as well. Although Smart Service refers to them as employees, their vendor status in QuickBooks will remain unchanged.
Looking for QuickBooks User Permissions?
Continue to our article about the recommended QuickBooks user permissions here, just click the image of the user on the left.
When you first start with Smart Service, all active employee profiles in QuickBooks will be brought into Smart Service as employee records. If you choose to delete old employee profiles from Smart Service, make sure to immediately inactivate those same profiles in QuickBooks to prevent them from coming back into Smart Service when running “Get Employees” later.
You also have the ability to click the “New User” option on the left hand side of your screen. Please note that creating a new user in Smart Service does not create an employee profile in QuickBooks. If you need an employee profile in QuickBooks also, we recommend creating the employee there and clicking on “Get Employees” in the file menu at the top left of your screen.
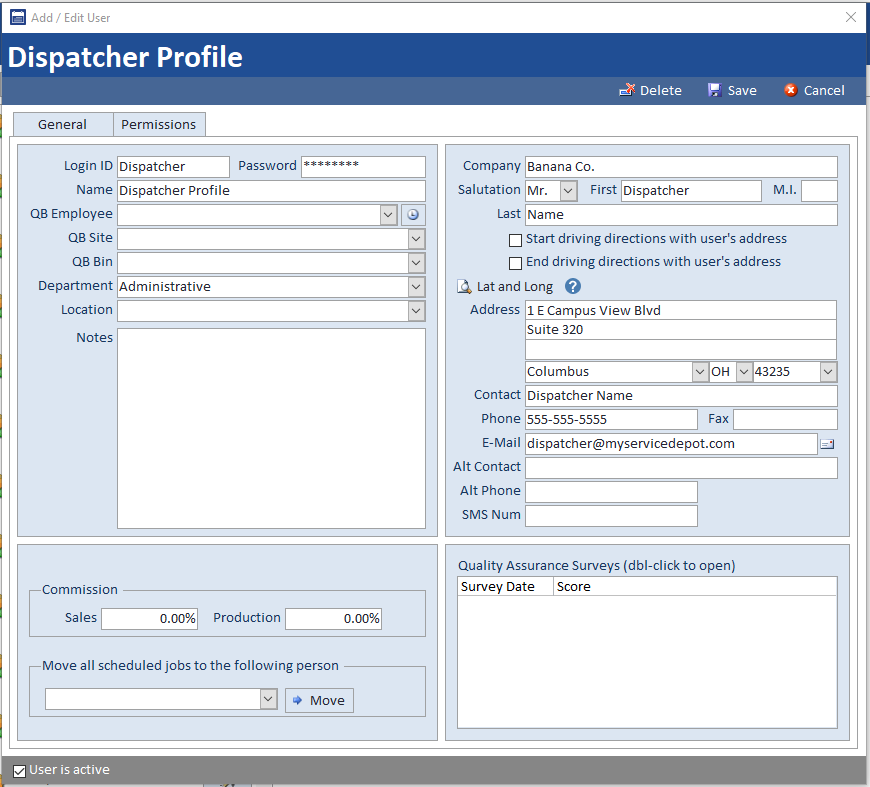
If you click on one of your existing employees or choose to create a new one, you will arrive at the following windows. Some of these options will only be for office users, so make sure to read each one.
If you’re an office user, this will be your username for Smart Service. If you’re an iFleet user, this will be the name presented on the schedule for you.
Only office users require a password. There are no complexity or length requirements for your Smart Service password, nor will we make you change your password every 90 days. Any password you enter is case sensitive.
The name placed here will be used when you create a timestamp. This name will also be used to reference you in various other areas of the program.
If you’d like to set up time tracking to the timesheet in QuickBooks, you must select the employee or vendor profile you wish to associate time values with. To the right of this section is a timeclock you can use to set default payroll and / or service items for your employee. Side note, the “Other” option in this window is used for break times.
This option only appears if you have enabled QuickBooks Advanced Inventory. You may choose a default site where this field users takes inventory. This can be changed later on a per item basis.
Department isn’t about what specifically you do for the company, so the owner and account shouldn’t have their own departments. Instead, department is a grouping for the scheduling board. All employees that generally stay in the office can go into the “Administrative” department, those who receive scheduled services or use iFleet can be in the “technician” or “field” department.
You can add new departments by just typing them in. To remove a department, move everyone out of that department and it will no longer appear in the list of options. You have the ability to create as many departments as you like, but keep in mind you must click to switch between departments on the schedule.
If your company has multiple buildings, it’s a good idea to write down which location this employee works at.
You can use the notes field for anything we didn’t already have a place for on this employee’s record.
If you track commission in your company, you can write in this employee’s commission percentages for sales and labor. If your commission is a little more complex, check out our reporting section for commission instead.
Be careful with this option, as it should only be used if an employee is being let go. Here you can select a user to take all scheduled jobs, correspondences, and anything else assigned to this user and move the records to their replacement.
This company and name information will only be used in this employee profile, but it’s a good place to store the user’s information.
For those who purchased Smart Routes, all routing will be done from the office’s address unless this option is checked. If this employee doesn’t leave from the office, you can enter an alternate starting / ending address for them below.
If you have Smart Routes, and this employee starts / ends their route from an address other than the office, enter their starting / ending point here and check the box above.
Any contact information you’d like to store for your employee can be placed here. This could be their information, or an emergency contact.
You can write down a cell phone number and choose the employee’s carrier on the right using the check mark. Doing so will give you the ability to text customer and job information to this employee from Smart Service.
Towards the top of each employee record is a “permissions” tab you can click on to allow / deny access to certain areas of Smart Service. Keep in mind that most of the options available are for office users only.
Read each permission (also listed below) very carefully as they control what a user can and cannot do within the program.
All of these permissions are dependent on the user’s permissions in QuickBooks as well. If your user does not have the required permission level in QuickBooks, you will not be able to complete certain actions regardless of what permissions you have in Smart Service.
Smart Service Permissions
This permission is only necessary for those working in the office. Checking this option will allow users to log into the system using their own name and password.
Remember than in order to use Smart Service they will need to be logged into QuickBooks as well.
This permission is only necessary for those working in the office. Anyone with the “Login” permission should be able to create a database backup.
You can create a backup by clicking the “Back up Database” option under the file menu in the top left hand corner of your screen. If you’d like an automated backup solution for both Smart Service and QuickBooks, check out this product.
This permission is only relevant for those working in the office. It allows users to make changes to the program’s settings, which should be limited to as few hands as possible.
This permission is only relevant for those working in the office. It allows users to print documents from the program
This permission is only relevant for those working in the office. Anyone who will take part in the review and invoicing process should have this permission.
This permission is only relevant for those working in the office. It is meant for those who would like to see an overview of iFleet’s progress throughout the day. You can learn more about what’s on the dashboard by visiting our article here.
This permission is only relevant for those working in the office. Only check this option if you DON’T want this user to access your customer list.
This permission is only relevant for those working in the office. Only check this option if you DON’T want this user to access reporting in Smart Service.
This permission is only relevant for those working in the office. This will display the customer’s account balance at the top of each record.
This permission is only relevant for those working in the office. If you’re using the commission feature from the first employee page above, then you need this permission to assign those commissions.
This permission is only relevant for those working in the office. This option allows users to access the “Get” buttons under file at the top left-hand corner of the screen.
This permission is only relevant for those working in the office. Users who need to see the schedule require this option.
Use this permission if you wish this Smart Service user to only see their own calendar on the scheduling board.
This permission is only relevant for those working in the office. Users who need to make changes to the schedule require this option.
This permission is only relevant for those working in the office and who have Project Manager. Checking this option allows the user to complete project steps and phases.
This permission is only relevant for those working in the office and who have Project Manager. Checking this option allows the user to create project steps and phases.
If a phone call or reminder is scheduled for this user, they can receive a popup on their PC when it’s time to complete that correspondence record.
iFleet Permissions
This iFleet only permission will allow the iFleet user to edit the job’s primary email address. Allow this permission if your field users are collecting billing email addresses in the field. iFleet already provides the option of changing where the work order for today is sent, so this permission may not be necessary.
If you gave iFleet the ability to see customer notes via the iFleet tab in settings, giving iFleet this permission will allow the users to add to the private notes section. They will not be able to edit or remove the private notes entered by others.
This iFleet only permission is enabled by default and allows iFleet users to add, edit, or remove line items to the job. This permission is necessary for most businesses unless you wish to prevent your technicians from touching line items or the job contains contract items that should not be altered.
Enabling any of these options allows your field user to circumvent the typical new customer/job process by creating the entity directly from the field. This information will be sent back to the “Jobs added to QuickBooks” section of the office tab for your review, rather than directly to post work orders.
If you have an on-call technician, you should consider the “jobs” permission for that person.
“Open, email, and print work orders when finalizing” means that your iFleet user has options other than only sending the work order back to the office when completing a service. This option is checked by default so the user can send the customer a copy of their work order.
This permission will allow the user to create their own prospects out in the field. You can think of a prospect as a lead; someone who isn’t a customer yet but would like an estimate on something.
This permission will allow the user to create their own prospect locations for prospects out in the field. If your prospect has multiple properties you’ll need to record, then provide this permission.
This permission will provide the user with the ability to create prospect jobs (estimates) out in the field. The user can create a prospect job for any prospect in the database using this feature.
If your technician needs to be able to create a new customer out in the field, provide this permission. Customers created in the field will be synced back to Smart Service.
This permission will allow the user to create their own customer locations for customer records out in the field. If your customer has multiple properties you’ll need to record, then provide this permission.
This permission provides the ability to create your own work orders out in the field. You can create a work order for any customer in the database but those jobs won’t be synced to QuickBooks until they’re approved by the office.
“Open, email, and print work orders when finalizing” means that your iFleet user has options other than only sending the work order back to the office when completing a service. This option is checked by default so the user can send the customer a copy of their work order.
Giving a user this permission will allow phone calls and reminders scheduled for this user to appear in iFleet.
Recommended Permissions
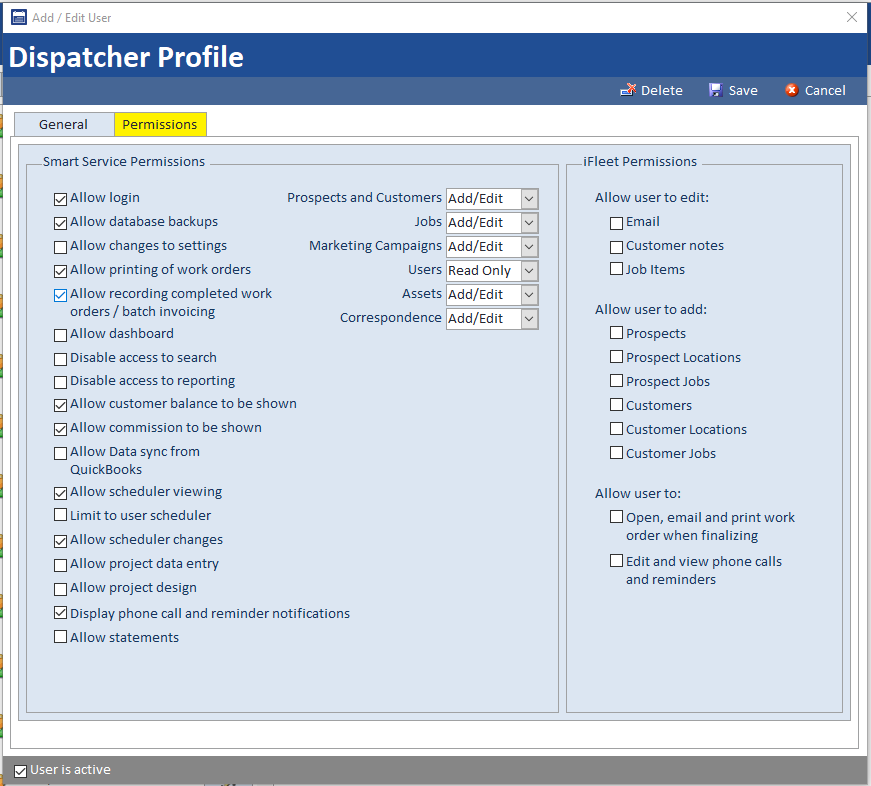
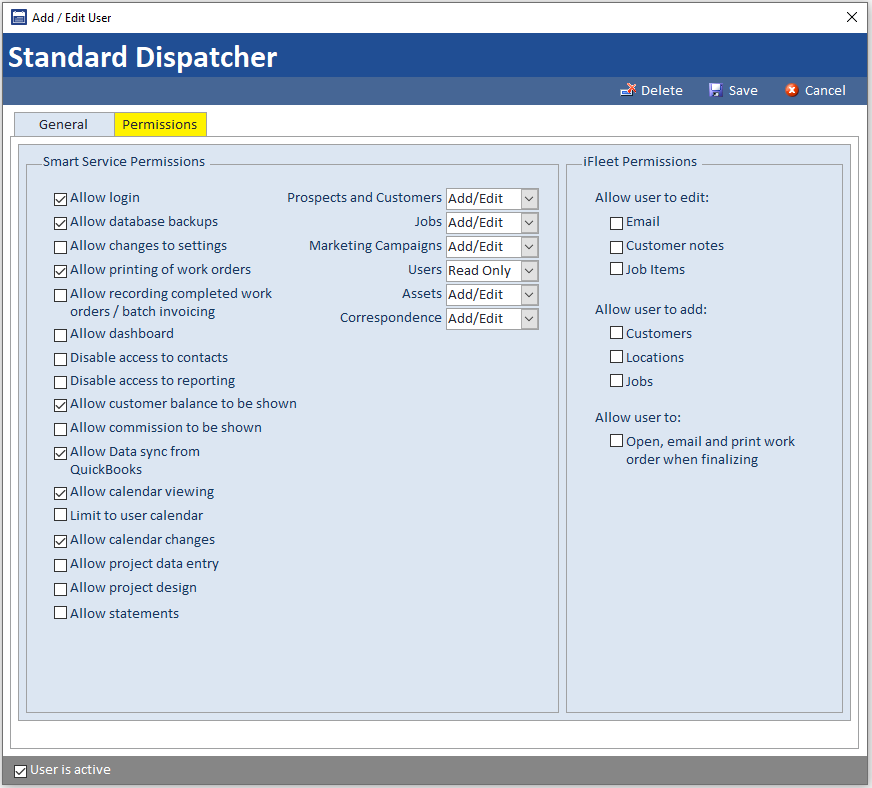
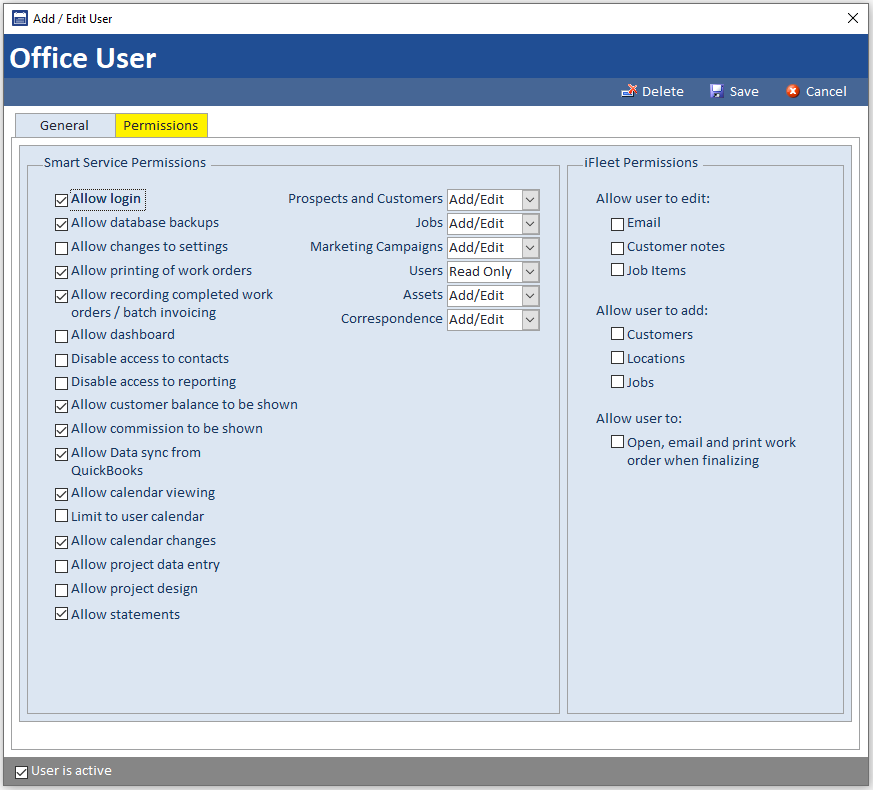
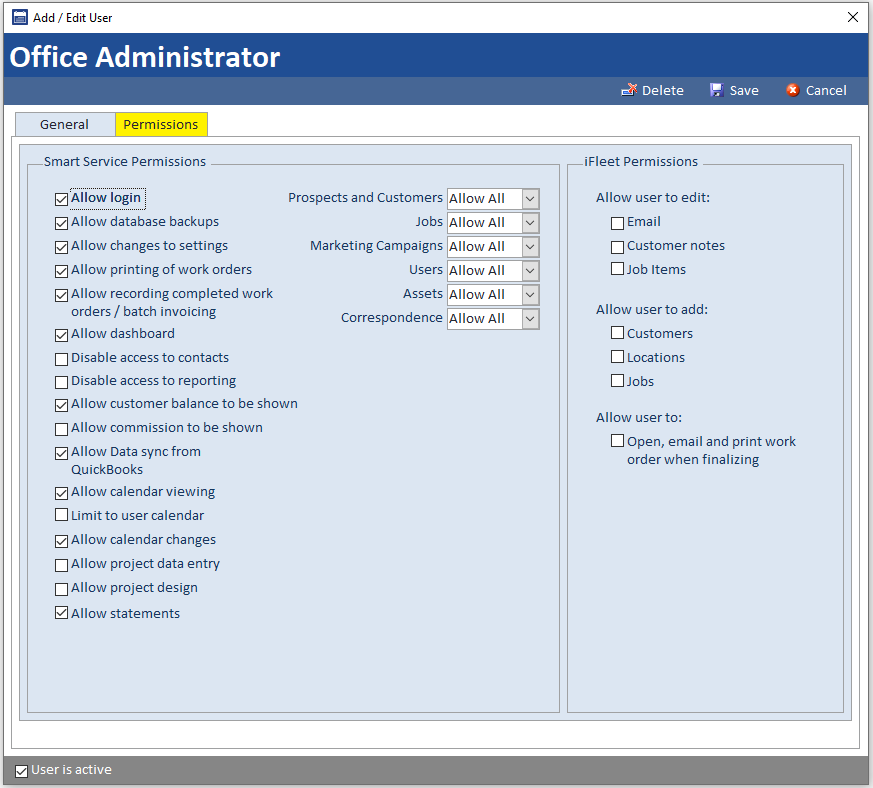
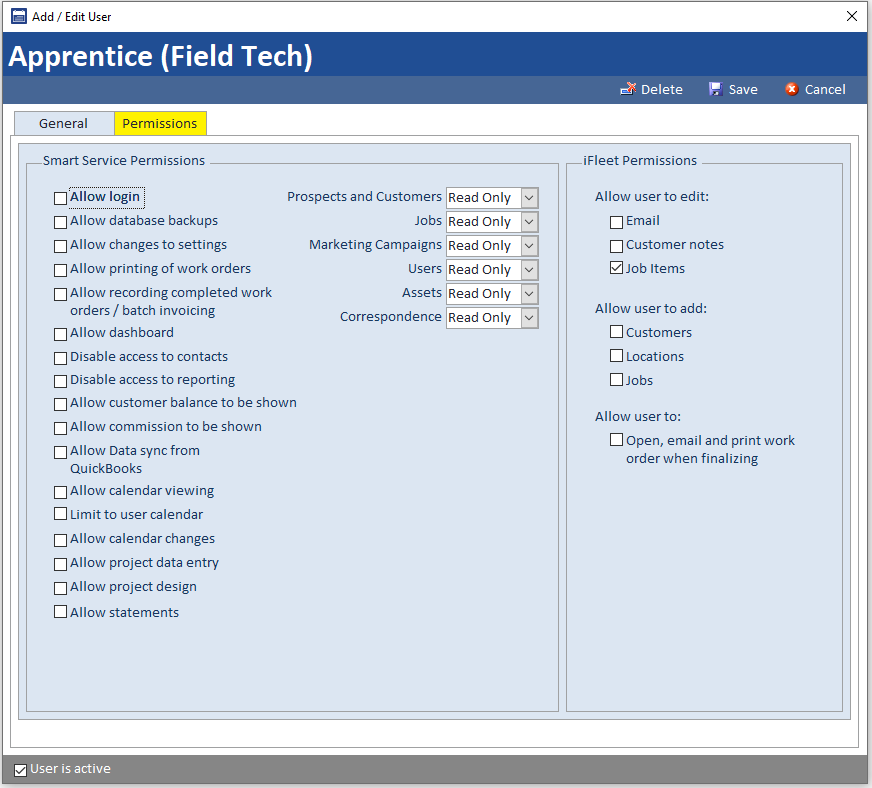
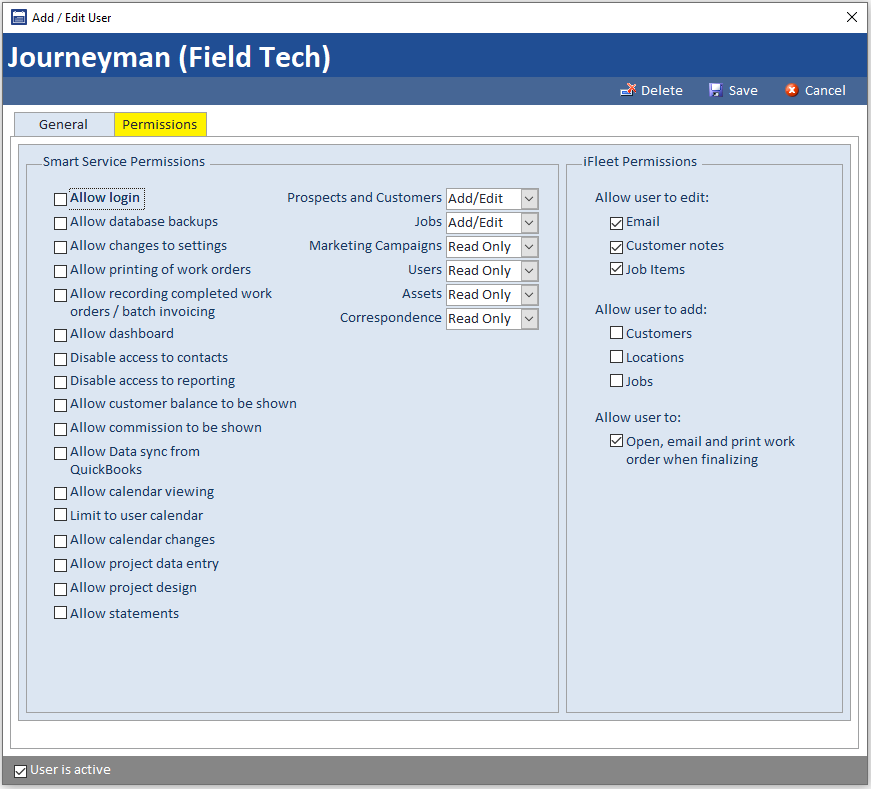
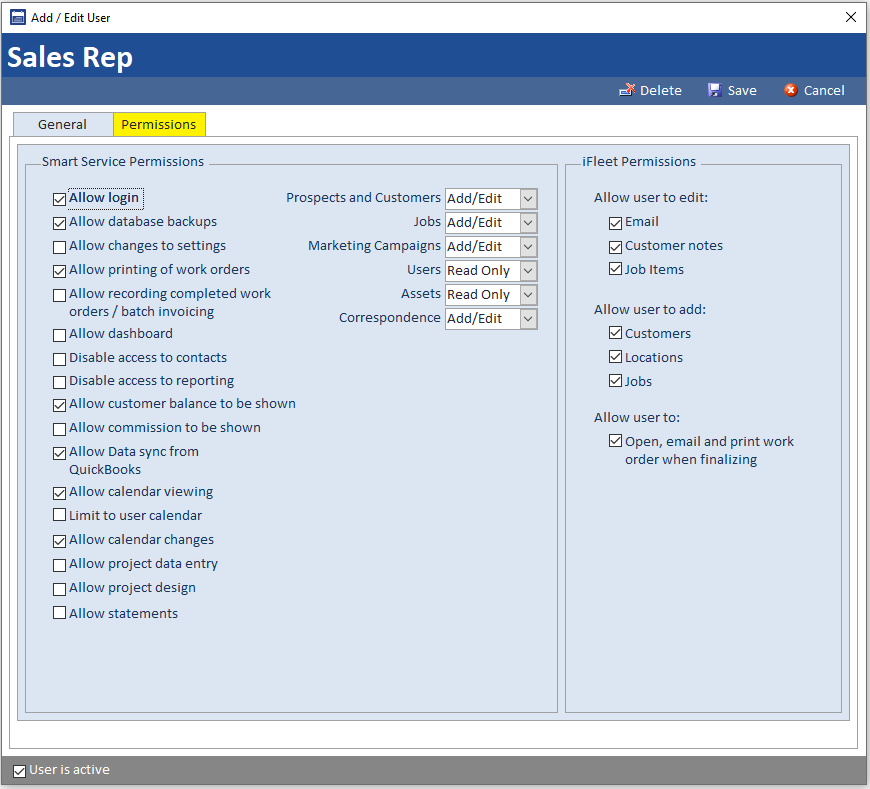
Below are examples of common permission settings based on job title. You can click on the images below to view them full screen. You can provide your employees with more or less than what’s shown below, but these are our recommendations for a smooth experience.
Using the examples below, the office users start at the “Standard Dispatcher”, which can be promoted to “Office User” and finally promoted to “Office Admin”. The technicians follow the same pattern with an “Apprentice” below a “Journeyman”.
Defaults
Here we can tell Smart Service what suggestions to make when creating a new customer or job record. Before you continue, remember that none of the setting changes you make her are permanent, and can be modified on a per customer or per job basis. Also, the default information you specify here will be helpful only if it applies to most of our customers and jobs. Before continuing, please consult your QuickBooks accountant.
Prospect / Customer Defaults
Per Intuit, “QuickBooks classes give you a way to categorize and track account balances by department, business office or location, separate properties you own, or any other meaningful breakdown of your business”. For reporting purposes, you can separate profit and losses as well as balance sheets for each class. Other reports can also be sorted and filtered by class. For more information on reporting and tracking for class, click here.
This is where you set your default Accounts Receivable account. For more information on Accounts in QuickBooks, click here.
Generally, you will not use a default customer type unless your customers are rarely any other type. Customer Type is used to categorize your customers, such as by industry (e.g., Residential, Commercial, Medical, Legal, etc.), location, and so forth. QuickBooks suggests using Customer Type to track how customers heard about your business, but we recommend doing this directly through Smart Service in the Marketing tab. For more information on Customer Types in QuickBooks, click here.
This is where you specify your default payment terms for new customers. For more information on Terms in QuickBooks, click here.
Enter your default Sales Rep. If you have multiple Sales Reps, then you will likely want to leave this field blank. Sales Reps are used in both Smart Service and QuickBooks to track sales income or commission. For more information on Sales Reps in QuickBooks, click here.
Price Breaks are unique to Smart Service. They allow you to specify how much you will charge for an item or service based on the quantity that the customer purchases. To learn how to use ”’Price Breaks”’ in Smart Service, click here.
Job Defaults
If applicable, set your default Job Type here. Our recommendation is that you set job type as required, and do not add a default here. Job Types are used to classify jobs, such as for Service, Installation, Warranty, and so forth. Job Types are used for job costing. For more information on Job Types in QuickBooks, click here.
This is where you set your default Job Status, which is pre-set to “Active”. This would be the recommended setting for 99% of customers. If you select “Pending” here, jobs will not be sent to iFleet until the status has been set to “Active”.
The default start time for jobs that you create directly within a Customer, Prospect, or Location record.
The default job duration for jobs that you create directly within a Customer, Prospect, or Location record.
This is where you set your default Invoicing Style. If you primarily invoice your customers immediately upon job completion, you should likely leave the pre-set default as “Immediate Invoicing for Job”. If you primarily invoice your customers for several jobs over a given date range, you may want to change the default to Batch Invoicing for Customer”.
If your company is using QuickBooks Online, be sure to select one of the “For Customer” options. This will parent the resulting invoice under the customer record so that the sub-customer record is inactivated.
Setting the default for this field determines what is displayed in the Item Description field of your completed batch invoice in QuickBooks.
Checking this box will enable Smart Service to generate invoice numbers for newly created jobs instead of QuickBooks. This will allow you to have the same invoice number in Smart Service, iFleet, and QuickBooks. Please be advised, however, that Smart Service does not follow the same numbering scheme that QuickBooks does when creating invoice numbers. The invoice numbers that are created by Smart Service are between 10-12 digits in length and include a timestamp for the date the invoice was generated.
If you will be using Smart Service to track commission, check this box. Default commission rates are set up in the Employees Tab.
Check this box to ensure that your assets can only be assigned to a single job at any given time. For more information about this setting, click Assets.
Once we have enabled the option to track “Cost and Gross Profit” we will see two new fields associated with each line item on a job.
- Gross Profit – Total amount of income based of the total “Amount” for the customer, versus the Total Cost our company has paid.
- Example: Gross Profit is calculated as Total Revenue (i.e. Subtotal) minus Total Cost
- Gross Profit Percentage – Percentage of income based off Rate for customer versus company Unit Cost.
- Example: Gross Profit Percentage is calculated as (Total Revenue minus Total Cost) divided by Total Revenue.
Sales Tax Defaults
This where you set your default Sales Tax codes and items from QuickBooks®. If you do not charge Sales Tax, set the Tax Code to “Non”. If you do charge Sales Tax but have numerous tax items, set the Tax Code to ”’Tax”’ and leave the Tax Item field blank, or simply leave both fields blank. For more information on Sales Tax in QuickBooks, click here.
Auto-Naming
This is where you set your Auto-Naming defaults for new Prospect and Customer jobs. Each job name must be unique in both Smart Service and QuickBooks®. If the majority of your jobs are one-time jobs that occur on a single date, you should likely leave the pre-sets to ””Prospect Name – Date”” and ‘Customer Name – Date’. If many of your jobs are recurring or occur over several days, you will likely want to change auto-naming for Prospect and Customer Jobs to ‘Prospect Name – Job Number’ and ‘Customer Name – Job Number’, respectively. This will generate a job name that includes a job number that increases incrementally by a unique counter.
Check for New QuickBooks® customers when starting Smart Service
Upon logging into Smart Service, the program can check QuickBooks’ Customer Center for any new customer or job entries. This feature is not advised for most users, as it is our intention to be used as the “front-end” of your business. When using Smart Service, all new customers and changes to existing customers will be transferred to QuickBooks automatically; although you can create new customers in QuickBooks and use this prompt to import their data, edits made to existing customers cannot be imported into Smart Service regardless. If the concern is in regards to accidental creation of a new customer in QuickBooks, you may use the File>Get Customers option at any time.
Check for changes in QuickBooks list when starting Smart Service
This setting will check for updated QuickBooks list information when a user logs into Smart Service. If your company is frequently or constantly updating QuickBooks list information
Enable customer and job notes to be saved into QuickBooks
Only check this option if you have a new QuickBooks company file as this option will push any notes added to Smart Service into QuickBooks. If QuickBooks already had notes on a given customer that weren’t entered through Smart Service, those notes will be replaced with what Smart Service sends.
Do Not Add Jobs to QuickBooks
If this setting is activated, Smart Service will not create a job record in QuickBooks when you create a work order in Smart Service. Since this setting can have a massive impact on how Smart Service works for your business, you will be asked to reach out to our support team for activation of this feature.
For those interested in this option, please discuss the information available here with the rest of your office staff so everyone is aware of the changes made in all areas of the program by this setting. You can reach out to our team at (888) 518-0818 for more information.
Post Work Orders
Your choices in this section will control the default options displayed when posting invoices to QuickBooks.
Scheduler
The scheduler section determines what times are available on the calendar, the color coding used, and what information is displayed on scheduled services. To get started, you need to first set up scheduler and business times. Regardless of what you set these times to, you can still schedule jobs for all 24 hours of the day, these settings determine what times are displayed on the calendar. Here’s a breakdown of what each option does:
- Scheduler Start Time: The earliest you will schedule a service.
- Business Start Time: When you expect the first job of the day to begin.
- Business End Time: When you expect the first job of the day to end.
- Scheduler End Time: The latest you would schedule a service.
Show History on Scheduler
Check this option if you’d like the history left behind after posting to QuickBooks to remain on the calendar. This allows you to look back and see what services were completed on a given day in the past.Regardless of your preference, the customer’s history will always be saved within the customer.
Show Job Total on Scheduler Summary
Checking this option allows Smart Service to display a total dollar amount for a given employee’s schedule. Using this option does slow down scheduler responsiveness slightly.
Scheduler Fields
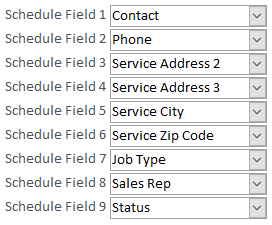
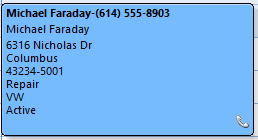
The Schedule Fields allow you to determine the customer and job information that you want displayed within a job box on the Schedule. There are a total of 9 fields from which to choose. Fields 1 and 2 are displayed on the first line in bold within the job box, so the most important customer and job information should always be set in these two fields.
Scheduler Color Settings
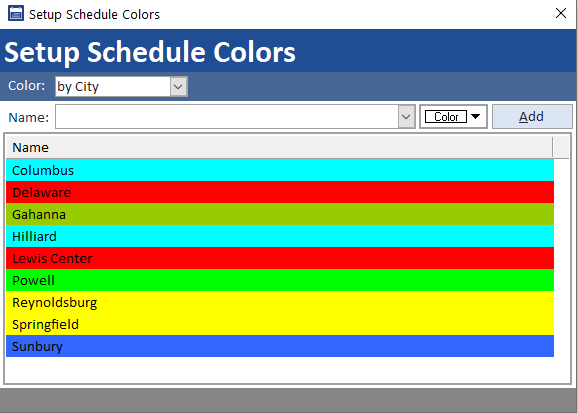
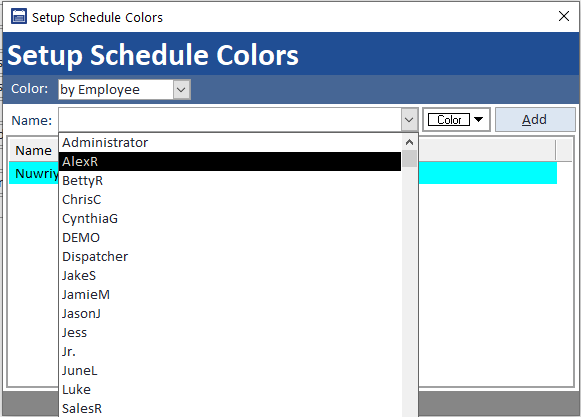
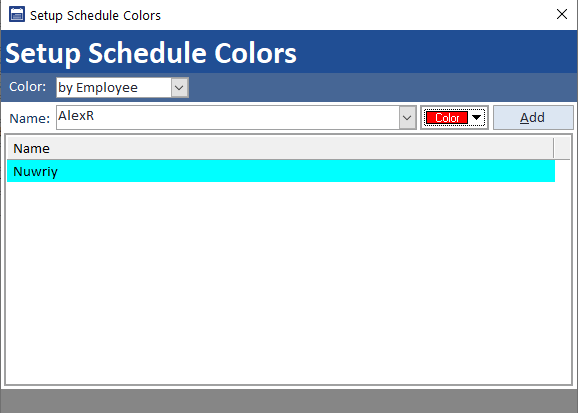
By default, each color coding option on the scheduling board comes with a default color. Some users may wish to create your own set of color codes for cities, timestamps, etc. but remember, color coding option set here will reflect on all users’ scheduling boards. Clicking this button will open the ‘Setup Schedule Color’ window from which you may create you own custom color schemes
Estimate
Estimates created in Smart Service can be a great feature for those who would like to schedule an estimate and dispatch a technician to perform said estimate on-site. Those who do not schedule estimates, or those who perform them over the phone may continue to use the estimate features of QuickBooks, as you have the ability to import line items from QuickBooks estimates into Smart Service jobs. The settings chosen here will also be reflected on the estimates created by iFleet, if your field employees have the ability to create them. If you’d like to see an in-depth comparison between the estimate capabilities of Smart Service vs. QuickBooks, check out our article here.
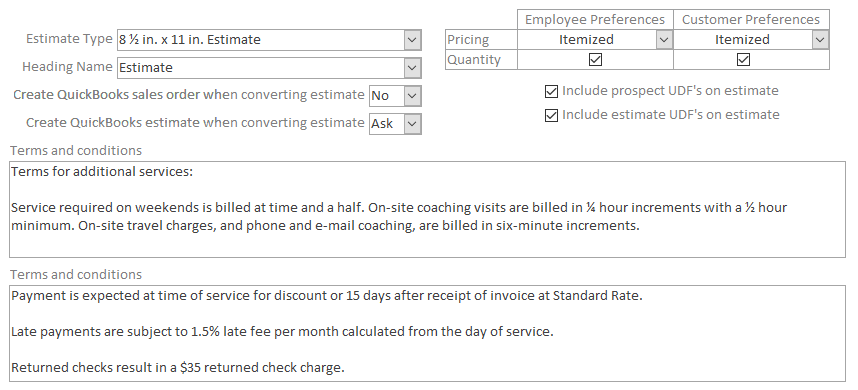
If you have a custom estimate .CST from Smart Service, you can select something other than the standard 8 1/2 in. x 11 in. Estimate provided by Smart Service.
Do you use the term “Estimate” or something else? You can customize the “Heading Name” by listing either another name from the dropdown or by entering a custom name.
The sales order, sometimes abbreviated as SO, is an order issued by a business or sole trader to a customer. A sales order may be for products and/or services. Given the wide variety of businesses, this means that the orders can be fulfilled in several ways.
If you want the benefits of using Smart Service estimates for scheduling and dispatching, but need you estimate in QuickBooks for costing later, activate this option. When you promote an estimate to a work order in Smart Service, this option will create a copy of that estimate in QuickBooks for you.
You office users will always be able to see all of the details on your estimate. This setting controls what your field users will see when viewing the estimate through iFleet or on the printed version.
This setting controls what pricing information will be displayed to your customers when emailing them a copy of the estimate through iFleet.
The “UDF’s” referenced in the image above are your company’s user defined fields. You may choose whether or not the customer should be able to see these user fields on your estimates.
Any terms and conditions you’d like your customer to see should be placed in these boxes. If you already have terms and conditions written elsewhere, you have the option to paste your terms into the box by using “CTRL+V” on your keyboard. If you’re writing directly into the box and need a link break, use “CTRL+Enter” to create one.
Work Order
Scheduling and dispatching work orders is the main reason you got this software, so make sure to pick the right options here! Some of these options are for paper work orders only, which will be noted in the option’s description.
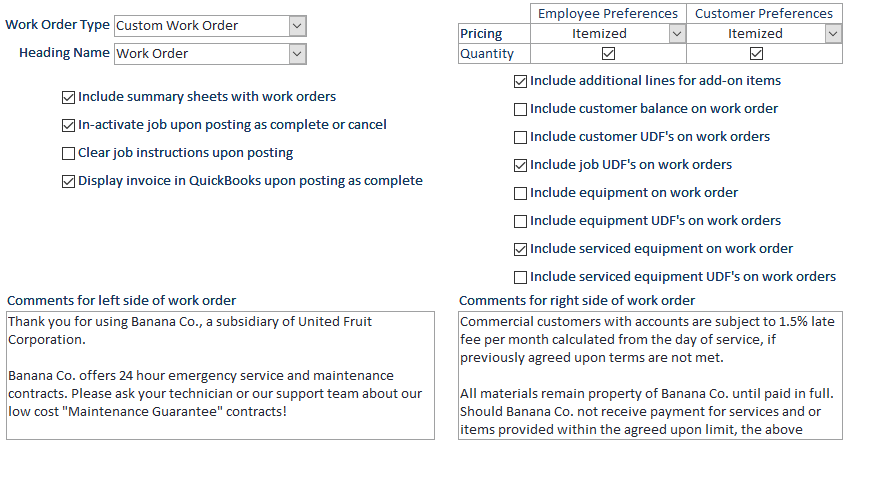
If you have a custom work order .CST from Smart Service, you can select something other than the standard 8 1/2 in. x 11 in. Work Order provided by Smart Service.
Do you use the term “Work Order” or something else? You can customize the “Heading Name” by listing either another name from the dropdown or by entering a custom name.
This option is for paper work orders only. A summary sheet is a convenient print out given to your drivers which lets them record their times for the day, and see the site addresses they’ll be traveling to.
Once you complete a service (and there are no additional dates listed) the job record should inactivate in Smart Service and QuickBooks. Checking this option will do just that. Inactivated jobs are still reportable in QuickBooks and Smart Service, so this setting should be check for nearly every business. If you have questions about this, please contact us to discuss.
Be careful with this one as once you post a job to QuickBooks, the notes from the service will be removed. You may wish to contact us to discuss whether or not this setting is right for you.
This option is available for QuickBooks desktop users only. Checking this option will cause the invoices created by Smart Service to display on your screen once the associated job has been posted to QuickBooks.
You office users will always be able to see all of the details on your work order. This setting controls what your field users will see when viewing the work order through iFleet or on the printed version.
This setting controls what pricing information will be displayed to your customers when emailing them a copy of the work order through iFleet.
If your company is using paper work orders, this option will add an extra few lines to the work orders so your technicians can write down any parts they’ve used on site.
Those using paper work orders may wish to include the customer’s equipment information on file. This information would include the equipment’s model number, serial number, install date, and more.
Another option for paper work orders only, this option will either hide or display the customer’s account balance from QuickBooks on your work order.
This option will hide or display customer user fields on paper work orders
This option will hide or display job user fields on paper work orders.
This option will hide or display equipment user fields on paper work orders.
Any terms and conditions you’d like your customer to see should be placed in these boxes. If you already have terms and conditions written elsewhere, you have the option to paste your terms into the box by using “CTRL+V” on your keyboard. If you’re writing directly into the box and need a link break, use “CTRL+Enter” to create one.
This allows equipment marked as serviced to appear on work orders.
This allows the Equipment marked as serviced UDF’s (User Definable Fields) to appear on printed work orders.
Invoice
You can choose to enable Smart Service’s customizable invoice template here. Once enabled, this invoice template will replace the customer-facing work order sent out by Smart Service and iFleet. When used with our integrated merchant service, CardPointe, your business can collect payment from your customers easily and securely via your Hosted Payment Page (HPP) which is automatically sent to the customer upon posting to QuickBooks.
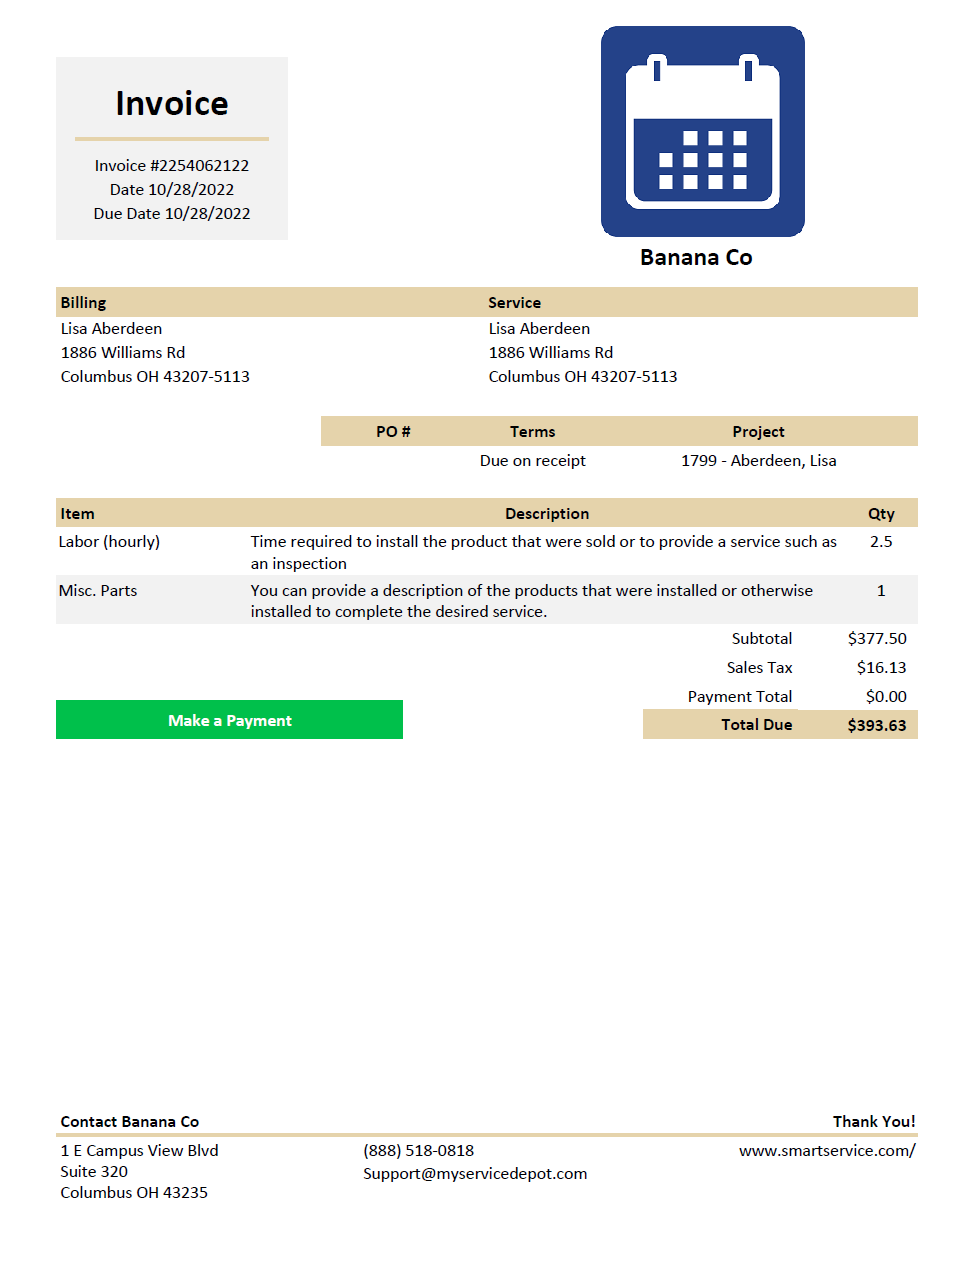
Below is an example of the default invoice template. This is typically a two-page document detailing the scope of work, products and services purchased, and your company’s contact information. Smart Service can also create a customized invoice template to replace the default one you see below if you would like to provide your customers with a document identical to what you’re sending them now. If you would like more information on getting a customized invoice template, please click here.
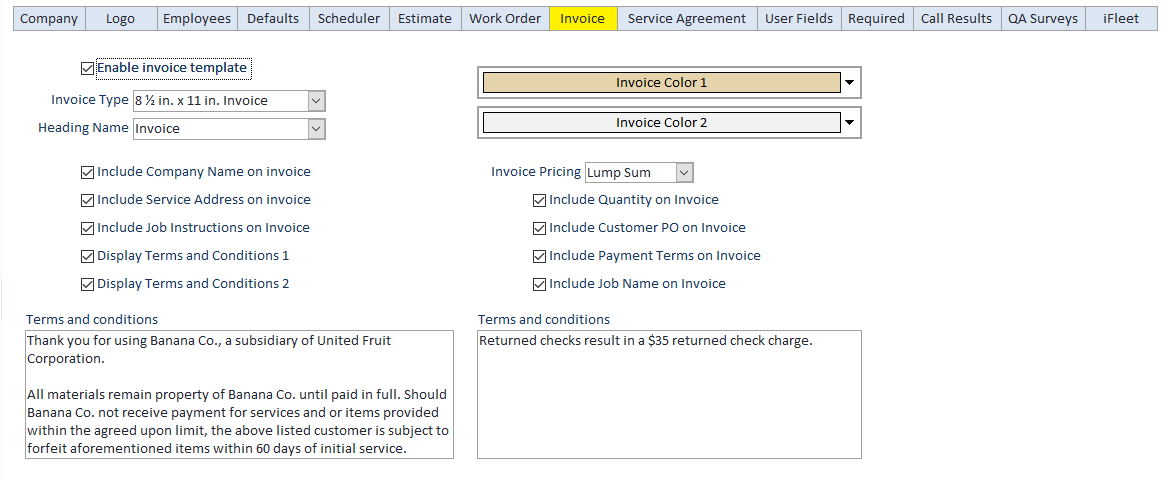
Within the settings tab for invoices, you’ll see not only the option to enable this template but also choices on how to customize the document. Remember, you can fully automate the process of sending invoices to your customers and collecting payment. If you would like to enable those invoicing and payment features, you can check out our article on that subject here.
Once the invoice template is enabled here, your “Send Invoice” button on jobs will use this template instead of the standard work order template. iFleet will also automatically switch to sending this invoice template instead of its work order template.
You can either use our invoice template (the 8 1/2 in. x 11 in. Invoice) or choose your custom invoice template, provided you had our company create and integrate your customized template.
Choose a name for your invoice document here. Changing this name will change the header on the template document so pick something you want the customers to see and something that fits within the space allowed for the name on the document.
The company name field would pull from Settings > Company and would display under the space allotted for your logo on the invoice. Since you may already have your company name as part of your logo, you might choose to disable the company name field here.
We’ll include the customer’s billing address by default, but you can choose whether or now the customer’s service address is represented on the invoice. We encourage the use of this setting for those of your whose customers have more than one property.
There are two terms and conditions sections that display on the invoice. This setting controls the left box on the settings screen (pictured above) and that box will show up first on the invoice template.
There are two terms and conditions sections that display on the invoice. This setting controls the right box on the settings screen (pictured above) and that box will show up second on the invoice template.
Before choosing these colors, you should preview one of your invoices with your logo on it and pick colors that work with your logo. In the image above, you can see the colors in our settings and on the invoice template images above it.
Before choosing these colors, you should preview one of your invoices with your logo on it and pick colors that work with your logo. In the image above, you can see the colors in our settings and on the invoice template images above it.
You can choose to use either itemized or lump sum pricing on your invoices. Itemized pricing will display each item and the price of each whereas lump sum will show the item names but not individual pricing. Either option will display a subtotal, tax, and total at the bottom.
Aside from the pricing preferences, you can choose whether or not your invoice shows the quantity of the items listed.
For those of you who receive a PO number from your customers that must be present on their invoice for you to get paid, enable this option! This will pull the “Customer PO” field from the work order onto the invoice.
If you have payment terms listed on the work order, we can display those terms as well as calculate the due date based on the specified terms. Enabling this setting will display both the payment terms as well as the due date.
The job name will display under the header “Project” on the invoice. Project is a generic term to represent the various types of services companies like you provide to your customers.
User Fields
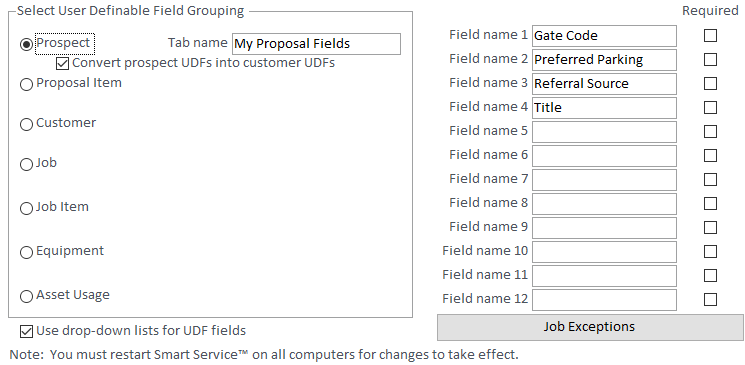
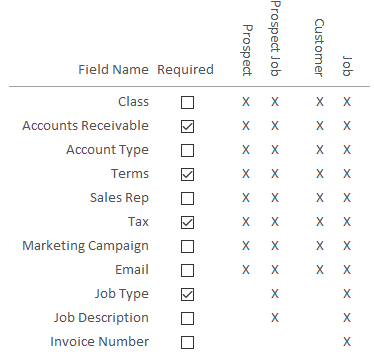
User Defined Fields give you the flexibility to add customized information to data that Smart Service already tracks about Prospects, Prospect Job Items, Customers, Jobs, Job Items, Equipment, and Asset Usage. The information you enter into these User Definable Fields can be used to keep valuable data that you need for your business on file. You can also include data from User Definable Fields in your reports.
When creating your user fields, choose the record type you wish to create a field for and use the next available “Field Name” on the right. Don’t forget that checking the “Required” box next to each field will only make this information required for your office users and not those in iFleet.
If you are using QuickBooks’ user definable fields, the user fields maintained by Smart Service do not integrate with QuickBooks. Keep this in mind when choosing which user fields are right for you. If you’d like to see some examples on user defined fields, check out this article.
Job Exceptions
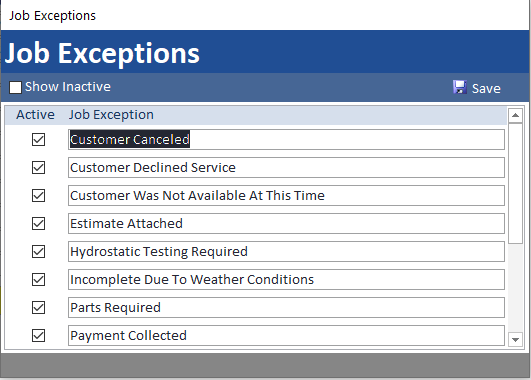
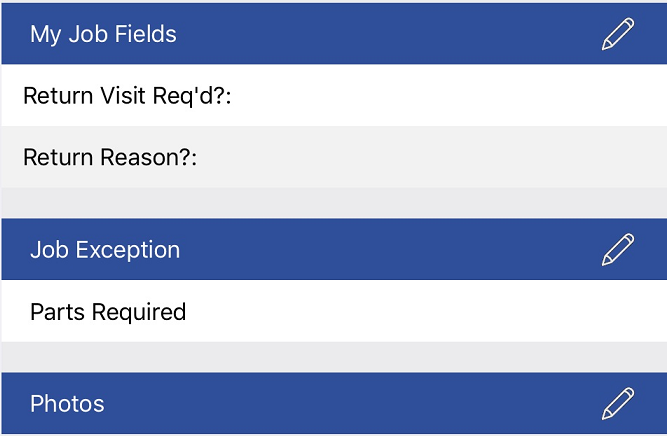
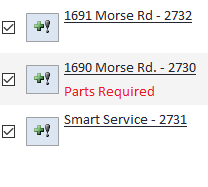
If your company has iFleet, then creating job exceptions here will be an essential feature for the hand-off between field and office. A job exception is a list of occurrences that may happen in the field which require attention from the office. When reviewing jobs in “Post Work Orders”, the selected job exception will be displayed at a glance to make sure the office notices and corrects the issue.
In summation, create job exceptions for things that you want to make sure you’re alerted to when the happen in the field. You may also wish to add a generic “Attention Needed” exception. This way, the technicians can choose this to alert you, then describe the issue in notes or a job user field.
Required
Choosing to make fields required will ensure that office staff entering, or opening a customer missing this information will gather the required information before proceeding in Smart Service. These required fields will have no effect on iFleet users, so keep this in mind when making a selection. Also keep in mind that you will not be able to continue to the next step until this information is entered if it was missing from your customer. For that reason, you may wish to add a value for “N/A” to any dropdowns you make required if the information cannot be gathered.
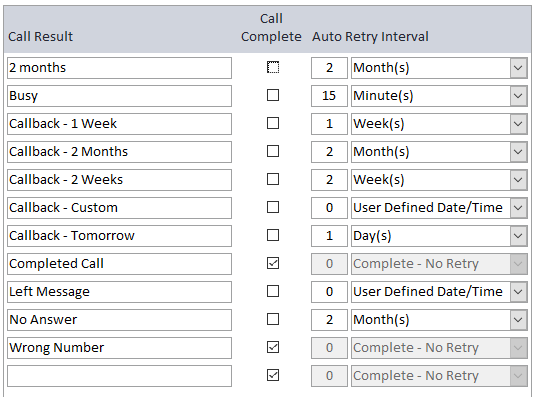
Call Results
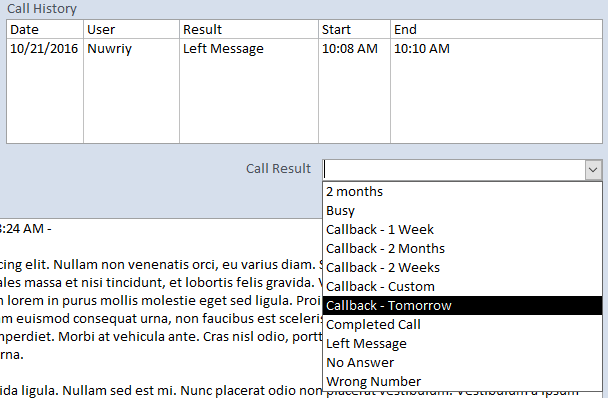
You can create or modify the existing call results, which will customize your options when using the phone call correspondences available in Smart Service. Setting up one of the “Retry Intervals” will tell Smart Service to schedule an additional phone call. Only mark the “Call Complete” if you don’t want another phone call created when making that selection.
QA Surveys
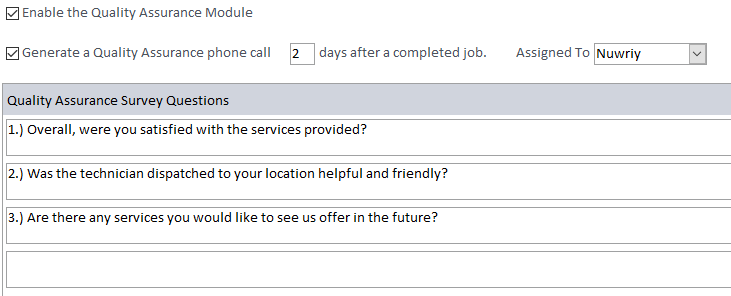
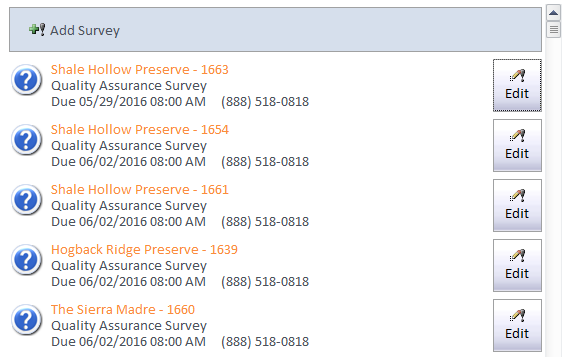
The QA Survey section will generate quality assurance surveys after a service is completed for a specific user. That user is expected to call the customer and asked the questions created here. To get started with QA Surveys you need to check “Enable the Quality Assurance Module”, create some questions, and assign an office employee to conduct the surveys.
Surveys generated will appear on your home screen. Clicking on this option will display all incomplete surveys. If you’d like to know the results of your surveys, use the “Quality Assurance Survey” type reports.
iFleet
If your company purchased iFleet, your settings should contain this additional tab. The options available here are also available in Mobile Workforce. The settings in this window are global, meaning they will be uniform across all iFleet users.
Smart Service will automatically send any new information from the office to iFleet on a set interval. For the best results, this interval should be set to 10 minutes.
This setting determines how many days in advance worth of jobs will be displayed to iFleet users. Choosing 1 will display jobs scheduled for today. Choosing 2 will allow users to see jobs scheduled for today and tomorrow, and so on.
Any jobs scheduled for previous dates will appear on the device for 60 days or until the office posts the job to QuickBooks.
You can control how many previous visits to a customer iFleet can see. You have the option of seeing 10,20, or 30 previous visits with no limit on how long ago the visit occurred.
Only check this setting if you’ve already uploaded a custom PDF to each of your iFleet devices. If you’d like more information on custom work orders, visit the article here.
If this setting is checked, iFleet will only see one job at a time. Once that job is completed, the next scheduled service will be sent to them. As an additional note, this setting will also prevent iFleet users from seeing their last service. Generally this setting is paired with selecting 1 day’s worth of jobs sent to iFleet so the user doesn’t continue working on the next day’s schedule.
This setting allows you to limit when a job resend occurs, so long as the technician has started their production time with a clock in to the job.
In iFleet, you have a billing and a service address. The service address is the job site, and where all navigational features take you. The billing address is the address the office sends the invoice to. If you are collecting payment in the field, you may wish to display the billing address to ensure you’re collecting from the right person.
If you have our texting module, you can create a text template to be sent to your customer when the iFleet user taps “Start Traveling to Job” in iFleet. Once this box is checked, click the “Template” option to the right to design your message.
When building the message template, you can right click to add custom fields such as ” [ifleetCustomerFirstName]” so you can address your customer by name. There are several fields available for the template, so be sure to check them out!
Customer notes are also known as private notes, notes that can be displayed to iFleet but never the customer. If you’d like to pass notes about a specific customer to your iFleet users discreetly, check this setting.
Most companies will choose to leave this setting unchecked. A common misconception is that this setting will allow technicians to make notes; your technicians can take notes regardless of this setting as its true purpose is to allow iFleet to edit notes written by the office. If you want your technicians to make notes, but not erase the instructions you gave them, leave this option unchecked.
If your company orders products from vendors to complete services, you should enable this option. This allows iFleet to create a purchase order that will be synced back to Smart Service and QuickBooks. Think of this as the ability to create a shopping list from iFleet. Your office can review these orders and place the actual request from the vendor.
Equipment is defined as anything your customer owns that your company services. Model number is always an optional field in iFleet, but checking this setting will make an entry required when entering equipment. If the equipment in question already has a model number, of iFleet is not working on that equipment this visit, iFleet won’t force you to gather the information.
If the equipment in question does not have a model number, or your iFleet user cannot find the model number, you have the option of adding “N/A” to bypass the requirement.
Equipment is defined as anything your customer owns that your company services. Serial number is always an optional field in iFleet, but checking this setting will make an entry required when entering equipment. If the equipment in question already has a model number, of iFleet is not working on that equipment this visit, iFleet won’t force you to gather the information.
If the equipment in question does not have a model number, or your iFleet user cannot find the serial number, you have the option of adding “N/A” to bypass the requirement.
This setting is only applicable if you have inventory items in QuickBooks. Your cost (what you pay to buy the item) can be hidden from iFleet users with this setting. If you enable this and the purchase order setting, cost will remain visible on purchase orders only.
This allows you to create a notification template for the customer as the technician begins travel.
Allows you to draft a template once a job has been completed that will send out to customers.
This permission allows you to create a template that will go out to customers once an estimate has been completed.

